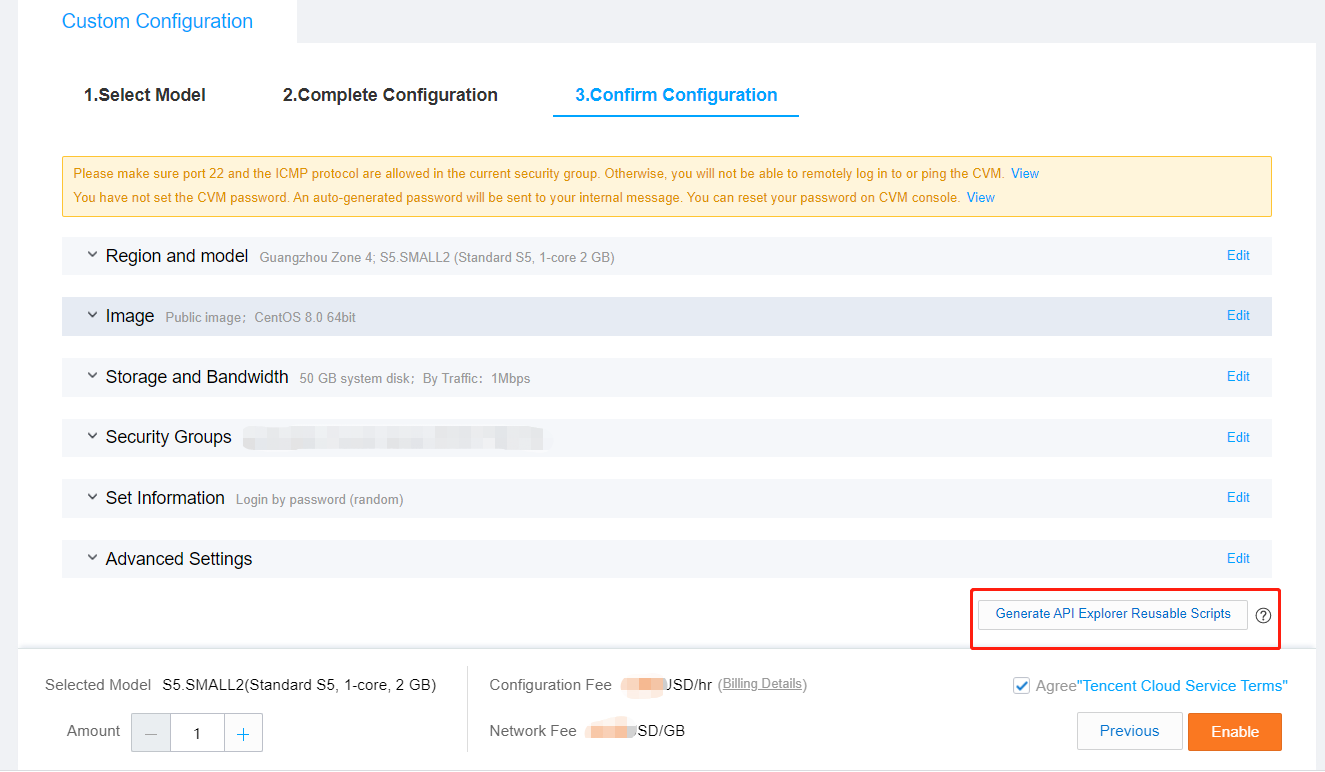
When creating a Tencent Cloud CVM, the instance type you specify determines the instance's host hardware configuration. Each instance type provides different computing, memory and storage features. You can choose the instance type that suits your application scale. Tencent Cloud provides a range of instance families with varying combinations of CPU, memory, storage, heterogeneous hardware, and network bandwidth. This gives you the flexibility in selecting the appropriate mix of resources for your applications.
Tencent Cloud CVM is pay-as-you-go. Instances can be activated and terminated at any time, and you only pay for resources used. This flexible billing mode lets you meet fluctuating demands while keeping costs low. In addition, usage is billed in seconds to further maximize your savings.
Instance Type
Tencent Cloud instance families are categorized as follows:
|
| | Standard instances provide a balance of compute, memory, and network resources to accommodate most applications. |
| | Memory optimized instances feature large memory and are suitable for applications that require extensive memory operations, searches, and computations, such as high-performance databases and distributed memory caching. |
| | High I/O instances feature high random IOPS, high throughput and low latency. They are suitable for I/O-intensive applications that require high disk read/write performance and low latency, such as high-performance databases. |
| | This instance family is equipped with massive storage resources, features high throughput, and is suitable for throughput-intensive applications such as Hadoop distributed computing, massive log processing, distributed file systems, and large data warehouses. |
| | This family comes with a turbo frequency up to 3.8 GHz, and provides the highest single-core computing performance. It is suitable for compute-intensive applications such as batch processing, high performance computing, and dedicated game servers. |
| | BeFast 1 instances provide cost-effective, balanced and stable computing, memory and network resources. Instances of this family are dynamically managed through the Tencent Cloud's intelligent scheduling capability, meeting the needs for application resources in most scenarios. |
| - | This family is equipped with heterogeneous hardware such as GPU and FPGA to deliver real-time, fast parallel computing and floating-point computing capabilities. It is suitable for high-performance applications such as deep learning, scientific computing, video encoding/decoding, and graphics workstations. |
Note:
Some of the families are discontinued.
Glossary
Send/Receive Packets: the maximum number of data packets that the instance can process per second for both sending and receiving, without differentiating private or public network traffic.
Private Network Bandwidth Capacity: the maximum number of bits that the instance can transfer per second over private network. Multi-queue Technology: multiple send/receive packet queues are supported on a virtual ENI, with the sending and receiving of the data packets of each queue capable of being simultaneously processed by different CPUs.
Number of Queues: the quantity of send/receive packet queues supported by each virtual ENI (N number of queues indicates that N number of receiving queues and N number of sending queues can be simultaneously supported).
Restrictions on Instances
The total number of instances that can be enabled in one region is limited. For more information, please see CVM Instance Purchase Limit. Restrictions on system and data disks mounted on an instance: to ensure premium disk I/O performance, Tencent Cloud sets limits on the size and type of data disks purchased with an instance. For more information, see the supported disks of each instance family. You can also purchase separate cloud disks if you have higher disk requirements.
Note that the private network bandwidth capacity of an instance specification is the maximum private network bandwidth limit of the corresponding instance. If the CVM private network traffic exceeds this limit, random packet loss may happen within the private network for your instances.
The availability of instance specifications may vary from region to region. Some configurations may be sold out. Please see the purchase page for the latest information.
The send/receive packets performance data noted in this document is the results of a one-time network forwarding test. See Network Performance Test for the testing method. Separate testing is needed to estimate the performance for your business. Here is a complete list of instance families.
Standard Instance Family
Standard instances provide a balance of compute, memory, and network resources to accommodate most applications.
Standard S8
The Standard S8 instance is the latest generation of standard instances. Based on a newly optimized virtualization platform, it provides balanced, stable computing, memory, and network resources, making it the optimal choice for a wide range of applications.
The Standard S8 instance uses the new Intel Emerald Rapids processor, the latest DDR5 memory, and with default network optimization. The maximum private network packet receive and send processing capability reaches 45 million pps, with the highest private network bandwidth supporting up to 120 Gbps.
Instance Features
The new generation Tencent Cloud self-developed Star Lake two-way server is equipped with an Intel Emerald Rapids processor.
Uses the Intel Emerald Rapids processor with Turbo Boost up to 3.0 GHz.
Offers a variety of processor to memory ratios, including 1:2 and 1:4.
Supports up to 120 GB private network bandwidth, 45 million PPS, with exceptional network packet receive and send processing capability, meeting the demands for high private network transfer requirements.
The network performance of instances corresponds to their specifications. Higher specifications result in stronger network forwarding performance and higher private network bandwidth limits.
Supports the configuration to disable or enable Hyper-Threading.
Supports burst bandwidth.
Note:
Burst bandwidth: The size of private network bandwidth is related to instance specifications, each having its own maximum private network bandwidth limit. In scenarios where network traffic surges within a short duration, Tencent Cloud servers offer burst bandwidth processing capabilities. For cloud servers that meet burst conditions, exceeding of the private network bandwidth limit for a short period is allowed, catering to customer business needs.
Supports Jumbo Frames
Note:
Jumbo frames: Tencent Cloud supports sending Ethernet frames with an 8500-byte payload. Using Jumbo frames can fully maximize network performance, making it suitable for storage scenarios and other high traffic situations, thereby enhancing transmission efficiency.
Use Cases
The Standard S8 instance can be applied to the following scenarios:
Various types and sizes of enterprise-level applications.
Medium and small database systems, caching, and search clusters.
Compute clusters, memory-dependent data processing.
Scenarios with high demanding of network packet receive and send processing, such as video danmaku, live streaming, games, etc.
Instance Requirements
S8 instances can be used as monthly subscription instances as well as pay-as-you-go billing instances.
S8 instances can only be launched in a Virtual Private Cloud.
It is recommended to pair with the TencentOS Server operating system for optimal application performance of the instance.
See the specifications below to see the sizes of S8 instances available for purchase. Ensure the size of the S8 instance you choose meets the minimum CPU and memory requirements of your operating system and application.
An Instance can support up to 120 Gbps of network bandwidth, depending on the kernel version and runtime environment of the instance operating system. When PPS exceeds 10 million and the bandwidth exceeds 50 Gbps, the kernel protocol stack can cause significant network performance loss. In such cases, the bandwidth values tested by netperf may not meet expectations. The DPDK method can be used to overcome the differences in the cloud server's kernel protocol stack, getting the instance's real network performance. For testing methods, see high-throughput network performance testing. |
S8.MEDIUM8 | 2 | 8 | 400,000 | 250,000 | 2 | 1.5/10 | 2 | 20,000 | - |
S8.LARGE8 | 4 | 8 | 800,000 | 250,000 | 4 | 2/10 | 2.5 | 30,000 | - |
S8.LARGE16 | 4 | 16 | 800,000 | 250,000 | 4 | 2/10 | 2.5 | 30,000 | - |
S8.2XLARGE16 | 8 | 16 | 1,600,000 | 500,000 | 8 | 4/10 | 4 | 40,000 | - |
S8.2XLARGE32 | 8 | 32 | 1,600,000 | 500,000 | 8 | 4/10 | 4 | 40,000 | - |
S8.4XLARGE32 | 16 | 32 | 3,200,000 | 1,100,000 | 16 | 9/10 | 6 | 60,000 | - |
S8.4XLARGE64 | 16 | 64 | 3,200,000 | 1,100,000 | 16 | 9/10 | 6 | 60,000 | - |
S8.8XLARGE64 | 32 | 64 | 6,400,000 | 2,200,000 | 32 | 17/25 | 10 | 80,000 | - |
S8.8XLARGE128 | 32 | 128 | 6,400,000 | 2,200,000 | 32 | 17/25 | 10 | 80,000 | - |
S8.14XLARGE256 | 56 | 256 | 11,200,000 | 4,000,000 | 48 | 30 | 16 | 100,000 | - |
S8.16XLARGE256 | 64 | 256 | 12,800,000 | 4,500,000 | 48 | 34 | 20 | 125,000 | - |
S8.28XLARGE512 | 112 | 512 | 22,500,000 | 8,000,000 | 48 | 60 | 32 | 200,000 | - |
S8.56XLARGE1024 | 224 | 1024 | 45,000,000 | 16,000,000 | 48 | 120 | 64 | 400,000 |
|
Standard SA5
The Standard SA5 instance is the latest generation of standard instances. Based on a newly optimized virtualization platform, it provides balanced, stable computing, memory, and network resources, making it the optimal choice for a wide range of applications.
The Standard SA5 instance uses the new AMD EPYC™ Bergamo processor, the latest DDR5 memory, and with default network optimization. The maximum private network packet receive and send processing capability reaches 45 million pps.
Instance Features
The new generation Tencent Cloud self-developed Star Lake two-way server is equipped with an AMD EPYC™ Bergamo processor with Turbo Boost up to 3.1 GHz.
Offers a variety of processor to memory ratios, including 1:2 and 1:4.
Supports up to 45 million PPS, with exceptional network packet receive and send processing capability, meeting the demands for high private network transfer requirements.
The network performance of instances corresponds to their specifications. Higher specifications result in stronger network forwarding performance and higher private network bandwidth limits.
Supports the configuration to disable or enable Hyper-Threading.
Supports burst bandwidth.
Note:
Burst bandwidth: The size of private network bandwidth is related to instance specifications, each having its own maximum private network bandwidth limit. In scenarios where network traffic surges within a short duration, Tencent Cloud servers offer burst bandwidth processing capabilities. For cloud servers that meet burst conditions, exceeding of the private network bandwidth limit for a short period is allowed, catering to customer business needs.
Supports Jumbo Frames
Note:
Jumbo frames: Tencent Cloud supports sending Ethernet frames with an 8500-byte payload. Using Jumbo frames can fully maximize network performance, making it suitable for storage scenarios and other high traffic situations, thereby enhancing transmission efficiency.
Use Cases
The Standard SA5 instance can be applied to the following scenarios:
Various types and sizes of enterprise-level applications.
Medium and small database systems, caching, and search clusters.
Compute clusters, memory-dependent data processing.
Scenarios with high demanding of network packet receive and send processing, such as video danmaku, live streaming, games, etc.
Instance Requirements
SA5 instances can be used as monthly subscription instances as well as pay-as-you-go billing instances.
SA5 instances can only be launched in the Virtual Private Cloud.
It is recommended to pair with the TencentOS Server operating system for optimal application performance of the instance.
See the specifications below to see the sizes of SA5 instances available for purchase. Ensure the size of the SA5 instance you choose meets the minimum CPU and memory requirements of your operating system and application. In many use cases, operating systems with GUIs that consume a lot of memory and CPU resources (such as Windows) may need larger instance sizes. As your workload's memory and CPU needs increase over time, you can scale to higher configurations or choose other types of instances.
Depends on the support from the instance's operating system kernel version and runtime environment. When PPS exceeds 10 million and the bandwidth exceeds 50 Gbps, the kernel protocol stack can cause significant network performance loss. In such cases, the bandwidth values tested by netperf may not meet expectations. The DPDK method can be used to overcome the differences in the cloud server's kernel protocol stack, getting the instance's real network performance. For testing methods, see high-throughput network performance testing. |
SA5.MEDIUM2 | 2 | 2 | 250,000 | 250,000 | 2 | 1.5/10 | 1 | 10,000 | - |
SA5.MEDIUM4 | 2 | 4 | 250,000 | 250,000 | 2 | 1.5/10 | 1 | 10,000 | - |
SA5.LARGE8 | 4 | 8 | 300,000 | 250,000 | 4 | 1.5/10 | 1.5 | 15,000 | - |
SA5.LARGE16 | 4 | 16 | 300,000 | 250,000 | 4 | 1.5/10 | 1.5 | 15,000 | - |
SA5.2XLARGE16 | 8 | 16 | 700,000 | 250,000 | 8 | 3/10 | 2 | 20,000 | - |
SA5.2XLARGE32 | 8 | 32 | 700,000 | 250,000 | 8 | 3/10 | 2 | 20,000 | - |
SA5.4XLARGE32 | 16 | 32 | 1,400,000 | 500,000 | 16 | 5/10 | 2.5 | 30,000 | - |
SA5.4XLARGE64 | 16 | 64 | 1,400,000 | 500,000 | 16 | 5/10 | 2.5 | 30,000 | - |
SA5.8XLARGE64 | 32 | 64 | 2,800,000 | 1,000,000 | 32 | 10/25 | 3 | 40,000 | - |
SA5.8XLARGE128 | 32 | 128 | 2,800,000 | 1,000,000 | 32 | 10/25 | 3 | 40,000 | - |
SA5.12XLARGE96 | 48 | 96 | 4,200,000 | 1,500,000 | 48 | 15/25 | 3.5 | 45,000 | - |
SA5.12XLARGE192 | 48 | 192 | 4,200,000 | 1,500,000 | 48 | 15/25 | 3.5 | 45,000 | - |
SA5.16XLARGE256 | 64 | 256 | 5,600,000 | 2,000,000 | 48 | 20/25 | 4 | 50,000 | - |
SA5.16XLARGE288 | 64 | 288 | 5,600,000 | 2,000,000 | 48 | 20/25 | 4 | 50,000 | - |
SA5.32XLARGE576 | 128 | 576 | 11,200,000 | 4,000,000 | 48 | 40/- | 8 | 100,000 | - |
SA5.64XLARGE1152 | 256 | 1152 | 22,500,000 | 8,000,000 | 48 | 80/- | 16 | 200,000 | - |
SA5.128XLARGE2304 | 512 | 2304 | 45,000,000 | 16,000,000 | 48 | 160/- | 32 | 400,000 |
|
Standard SA4
The Standard SA4 instance is based on a newly optimized virtualization platform, it provides balanced, stable computing, memory, and network resources, making it the optimal choice for a wide range of applications.
The Standard SA4 instance uses the new AMD EPYC™ Genoa processor, the latest DDR5 memory, and with default network optimization. The maximum private network packet receive and send processing capability reaches 45 million pps, with the highest private network bandwidth supporting up to 100 Gbps.
Instance Features
The new generation Tencent Cloud self-developed Star Lake two-way server is equipped with the AMD EPYC™ Genoa processor.
Uses the AMD EPYC™ Genoa processor with Turbo Boost up to 3.7GHz.
Offers a variety of processor to memory ratios, including 1:2 and 1:4
Supports up to 100 GB private network bandwidth, 45 million PPS, with exceptional network packet receive and send processing capability, meeting the demands for high private network transfer requirements.
The network performance of instances corresponds to their specifications. Higher specifications result in stronger network forwarding performance and higher private network bandwidth limits.
Supports the configuration to disable or enable Hyper-Threading.
Use Cases
The Standard SA4 instance can be applied to the following scenarios:
Various types and sizes of enterprise-level applications.
Medium and small database systems, caching, and search clusters.
Compute clusters, memory-dependent data processing.
Scenarios with high demanding of network packet receive and send processing, such as video danmaku, live streaming, games, etc.
Instance Requirements
SA4 instances can be used as monthly subscription instances as well as pay-as-you-go billing instances.
SA4 instances can only be launched in a Virtual Private Cloud.
It is recommended to pair with the TencentOS Server operating system for optimal application performance of the instance.
Refer to the specifications below to see the sizes of SA4 instances available for purchase. Ensure the size of the SA4 instance you choose meets the minimum CPU and memory requirements of your operating system and application. In many use cases, operating systems with GUIs that consume a lot of memory and CPU resources (such as Windows) may need larger instance sizes. As your workload's memory and CPU needs increase over time, you can scale to higher configurations or choose other types of instances.
An Instance can support up to 100 Gbps of network bandwidth, depending on the kernel version and runtime environment of the instance operating system. When PPS exceeds 10 million and the bandwidth exceeds 50 Gbps, the kernel protocol stack can cause significant network performance loss. In such cases, the bandwidth values tested by netperf may not meet expectations. The DPDK method can be used to overcome the differences in the cloud server's kernel protocol stack, getting the instance's real network performance. For testing methods, see high-throughput network performance testing. |
SA4.2XLARGE16 | 8 | 16 | 900,000 | 300,000 | 8 | 2 | - |
SA4.2XLARGE32 | 8 | 32 | 900,000 | 300,000 | 8 | 2 | - |
SA4.4XLARGE32 | 16 | 32 | 1,800,000 | 600,000 | 16 | 4 | - |
SA4.4XLARGE64 | 16 | 64 | 1,800,000 | 600,000 | 16 | 4 | - |
SA4.8XLARGE64 | 32 | 64 | 3,700,000 | 1,300,000 | 32 | 8 | - |
SA4.8XLARGE128 | 32 | 128 | 3,700,000 | 1,300,000 | 32 | 8 | - |
SA4.16XLARGE128 | 64 | 128 | 7,500,000 | 2,600,000 | 48 | 17 | - |
SA4.16XLARGE256 | 64 | 256 | 7,500,000 | 2,600,000 | 48 | 17 | - |
SA4.24XLARGE192 | 96 | 192 | 11,200,000 | 4,000,000 | 48 | 25 | - |
SA4.48XLARGE384 | 192 | 384 | 22,500,000 | 8,000,000 | 48 | 50 | - |
SA4.96XLARGE768 | 384 | 768 | 45,000,000 | 16,000,000 | 48 | 100 | - |
Standard S6
As the latest generation of standard instances, S6 instances are powered by an all-new optimized virtualization platform, and provide balanced and stable compute, memory, and network resources. These instances are ideal for many applications.
S6 instances come with the new Intel® Xeon® processors with the latest DDR4 memory. They are network optimized by default, offering a private network throughput of up to 19 million pps and a private network bandwidth of up to 100 Gbps.
Note:
This instance type is now only available to beta users. Contact your account manager to purchase it.
Features
A new-generation Star Lake two-way server developed by Tencent Cloud, with the 3rd generation Intel® Xeon® scalable processor.
Intel® Xeon® Ice Lake processor, with a CPU clock rate of 2.7 GHz and a turbo frequency of 3.3 GHz.
Supported CPU/RAM ratios: 1:2 and 1:4.
Supports up to 100 Gbps of private network bandwidth, providing ultra-high packet throughput to meet high private network transmission requirements.
The network performance of an instance depends on its specification. A higher specification means a greater network forwarding performance and a higher private network bandwidth cap.
Supports hyper-threading.
Use Cases
Standard S6 instances are applicable to the following scenarios:
Enterprise applications of different types and sizes.
Small and medium-sized database systems, caches, and search clusters.
Computing clusters, memory-intensive data processing.
Scenarios that require sending and receiving massive network packets, such as video on-screen comments, live video broadcasting, and gaming.
Requirements
Supports pay-as-you-go.
Supports only VPC.
See below for available S6 instance specifications. Make sure that the instance specification you choose meets the minimum CPU and memory requirements of your operating system and applications. In many cases, GUI operating systems (such as Windows) that consume extensive memory and CPU resources may need higher specifications. As the needs of your workload for memory and CPU increase, you can choose higher configurations or other instance types.
|
S6.SMALL1 | 1 | 1 | 260,000 | 260,000 | 1 | 1.6 | 2.7GHz | - |
S6.SMALL2 | 1 | 2 | 260,000 | 260,000 | 1 | 1.6 | 2.7GHz | - |
S6.SMALL4 | 1 | 4 | 260,000 | 260,000 | 1 | 1.6 | 2.7GHz | - |
S6.MEDIUM4 | 2 | 4 | 300,000 | 260,000 | 2 | 2 | 2.7GHz | - |
S6.MEDIUM8 | 2 | 8 | 300,000 | 260,000 | 2 | 2 | 2.7GHz | - |
S6.LARGE8 | 4 | 8 | 600,000 | 600,000 | 4 | 4 | 2.7GHz | - |
S6.LARGE16 | 4 | 16 | 600,000 | 600,000 | 4 | 4 | 2.7GHz | - |
S6.2XLARGE16 | 8 | 16 | 1,200,000 | 1,000,000 | 8 | 7 | 2.7GHz | - |
S6.2XLARGE32 | 8 | 32 | 1,200,000 | 1,000,000 | 8 | 7 | 2.7GHz | - |
S6.4XLARGE32 | 16 | 32 | 2,600,000 | 2,000,000 | 16 | 13 | 2.7GHz | - |
S6.4XLARGE64 | 16 | 64 | 2,600,000 | 2,000,000 | 16 | 13 | 2.7GHz | - |
S6.8XLARGE64 | 32 | 64 | 6,000,000 | 4,000,000 | 32 | 26 | 2.7GHz | - |
S6.8XLARGE128 | 32 | 128 | 6,000,000 | 4,000,000 | 32 | 26 | 2.7GHz | - |
S6.12XLARGE96 | 48 | 96 | 7,000,000 | 6,000,000 | 48 | 39 | 2.7GHz | - |
S6.12XLARGE192 | 48 | 192 | 7,000,000 | 6,000,000 | 48 | 39 | 2.7GHz | - |
S6.16XLARGE266 | 64 | 266 | 10,000,000 | 8,000,000 | 48 | 62 | 2.7GHz | - |
S6.31MEDIUM216 | 62 | 216 | 10,000,000 | 6,000,000 | 48 | 60 | 2.7GHz | - |
S6.16XLARGE216 | 64 | 216 | 10,000,000 | 8,000,000 | 48 | 50 | 2.7GHz | - |
S6.32XLARGE432 | 128 | 432 | 19,000,000 | 16,000,000 | 48 | 100 | 2.7GHz | - |
Standard SA3
SA3 instances are optimized with the latest generation of AMD EPYC™ processor. They deliver ultra-high cost performance with a variety of specifications, and provide a balance of compute, storage, and network resources, making them ideal for many applications.
SA3 instances come with the new AMD EPYC™ Milan processors with the latest DDR4 memory. They are network optimized by default, offering a private network throughput up to 19 million pps and a private network bandwidth up to 100 Gbps.
Note:
This instance type is now only available to beta users. Contact your account manager to purchase it.
Features
Provides high performance with high reliability, security, and stability based on the Star Lake servers developed by Tencent Cloud.
Comes with 2.55 GHz AMD EPYC™ Milan processor, with a turbo frequency of 3.5GHz and the latest generation of 8-channel DDR4 for stable memory computing performance.
Higher specification, SA3.58XLARGE940, offering 232 vCPUs and 940 GB memory.
A wide range of CPU/RAM ratios, such as 1:2 and 1:4.
Supports up to 100 Gbps of private network bandwidth for ultra-high packet throughput to meet extremely high private network transmission requirements.
The network performance of an instance depends on its specification. A higher specification means a greater network forwarding performance and a higher private network bandwidth cap.
Use Cases
Standard SA3 instances are applicable to the following scenarios:
Enterprise applications of different types and sizes.
Search and other computing clusters.
Video encoding and decoding, video rendering and other applications sensitive to the single-core performance.
Requirements
Supports pay-as-you-go.
Supports only VPC.
See below for available SA3 instance specifications. Make sure that the instance specification you choose meets the minimum CPU and memory requirements of your operating system and applications. In many cases, GUI operating systems (such as Windows) that consume extensive memory and CPU resources may need higher specifications. As the needs of your workload for memory and CPU increase, you can choose higher configurations or other instance types.
With the support of appropriate operating system kernel version and runtime environment, the instance’s network bandwidth can reach up to 100 Gbps. If the network throughput is larger than 10 million pps and the network bandwidth is higher than 50 Gbps, the kernel protocol stack consumes a lot of network resources. In this case, the resulted bandwidth of netperf test may not meet the expectation. To obtain the actual network performance of the instance, use the DPDK method to shield the difference caused by the kernel protocol stack.
|
SA3.SMALL1 | 1 | 1 | 250,000 | 250,000 | 1 | 1.5 | 2.55GHz | - |
SA3.SMALL2 | 1 | 2 | 250,000 | 250,000 | 1 | 1.5 | 2.55GHz | - |
SA3.SMALL4 | 1 | 4 | 250,000 | 250,000 | 1 | 1.5 | 2.55GHz | - |
SA3.MEDIUM4 | 2 | 4 | 300,000 | 250,000 | 2 | 1.5 | 2.55GHz | - |
SA3.MEDIUM8 | 2 | 8 | 300,000 | 250,000 | 2 | 1.5 | 2.55GHz | - |
SA3.LARGE8 | 4 | 8 | 500,000 | 250,000 | 4 | 2 | 2.55GHz | - |
SA3.LARGE16 | 4 | 16 | 500,000 | 250,000 | 4 | 2 | 2.55GHz | - |
SA3.2XLARGE16 | 8 | 32 | 800,000 | 500,000 | 8 | 4 | 2.55GHz | - |
SA3.2XLARGE32 | 8 | 32 | 800,000 | 500,000 | 8 | 4 | 2.55GHz | - |
SA3.4XLARGE32 | 16 | 32 | 1,500,000 | 1,100,000 | 16 | 7 | 2.55GHz | - |
SA3.4XLARGE64 | 16 | 64 | 1,500,000 | 1,100,000 | 16 | 7 | 2.55GHz | - |
SA3.8XLARGE64 | 32 | 64 | 2,500,000 | 2,200,000 | 32 | 14 | 2.55GHz | - |
SA3.8XLARGE128 | 32 | 128 | 2,500,000 | 2,200,000 | 32 | 14 | 2.55GHz | - |
SA3.12XLARGE96 | 48 | 96 | 4,000,000 | 3,300,000 | 48 | 21 | 2.55GHz | - |
SA3.12XLARGE192 | 48 | 192 | 4,000,000 | 3,300,000 | 48 | 21 | 2.55GHz | - |
SA3.16XLARGE128 | 64 | 128 | 5,200,000 | 4,400,000 | 48 | 28 | 2.55GHz | - |
SA3.16XLARGE256 | 64 | 256 | 5,200,000 | 4,400,000 | 48 | 28 | 2.55GHz | - |
SA3.20XLARGE160 | 80 | 160 | 6,500,000 | 5,500,000 | 48 | 35 | 2.55GHz | - |
SA3.20XLARGE320 | 80 | 320 | 6,500,000 | 5,500,000 | 48 | 35 | 2.55GHz | - |
SA3.24XLARGE192 | 96 | 192 | 7,800,000 | 6,600,000 | 48 | 42 | 2.55GHz | - |
SA3.24XLARGE384 | 96 | 384 | 7,800,000 | 6,600,000 | 48 | 42 | 2.55GHz | - |
SA3.29XLARGE216 | 116 | 216 | 9,500,000 | 8,000,000 | 48 | 50 | 2.55GHz | - |
SA3.29XLARGE470 | 116 | 470 | 9,500,000 | 8,000,000 | 48 | 50 | 2.55GHz | - |
SA3.32XLARGE256 | 128 | 256 | 10,000,000 | 8,800,000 | 48 | 56 | 2.55GHz | - |
SA3.32XLARGE512 | 128 | 512 | 10,000,000 | 8,800,000 | 48 | 56 | 2.55GHz | - |
SA3.40XLARGE320 | 160 | 320 | 13,000,000 | 11,000,000 | 48 | 69 | 2.55GHz | - |
SA3.40XLARGE640 | 160 | 640 | 13,000,000 | 11,000,000 | 48 | 69 | 2.55GHz | - |
SA3.58XLARGE432 | 232 | 432 | 19,000,000 | 16,000,000 | 48 | 100 | 2.55GHz | - |
SA3.58XLARGE940 | 232 | 940 | 19,000,000 | 16,000,000 | 48 | 100 | 2.55GHz | - |
Standard SR1
Standard SR1 instances are the latest generation of ARM standard instances. Based on an all-new optimized virtualization platform, this family provides a balance of stable computing, memory, and network resources. This is a premium choice for many applications.
Features
Use the Ampere® Altra® processor with a clock rate of 2.8 GHz and a turbo frequency of 3.0 GHz.
A wide range of processor to memory ratio, such as 1:2 and 1:4.
Support premium, SSD and enhance SSD cloud disks.
Support up to 25 Gbps of private network bandwidth for ultra-high packet throughput to meet the needs of extremely high private network transmission demand.
The network performance of an instance depends on its specification. A higher specification means a greater network forwarding performance and a higher private network bandwidth cap.
Use Cases
Standard SR1 instances are applicable to the following scenarios:
Enterprise applications of different types and sizes.
ARM simulation testing.
Embedded development and testing.
CPU-based machine learning and reasoning.
Requirements
Support purchase configuration. See the instance specifications below to make sure that the size of the SR1 instance you selected meets the minimum CPU memory requirement for your operating system and application. As your workload demands more memory and CPU over time, you can expand to a higher configuration or choose other types of instances.
|
SR1.SMALL1 | 1 | 1 | 250,000 | 1 | 1.5 | 2.8GHz | - |
SR1.SMALL2 | 1 | 2 | 250,000 | 1 | 1.5 | 2.8GHz | - |
SR1.MEDIUM4 | 2 | 4 | 250,000 | 2 | 1.5 | 2.8GHz | - |
SR1.MEDIUM8 | 2 | 8 | 250,000 | 2 | 1.5 | 2.8GHz | - |
SR1.LARGE8 | 4 | 8 | 250,000 | 2 | 1.5 | 2.8GHz | - |
SR1.LARGE16 | 4 | 16 | 250,000 | 2 | 1.5 | 2.8GHz | - |
SR1.2XLARGE16 | 8 | 16 | 500,000 | 2 | 3 | 2.8GHz | - |
SR1.2XLARGE32 | 8 | 32 | 500,000 | 2 | 3 | 2.8GHz | - |
SR1.4XLARGE32 | 16 | 32 | 1,100,000 | 4 | 6 | 2.8GHz | - |
SR1.4XLARGE64 | 16 | 64 | 1,100,000 | 4 | 6 | 2.8GHz | - |
SR1.8XLARGE64 | 32 | 64 | 2,200,000 | 8 | 12 | 2.8GHz | - |
SR1.8XLARGE128 | 32 | 128 | 2,200,000 | 8 | 12 | 2.8GHz | - |
SR1.16XLARGE128 | 64 | 128 | 4,500,000 | 16 | 16 | 2.8GHz | - |
Standard S5
Standard S5 instances are the latest generation of standard instances. Based on an all-new optimized virtualization platform, this family provides a balance of stable computing, memory, and network resources. This is a premium choice for many applications.
Features
Intel® Xeon® Cascade Lake or Intel® Xeon® Cooper Lake processor, with a CPU clock rate of 2.5 GHz and turbo frequency of 3.1 GHz.
New Intel Advanced Vector Extension (AVX-512) instruction set.
Supported CPU/RAM ratios: 1:2 and 1:4.
Supports up to 28 Gbps of private network bandwidth for ultra-high packet throughput to meet the needs of extremely high private network transmission demand.
The network performance of an instance depends on its specification. A higher specification means a greater network forwarding performance and a higher private network bandwidth cap.
Supports the configuration to disable or enable Hyper-Threading.
Application Scenarios
Standard S5 instances are applicable to the following scenarios:
Enterprise applications of different types and sizes
Small and medium-sized database systems, caches, and search clusters.
Computing clusters, memory-intensive data processing.
Scenarios that require sending and receiving massive network packets, such as video on-screen comments, live video broadcasting, and gaming.
Requirements
Supports pay-as-you-go.
Supports only VPC.
Configuration purchase is available for S5 instances. Please see the instance specifications below. Make sure that the size of the S5 instance you choose meet the minimum CPU memory requirements of your operating system and applications. In many cases, GUI operating systems (such as Windows) that consume extensive memory and CPU resources may need larger instances. As the needs of your workload for memory and CPU increase, you can expand to higher configurations or choose other instance types.
|
S5.SMALL1 | 1 | 1 | 250,000 | 250,000 | 1 | 1.5 | 2.5 GHz | - |
S5.SMALL2 | 1 | 2 | 250,000 | 250,000 | 1 | 1.5 | 2.5 GHz | - |
S5.SMALL4 | 1 | 4 | 250,000 | 250,000 | 1 | 1.5 | 2.5 GHz | - |
S5.MEDIUM4 | 2 | 4 | 300,000 | 250,000 | 2 | 1.5 | 2.5 GHz | - |
S5.MEDIUM8 | 2 | 8 | 300,000 | 250,000 | 2 | 1.5 | 2.5 GHz | - |
S5.LARGE8 | 4 | 8 | 500,000 | 250,000 | 2 | 1.5 | 2.5 GHz | - |
S5.LARGE16 | 4 | 16 | 500,000 | 250,000 | 2 | 1.5 | 2.5 GHz | - |
S5.2XLARGE16 | 8 | 16 | 800,000 | 250,000 | 2 | 3.0 | 2.5 GHz | - |
S5.2XLARGE32 | 8 | 32 | 800,000 | 250,000 | 2 | 3.0 | 2.5 GHz | - |
S5.4XLARGE32 | 16 | 32 | 1,500,000 | 300,000 | 4 | 6.0 | 2.5 GHz | - |
S5.4XLARGE64 | 16 | 64 | 1,500,000 | 300,000 | 4 | 6.0 | 2.5 GHz | - |
S5.6XLARGE48 | 24 | 48 | 2,000,000 | 400,000 | 6 | 9.0 | 2.5 GHz | - |
S5.6XLARGE96 | 24 | 96 | 2,000,000 | 400,000 | 6 | 9.0 | 2.5 GHz | - |
S5.8XLARGE64 | 32 | 64 | 2,500,000 | 600,000 | 8 | 12 | 2.5 GHz | - |
S5.8XLARGE128 | 32 | 128 | 2,500,000 | 600,000 | 8 | 12 | 2.5 GHz | - |
S5.12XLARGE96 | 48 | 96 | 4,000,000 | 900,000 | 12 | 17.0 | 2.5 GHz | - |
S5.12XLARGE192 | 48 | 192 | 4,000,000 | 900,000 | 12 | 17.0 | 2.5 GHz | - |
S5.16XLARGE256 | 64 | 256 | 5,000,000 | 1,200,000 | 16 | 23.0 | 2.5 GHz | - |
Standard Storage Optimized S5se
Based on an all-new optimized virtualization platform, S5se instances improve the overall cloud disk performance. They are powered by new Xeon® Cascade Lake processors with the latest DDR4 memory to provide the excellent cloud disk performance.
Features
Supports Premium Cloud Storage and SSD as the system disk.
Supports Tremendous SSD as the data disk.
Provides cloud disk storage performance of up to 1,200,000 IOPS, and read/write bandwidth of 4 GB/s.
2.5 GHz Intel® Xeon® Cascade Lake processor, with a turbo frequency 3.1 GHz and the latest generation 6-channel DDR4 for stable memory computing performance.
New Intel Advanced Vector Extension (AVX-512) instruction set.
Supported CPU/RAM ratios: 1:2 and 1:4.
Supports up to 25 Gbps of private network bandwidth for ultra-high packet throughput to meet extremely high private network transmission requirements.
The network performance of an instance depends on its specification. A higher specification means a greater network forwarding performance and a higher private network bandwidth cap.
Supports the configuration to disable or enable Hyper-Threading.
Application Scenarios
Standard Storage Optimized S5se instances are applicable to the following scenarios:
Enterprise applications of different types and sizes.
IO-intensive applications including large databases, NoSQL databases, audio/video processing services, and Elasticsearch cluster.
Requirements
Supports pay-as-you-go.
Supports only VPC.
See below for available S5se specifications:
|
S5se.LARGE16 | 4 | 16 | 500,000 | 250,000 | 2 | 1.5 | 2.5GHz | - |
S5se.2XLARGE16 | 8 | 16 | 800,000 | 250,000 | 2 | 3.0 | 2.5GHz | - |
S5se.2XLARGE32 | 8 | 32 | 800,000 | 250,000 | 2 | 3.0 | 2.5GHz | - |
S5se.4XLARGE32 | 16 | 32 | 1,500,000 | 300,000 | 4 | 6.0 | 2.5GHz | - |
S5se.4XLARGE64 | 16 | 64 | 1,500,000 | 300,000 | 4 | 6.0 | 2.5GHz | - |
S5se.8XLARGE64 | 32 | 64 | 2,500,000 | 600,000 | 8 | 12.0 | 2.5GHz | - |
S5se.8XLARGE128 | 32 | 128 | 2,500,000 | 600,000 | 8 | 12.0 | 2.5GHz | - |
S5se.17XLARGE316 | 68 | 316 | 5,000,000 | 1,200,000 | 16 | 25.0 | 2.5GHz | - |
Standard SA2
SA2 instances are optimized with the latest generation AMD EPYC™ processor, deliver ultra-high cost performance with a variety of specifications, and provide a balance of compute, memory, and network resources, making them ideal for many applications.
SA2 instances come with the new AMD EPYC™ ROME processors with the latest DDR4 memory. They are network optimized by default, offering a private network throughput up to 7,500,000 pps and support up to 25 Gbps of private network bandwidth.
Features
Provides high performance with high reliability, security, and stability based on the Star Lake servers developed by Tencent Cloud.
2.6 GHz AMD EPYC™ ROME processor, with a turbo frequency 3.3 GHz and the latest generation 8-channel DDR4 for stable memory computing performance.
Higher specification, SA2.45XLARGE464, offering 180 vCPUs and 464 GB memory.
A wide range of CPU/RAM ratios, such as 1:2 and 1:4.
Supports up to 25 Gbps of private network bandwidth for ultra-high packet throughput to meet extremely high private network transmission requirements.
The network performance of an instance depends on its specification. A higher specification means a greater network forwarding performance and a higher private network bandwidth cap.
Supports the configuration to disable or enable Hyper-Threading.
Application Scenarios
Standard SA2 instances are applicable to the following scenarios:
Enterprise applications of different types and sizes.
Search and other computing clusters.
Video encoding and decoding, video rendering and other applications sensitive to the single-core performance.
Requirements
Supports pay-as-you-go.
Supports only VPC.
See below for available SA2 instance specifications. Make sure that the instance specification you choose meet the minimum CPU memory requirements of your operating system and applications. In many cases, GUI operating systems (such as Windows) that consume extensive memory and CPU resources may need higher specifications. As the needs of your workload for memory and CPU increase, you can choose higher configurations or other instance types.
|
SA2.SMALL1 | 1 | 1 | 250,000 | 1 | 1.5 | 2.6 GHz | - |
SA2.SMALL2 | 1 | 2 | 250,000 | 1 | 1.5 | 2.6 GHz | - |
SA2.SMALL4 | 1 | 4 | 250,000 | 1 | 1.5 | 2.6 GHz | - |
SA2.MEDIUM4 | 2 | 4 | 300,000 | 2 | 1.5 | 2.6 GHz | - |
SA2.MEDIUM8 | 2 | 8 | 300,000 | 2 | 1.5 | 2.6 GHz | - |
SA2.LARGE8 | 4 | 8 | 500,000 | 2 | 1.5 | 2.6 GHz | - |
SA2.LARGE16 | 4 | 16 | 500,000 | 2 | 1.5 | 2.6 GHz | - |
SA2.2XLARGE16 | 8 | 16 | 700,000 | 2 | 1.5 | 2.6 GHz | - |
SA2.2XLARGE32 | 8 | 32 | 700,000 | 2 | 1.5 | 2.6 GHz | - |
SA2.4XLARGE32 | 16 | 32 | 1,000,000 | 4 | 3.0 | 2.6GHz | - |
SA2.4XLARGE64 | 16 | 64 | 1,000,000 | 4 | 3.0 | 2.6GHz | - |
SA2.8XLARGE64 | 32 | 64 | 1,400,000 | 8 | 5.0 | 2.6GHz | - |
SA2.12XLARGE96 | 48 | 96 | 2,100,000 | 12 | 7.0 | 2.6GHz | - |
SA2.16XLARGE128 | 64 | 128 | 2,800,000 | 16 | 9.0 | 2.6GHz | - |
SA2.20XLARGE160 | 80 | 160 | 3,500,000 | 16 | 12.0 | 2.6GHz | - |
SA2.22XLARGE224 | 90 | 224 | 3,750,000 | 16 | 13.0 | 2.6GHz | - |
SA2.24XLARGE192 | 96 | 192 | 4,200,000 | 16 | 14.0 | 2.6GHz | - |
SA2.32XLARGE256 | 128 | 256 | 5,600,000 | 32 | 18.0 | 2.6GHz | - |
SA2.40XLARGE320 | 160 | 320 | 7,100,000 | 32 | 23.0 | 2.6GHz | - |
SA2.45XLARGE464 | 180 | 464 | 7,500,000 | 32 | 25.0 | 2.6GHz | - |
Standard S4
S4 instances provide a balance of compute, memory, and network resources, making them ideal for many applications.
S4 instances come with new Xeon® Skylake processors with the latest DDR4 memory. They are network optimized by default, offering a private network throughput up to 6,000,000 pps, and support up to 25 Gbps of private network bandwidth.
Features
2.4 GHz Intel® Xeon® Skylake 6148 processor, offering stable computing performance.
New Intel Advanced Vector Extension (AVX-512) instruction set.
The latest generation of 6-channel DDR4 memory with a bandwidth of 2,666 MT/s.
Higher specification, S4.18XLARGE228, offering 72 vCPUs and 228 GB memory.
Supported CPU/RAM ratios: 1:2 and 1:4.
Supports up to 25 Gbps of private network bandwidth for ultra-high packet throughput to meet extremely high private network transmission requirements.
The network performance of an instance depends on its specification. A higher specification means a greater network forwarding performance and a higher private network bandwidth cap.
Application Scenarios
Standard S4 instances are applicable to the following scenarios:
Enterprise applications of different types and sizes.
Small and medium-sized database systems, caches, and search clusters.
Computing clusters, memory-intensive data processing.
Scenarios that require massive send/receive network packets, such as on-screen comments, live video broadcasting, and gaming.
Requirements
Supports pay-as-you-go.
Supports only VPC.
See below for available S4 instance specifications. Make sure that the instance specification you choose meet the minimum CPU memory requirements of your operating system and applications. In many cases, GUI operating systems (such as Windows) that consume extensive memory and CPU resources may need higher specifications. As the needs of your workload for memory and CPU increase, you can choose higher configurations or other instance types.
|
S4.SMALL1 | 1 | 1 | 250,000 | 1 | 1.5 | 2.4GHz | - |
S4.SMALL2 | 1 | 2 | 250,000 | 1 | 1.5 | 2.4GHz | - |
S4.SMALL4 | 1 | 4 | 250,000 | 1 | 1.5 | 2.4GHz | - |
S4.MEDIUM4 | 2 | 4 | 300,000 | 2 | 1.5 | 2.4GHz | - |
S4.MEDIUM8 | 2 | 8 | 300,000 | 2 | 1.5 | 2.4GHz | - |
S4.LARGE8 | 4 | 8 | 500,000 | 2 | 1.5 | 2.4GHz | - |
S4.LARGE16 | 4 | 16 | 500,000 | 2 | 1.5 | 2.4GHz | - |
S4.2XLARGE16 | 8 | 16 | 800,000 | 2 | 3.0 | 2.4 GHz | - |
S4.2XLARGE32 | 8 | 32 | 800,000 | 2 | 3.0 | 2.4 GHz | - |
S4.4XLARGE32 | 16 | 32 | 1,500,000 | 4 | 6.0 | 2.4 GHz | - |
S4.4XLARGE64 | 16 | 64 | 1,500,000 | 4 | 6.0 | 2.4 GHz | - |
S4.6XLARGE48 | 24 | 48 | 2,000,000 | 6 | 8.0 | 2.4 GHz | - |
S4.6XLARGE96 | 24 | 96 | 2,000,000 | 6 | 8.0 | 2.4 GHz | - |
S4.8XLARGE64 | 32 | 64 | 2,500,000 | 8 | 11.0 | 2.4 GHz | - |
S4.8XLARGE128 | 32 | 128 | 2,500,000 | 8 | 11.0 | 2.4 GHz | - |
S4.12XLARGE96 | 48 | 96 | 4,000,000 | 12 | 16.0 | 2.4 GHz | - |
S4.12XLARGE192 | 48 | 192 | 4,000,000 | 12 | 16.0 | 2.4 GHz | - |
S4.16XLARGE256 | 64 | 256 | 5,000,000 | 16 | 22.0 | 2.4 GHz | - |
S4.18XLARGE288 | 72 | 288 | 6,000,000 | 16 | 24.0 | 2.4 GHz | - |
Standard Network Optimized SN3ne
Standard SN3ne instances are a relatively new generation of network optimized instances. This family provides a balance of computing, memory, and network resources, with outstanding network throughput, and it is a good choice for many applications.
Standard Network Optimized SN3ne instances are equipped with the latest Xeon® Skylake processors with the latest DDR4 memory, default network optimization, and private network throughput up to 6,000,000 pps, with performance is nearly 8 times greater than the Standard S3 family. It can support up to 25 Gbps of private network bandwidth, with performance 2.5 times greater than the Standard S3 family.
Features
2.5 GHz Intel Xeon® Skylake 6133 processors with stable computing performance.
The latest generation of 6-channel DDR4 memory with a memory bandwidth of 2,666 MT/s.
Larger instance size, SN3ne.18XLARGE228, offering 72 vCPUs and 228 GB of memory.
Supported CPU/RAM ratios: 1:2 and 1:4.
Supports up to 25 Gbps of private network bandwidth for ultra-high packet throughput to meet the needs of extremely high private network transmission demand.
The network performance of an instance depends on its specification. A higher specification means a greater network forwarding performance and a higher private network bandwidth cap.
Support all types of cloud disks.
Application Scenarios
Standard Network Optimized SN3ne instances are applicable to the following scenarios:
Enterprise applications of different types and sizes.
Small and medium-sized database systems, caches, and search clusters.
Computing clusters, memory-intensive data processing.
Scenarios that require sending and receiving massive network packets, such as video on-screen comments, live video broadcasting, and gaming.
Requirements
SN3ne instances are pay-as-you-go.
SN3ne instances can only be launched in a VPC.
Configuration purchase is available for SN3ne instances. Please see the instance specifications below. Make sure that the size of the SN3ne instance you choose meet the minimum CPU memory requirements of your operating system and applications. In many cases, GUI operating systems (such as Windows) that consume extensive memory and CPU resources may need larger instances. As the needs of your workload for memory and CPU increase, you can expand to higher configurations or choose other instance types.
|
SN3ne.SMALL2 | 1 | 2 | 250,000 | 1 | 1.5 | 2.5 GHz | - |
SN3ne.MEDIUM4 | 2 | 4 | 300,000 | 2 | 1.5 | 2.5 GHz | - |
SN3ne.LARGE8 | 4 | 8 | 500,000 | 2 | 1.5 | 2.5 GHz | - |
SN3ne.LARGE16 | 4 | 16 | 500,000 | 2 | 1.5 | 2.5 GHz | - |
SN3ne.2XLARGE16 | 8 | 16 | 800,000 | 2 | 3.0 | 2.5 GHz | - |
SN3ne.2XLARGE32 | 8 | 32 | 800,000 | 2 | 3.0 | 2.5 GHz | - |
SN3ne.3XLARGE24 | 12 | 24 | 1,000,000 | 3 | 4.0 | 2.5 GHz | - |
SN3ne.4XLARGE32 | 16 | 32 | 1,500,000 | 4 | 6.0 | 2.5 GHz | - |
SN3ne.4XLARGE64 | 16 | 64 | 1,500,000 | 4 | 6.0 | 2.5 GHz | - |
SN3ne.6XLARGE48 | 24 | 48 | 2,000,000 | 6 | 8.0 | 2.5 GHz | - |
SN3ne.6XLARGE96 | 24 | 96 | 2,000,000 | 6 | 8.0 | 2.5 GHz | - |
SN3ne.8XLARGE64 | 32 | 64 | 2,500,000 | 8 | 11.0 | 2.5 GHz | - |
SN3ne.8XLARGE128 | 32 | 128 | 2,500,000 | 8 | 11.0 | 2.5 GHz | - |
SN3ne.12XLARGE96 | 48 | 96 | 4,000,000 | 12 | 16.0 | 2.5 GHz | - |
SN3ne.12XLARGE192 | 48 | 192 | 4,000,000 | 12 | 16.0 | 2.5 GHz | - |
SN3ne.16XLARGE128 | 64 | 128 | 5,000,000 | 16 | 22.0 | 2.5 GHz | - |
SN3ne.16XLARGE256 | 64 | 256 | 5,000,000 | 16 | 22.0 | 2.5 GHz | - |
SN3ne.18XLARGE288 | 72 | 288 | 6,000,000 | 16 | 24.0 | 2.5 GHz | - |
Standard S3
Standard S3 instances are a relatively new generation of standard instances. This family provides a balance of computing, memory, and network resources, and it is a good choice for many applications.
Standard S3 instances are equipped with the latest Xeon® Skylake processors with the latest DDR4 memory and support for up to 10 Gbps of private network bandwidth.
Features
2.5 GHz Intel Xeon® Skylake 6133 processors with stable computing performance.
The latest generation of 6-channel DDR4 memory with a memory bandwidth of 2,666 MT/s.
Larger instance size, S3.20XLARGE320, offering 80 vCPUs and 320 GB of memory.
Supported CPU/RAM ratios: 1:2 and 1:4.
The network performance of an instance depends on its specification. A higher specification means a greater network forwarding performance and a higher private network bandwidth cap.
Support all types of cloud disks.
Application Scenarios
Standard S3 instances are applicable to the following scenarios:
Enterprise applications of different types and sizes.
Small and medium-sized database systems, caches, and search clusters.
Computing clusters, memory-intensive data processing.
Requirements
Supports pay-as-you-go.
Supports both classic network and VPC.
See below for available S3 instance specifications. Make sure that the instance specification you choose meets the minimum CPU and memory requirements of your operating system and applications. In many cases, GUI operating systems (such as Windows) that consume extensive memory and CPU resources may need higher specifications. As the needs of your workload for memory and CPU increase, you can choose higher configurations or other instance types.
|
S3.SMALL1 | 1 | 1 | 200,000 | 1 | 1.5 | 2.5 GHz | - |
S3.SMALL2 | 1 | 2 | 200,000 | 1 | 1.5 | 2.5 GHz | - |
S3.SMALL4 | 1 | 4 | 200,000 | 1 | 1.5 | 2.5 GHz | - |
S3.MEDIUM8 | 2 | 8 | 250,000 | 2 | 1.5 | 2.5 GHz | - |
S3.LARGE8 | 4 | 8 | 450,000 | 4 | 1.5 | 2.5 GHz | - |
S3.LARGE16 | 4 | 16 | 450,000 | 4 | 1.5 | 2.5 GHz | - |
S3.2XLARGE16 | 8 | 16 | 850,000 | 8 | 1.5 | 2.5 GHz | - |
S3.2XLARGE32 | 8 | 32 | 850,000 | 8 | 1.5 | 2.5 GHz | - |
S3.3XLARGE24 | 12 | 24 | 850,000 | 12 | 1.5 | 2.5 GHz | - |
S3.3XLARGE48 | 12 | 48 | 850,000 | 12 | 1.5 | 2.5 GHz | - |
S3.4XLARGE32 | 16 | 32 | 850,000 | 16 | 2.0 | 2.5 GHz | - |
S3.4XLARGE64 | 16 | 64 | 850,000 | 16 | 2.0 | 2.5 GHz | - |
S3.6XLARGE48 | 24 | 48 | 850,000 | 16 | 3.0 | 2.5 GHz | - |
S3.6XLARGE96 | 24 | 96 | 850,000 | 16 | 3.0 | 2.5 GHz | - |
S3.8XLARGE64 | 32 | 64 | 850,000 | 16 | 4.0 | 2.5 GHz | - |
S3.8XLARGE128 | 32 | 128 | 850,000 | 16 | 4.0 | 2.5 GHz | - |
S3.12XLARGE96 | 48 | 96 | 850,000 | 16 | 6.0 | 2.5 GHz | - |
S3.12XLARGE192 | 48 | 192 | 850,000 | 16 | 6.0 | 2.5 GHz | - |
S3.16XLARGE256 | 64 | 256 | 850,000 | 16 | 8.0 | 2.5 GHz | - |
S3.20XLARGE320 | 80 | 320 | 850,000 | 16 | 10.0 | 2.5 GHz | - |
Standard SA1
A Standard SA1 instance uses the AMD EPYC™ processor. This ultra-high cost performance instance family supports a variety of specifications, ensuring cost efficiency. Standard SA1 instances provides a balance of computing, memory, and network resources, and it is a good choice for many applications.
Features
2.0 GHz AMD EPYC™ 7551 processors with a Turbo Boost clock of 2.55 GHz, offering stable computing performance.
The latest generation of 8-channel DDR4 memory with a memory bandwidth of 2,666 MT/s.
Supported CPU/RAM ratios: 1:2 and 1:4.
The network performance of an instance depends on its specification. A higher specification means a greater network forwarding performance and a higher private network bandwidth cap.
Support all types of cloud disks.
Application Scenarios
Standard SA1 instances are applicable to the following scenarios:
Enterprise applications of different types and sizes.
Small and medium-sized database systems, caches, and search clusters.
Computing clusters, memory-intensive data processing.
Requirements
Supports pay-as-you-go.
Supports both classic network and VPC.
See below for available SA1 instance specifications. As the needs of your workload for memory and CPU increase, you can choose higher configurations or other instance types.
|
SA1.SMALL1 | 1 | 1 | - | 1 | 1.5 | 2.0 GHz | - |
SA1.SMALL2 | 1 | 2 | - | 1 | 1.5 | 2.0 GHz | - |
SA1.SMALL4 | 1 | 4 | - | 1 | 1.5 | 2.0 GHz | - |
SA1.MEDIUM4 | 2 | 4 | - | 2 | 1.5 | 2.0 GHz | - |
SA1.MEDIUM8 | 2 | 8 | - | 2 | 1.5 | 2.0 GHz | - |
SA1.LARGE8 | 4 | 8 | - | 4 | 1.5 | 2.0 GHz | - |
SA1.LARGE16 | 4 | 16 | - | 4 | 1.5 | 2.0 GHz | - |
SA1.2XLARGE16 | 8 | 16 | - | 8 | 1.5 | 2.0 GHz | - |
SA1.2XLARGE32 | 8 | 32 | - | 8 | 1.5 | 2.0 GHz | - |
SA1.4XLARGE32 | 16 | 32 | - | 16 | 1.5 | 2.0 GHz | - |
SA1.4XLARGE64 | 16 | 64 | - | 16 | 1.5 | 2.0 GHz | - |
Note:
In the "SA1 Instances Specification List", "-" in the Send/Receive Packets column indicates that, for this specification, the network packet rate and server CPU performance are not guaranteed. If you have strict requirement on the performance, please choose models with performance guarantee.
Standard Network Optimized S2ne
Standard Network Optimized S2ne instances are the best choice for applications that require sending and receiving massive network packets. They support sending and receiving up to millions of network packets per second. This family is recommended for businesses with high network PPS requirements, such as large game servers, videos, and live streaming.
Note:
This instance type is currently only available to beta users. Contact your account manager if you wish to purchase these instance type.
Features
Intel Xeon E5-2680 Broadwell (v4) processors with base frequency of 2.4 GHz and DDR4 memory, offering stable computing performance.
Up to 48 cores and 192 GB are available for sale.
Supported CPU/RAM ratios: 1:2 and 1:4.
The network performance of an instance depends on its specification. A higher specification means a greater network forwarding performance and a higher private network bandwidth cap.
Support all types of cloud disks.
Application Scenarios
Scenarios that require sending and receiving massive network packets, such as game services, video services, and financial analysis.
Enterprise applications of different types and sizes.
Requirements
Supports pay-as-you-go.
Supports only VPC.
See below for available S2ne specifications:
|
S2ne.SMALL2 | 1 | 2 | 120,000 | 1 | 1.5 | 2.4 GHz | - |
S2ne.MEDIUM4 | 2 | 4 | 150,000 | 2 | 1.5 | 2.4 GHz | - |
S2ne.LARGE8 | 4 | 8 | 300,000 | 2 | 1.5 | 2.4 GHz | - |
S2ne.LARGE16 | 4 | 16 | 300,000 | 2 | 1.5 | 2.4 GHz | - |
S2ne.2XLARGE16 | 8 | 16 | 600,000 | 2 | 2.0 | 2.4 GHz | - |
S2ne.2XLARGE32 | 8 | 32 | 600,000 | 2 | 2.0 | 2.4 GHz | - |
S2ne.3XLARGE24 | 12 | 24 | 900,000 | 3 | 2.5 | 2.4 GHz | - |
S2ne.3XLARGE48 | 12 | 48 | 900,000 | 3 | 2.5 | 2.4 GHz | - |
S2ne.4XLARGE32 | 16 | 32 | 1,200,000 | 4 | 3.5 | 2.4 GHz | - |
S2ne.4XLARGE64 | 16 | 64 | 1,200,000 | 4 | 3.5 | 2.4 GHz | - |
S2ne.6XLARGE48 | 24 | 48 | 1,800,000 | 6 | 5.0 | 2.4 GHz | - |
S2ne.6XLARGE96 | 24 | 96 | 1,800,000 | 6 | 5.0 | 2.4 GHz | - |
S2ne.8XLARGE64 | 32 | 64 | 2,400,000 | 8 | 6.5 | 2.4 GHz | - |
S2ne.8XLARGE128 | 32 | 128 | 2,400,000 | 8 | 6.5 | 2.4 GHz | - |
S2ne.12XLARGE192 | 48 | 192 | 3,600,000 | 12 | 9.5 | 2.4 GHz | - |
Standard S2
Standard S2 instances are a relatively new generation of instances. This family provides a balance of computing, memory, and network resources, and it is a good choice for many applications.
Standard S2 instances are equipped with Intel® Xeon® Broadwell processors with DDR4 memory.
Features
Intel Xeon E5-2680 Broadwell (v4) processors with base frequency of 2.4 GHz and DDR4 memory.
Up to 56 cores and 224 GB are available for sale.
Supported CPU/RAM ratios: 1:2 and 1:4.
Balance of computing, memory, and network resources.
Application Scenarios
This family is used for small and mid-size databases, data processing tasks that require additional memory and cache fleets, and for running backend servers for SAP, Microsoft SharePoint, cluster computing and other enterprise applications.
Requirements
S2 instances are pay-as-you-go, and can also be used as production instances of standard host HS20 in CDHs.
S2 instances can be launched in classic network and VPCs.
See below for available S2 instance specifications. Make sure that the instance specification you choose meets the minimum CPU and memory requirements of your operating system and applications. In many cases, GUI operating systems (such as Windows) that consume extensive memory and CPU resources may need higher specifications. As the needs of your workload for memory and CPU increase, you can choose higher configurations or other instance types.
|
S2.SMALL1 | 1 | 1 | 200,000 | 1 | 1.5 | 2.4 GHz | - |
S2.SMALL2 | 1 | 2 | 200,000 | 1 | 1.5 | 2.4 GHz | - |
S2.SMALL4 | 1 | 4 | 200,000 | 1 | 1.5 | 2.4 GHz | - |
S2.MEDIUM2 | 2 | 2 | 250,000 | 2 | 1.5 | 2.4 GHz | - |
S2.MEDIUM4 | 2 | 4 | 250,000 | 2 | 1.5 | 2.4 GHz | - |
S2.MEDIUM8 | 2 | 8 | 250,000 | 2 | 1.5 | 2.4 GHz | - |
S2.LARGE8 | 4 | 8 | 450,000 | 4 | 1.5 | 2.4 GHz | - |
S2.LARGE16 | 4 | 16 | 450,000 | 4 | 1.5 | 2.4 GHz | - |
S2.2XLARGE16 | 8 | 16 | 500,000 | 8 | 1.5 | 2.4 GHz | - |
S2.2XLARGE32 | 8 | 32 | 500,000 | 8 | 1.5 | 2.4 GHz | - |
S2.3XLARGE24 | 12 | 24 | 500,000 | 8 | 2.5 | 2.4 GHz | - |
S2.3XLARGE48 | 12 | 48 | 500,000 | 8 | 2.5 | 2.4 GHz | - |
S2.4XLARGE32 | 16 | 32 | 500,000 | 8 | 3.0 | 2.4 GHz | - |
S2.4XLARGE64 | 16 | 64 | 500,000 | 8 | 3.0 | 2.4 GHz | - |
S2.6XLARGE48 | 24 | 48 | 700,000 | 8 | 4.5 | 2.4 GHz | - |
S2.6XLARGE96 | 24 | 96 | 700,000 | 8 | 4.5 | 2.4 GHz | - |
S2.8XLARGE64 | 32 | 64 | 700,000 | 8 | 6.0 | 2.4 GHz | - |
S2.8XLARGE128 | 32 | 128 | 700,000 | 8 | 6.0 | 2.4 GHz | - |
S2.14XLARGE224 | 56 | 224 | 700,000 | 8 | 10.0 | 2.4 GHz | - |
Standard S1
Standard S1 instances offer a range of CPUs from low to high core count. They deliver significant savings with flexible configuration options to meet diverse needs. They also offer a range of data disk options, including local disks and SSD cloud disks. (Options may vary depending on hardware specifications).
Features
Standard S1 instances have the following features:
Offer a range of CPUs from low to high core count for flexible configuration options.
Intel Xeon CPUs and DDR3 memories.
Support storage options of local disks and SSD cloud disks.
Balance of computing, memory, and network resources.
Application Scenarios
Standard S1 instances are suitable for large, medium, and small-sized applications and databases.
Requirements
S1 instances are pay-as-you-go, and can also be used as production instances of standard host in CDHs.
S1 instances can be launched in classic network and VPCs.
"-" indicates that, for this specification, the network packet rate and server CPU performance are not guaranteed. If you have strict requirement on the performance, please choose models with performance guarantee.
See below for available S1 instance specifications. Make sure that the instance specification you choose meets the minimum CPU and memory requirements of your operating system and applications. In many cases, GUI operating systems (such as Windows) that consume extensive memory and CPU resources may need higher specifications. As the needs of your workload for memory and CPU increase, you can choose higher configurations or other instance types.
|
S1.SMALL1 | 1 | 1 | - | 1 | 1.5 | - | - |
S1.SMALL2 | 1 | 2 | - | 1 | 1.5 | - | - |
S1.SMALL4 | 1 | 4 | - | 1 | 1.5 | - | - |
S1.MEDIUM2 | 2 | 2 | - | 2 | 1.5 | - | - |
S1.MEDIUM4 | 2 | 4 | - | 2 | 1.5 | - | - |
S1.MEDIUM8 | 2 | 8 | - | 2 | 1.5 | - | - |
S1.MEDIUM12 | 2 | 12 | - | 2 | 1.5 | - | - |
S1.LARGE4 | 4 | 4 | - | 4 | 1.5 | - | - |
S1.LARGE8 | 4 | 8 | - | 4 | 1.5 | - | - |
S1.LARGE16 | 4 | 16 | - | 4 | 1.5 | - | - |
S1.2XLARGE8 | 8 | 8 | - | 8 | 2.0 | - | - |
S1.2XLARGE16 | 8 | 16 | - | 8 | 2.0 | - | - |
S1.2XLARGE32 | 8 | 32 | - | 8 | 2.0 | - | - |
S1.3XLARGE24 | 12 | 24 | - | 8 | 2.5 | - | - |
S1.3XLARGE48 | 12 | 48 | - | 8 | 2.5 | - | - |
S1.4XLARGE16 | 16 | 16 | - | 8 | 3.5 | - | - |
S1.4XLARGE32 | 16 | 32 | - | 8 | 3.5 | - | - |
S1.4XLARGE48 | 16 | 48 | - | 8 | 3.5 | - | - |
S1.4XLARGE64 | 16 | 64 | - | 8 | 3.5 | - | - |
S1.6XLARGE48 | 24 | 48 | - | 8 | 5.0 | - | - |
S1.8XLARGE64 | 32 | 64 | - | 8 | 7.0 | - | - |
S1.12XLARGE96 | 48 | 96 | - | 8 | 10.0 | - | - |
Note:
In the S1 instance list, "-" indicates that, for this specification, the send/receive packets and CPU clock rate are not guaranteed. If you have a strict performance requirement, please choose models with performance guarantee.
Memory Optimized Instance Family
This family features a large memory. It is well suited for memory-intensive operations, searches, and applications, such as high-performance databases and distributed in-memory caching.
MEM-optimized M8
The MEM-optimized M8 instance is the latest generation of memory-optimized instances. Based on a newly optimized virtualization platform, it is designed to deliver fast and stable performance for workloads processing large datasets in memory. It is the optimal choice for high memory computing applications.
Instance Features
The new generation of Tencent Cloud self-developed Star Lake two-way server is equipped with the Intel Emerald Rapids processor.
Offers a variety of processor to memory ratios, such as 1:8.
Purchases the same-size memory at the lowest price.
The network performance of instances corresponds to their specifications. Higher specifications result in stronger network forwarding performance and higher private network bandwidth limits.
Supports the configuration to disable or enable Hyper-Threading.
Supports burst bandwidth.
Note:
Burst bandwidth: The size of private network bandwidth is related to instance specifications, each having its own maximum private network bandwidth limit. In scenarios where network traffic surges within a short duration, Tencent Cloud servers offer burst bandwidth processing capabilities. For cloud servers that meet burst conditions, exceeding of the private network bandwidth limit for a short period is allowed, catering to customer business needs.
Supports Jumbo Frames
Note:
Jumbo frames: Tencent Cloud supports sending Ethernet frames with an 8500-byte payload. Using Jumbo frames can fully maximize network performance, making it suitable for storage scenarios and other high traffic situations, thereby enhancing transmission efficiency.
Use Cases
The MEM-optimized M8 instance is highly suitable for the following scenarios:
High-performance databases, distributed memory caching, and other applications that require extensive memory operations, searches, and computations.
Users who build their own Hadoop clusters or use Redis for gene computing purposes.
Scenarios with high demanding of network packet receive and send processing, such as video danmaku, live streaming, games, etc.
Instance Requirements
M8 instances can be used as monthly subscription instances as well as pay-as-you-go billing instances.
M8 instances can only be launched in a Virtual Private Cloud.
It is recommended to pair with the TencentOS Server operating system for optimal application performance of the instance.
Refer to the specifications below to see the sizes of M8 instances available for purchase. Ensure the size of the M8 instance you choose meets the minimum CPU and memory requirements of your operating system and application. In many use cases, operating systems with GUIs that consume a lot of memory and CPU resources (such as Windows) may need larger instance sizes. As your workload's memory and CPU needs increase over time, you can scale to higher configurations or choose other types of instances.
Depends on the support from the instance's operating system kernel version and runtime environment. When PPS exceeds 10 million and the bandwidth exceeds 50 Gbps, the kernel protocol stack can cause significant network performance loss. In such cases, the bandwidth values tested by netperf may not meet expectations. The DPDK method can be used to overcome the differences in the cloud server's kernel protocol stack, getting the instance's real network performance. For testing methods, see high-throughput network performance testing. |
M8.MEDIUM16 | 2 | 16 | 400,000 | 250,000 | 2 | 1.5/10 | 2 | 20,000 |
|
M8.LARGE32 | 4 | 32 | 800,000 | 250,000 | 4 | 2/10 | 2.5 | 30,000 | - |
M8.2XLARGE64 | 8 | 64 | 1,400,000 | 500,000 | 8 | 4/10 | 4 | 40,000 | - |
M8.4XLARGE128 | 16 | 128 | 3,200,000 | 1,100,000 | 16 | 9/10 | 6 | 60,000 | - |
M8.8XLARGE256 | 32 | 256 | 6,400,000 | 2,200,000 | 32 | 17/25 | 10 | 80,000 | - |
M8.16XLARGE512 | 64 | 512 | 12,800,000 | 4,500,000 | 48 | 34 | 20 | 125,000 | - |
MEM-optimized MA5
The MEM-optimized MA5 instance is the latest generation of memory-optimized instances. Based on a newly optimized virtualization platform, it is designed to deliver fast and stable performance for workloads processing large datasets in memory. It is the optimal choice for high memory computing applications.
Instance Features
The new generation of Tencent Cloud self-developed Star Lake two-way server is equipped with the AMD EPYC™ Bergamo processor.
Offers a variety of processor to memory ratios, such as 1:8.
Purchases the same-size memory at the lowest price.
The network performance of instances corresponds to their specifications. Higher specifications result in stronger network forwarding performance and higher private network bandwidth limits.
Supports the configuration to disable or enable Hyper-Threading.
Supports burst bandwidth.
Note:
Burst bandwidth: The size of private network bandwidth is related to instance specifications, each having its own maximum private network bandwidth limit. In scenarios where network traffic surges within a short duration, Tencent Cloud servers offer burst bandwidth processing capabilities. For cloud servers that meet burst conditions, exceeding of the private network bandwidth limit for a short period is allowed, catering to customer business needs.
Supports Jumbo Frames
Note:
Jumbo frames: Tencent Cloud supports sending Ethernet frames with an 8500-byte payload. Using Jumbo frames can fully maximize network performance, making it suitable for storage scenarios and other high traffic situations, thereby enhancing transmission efficiency.
Use Cases
The MEM-optimized MA5 instance is highly suitable for the following scenarios:
High-performance databases, distributed memory caching, and other applications that require extensive memory operations, searches, and computations.
Users who build their own Hadoop clusters or use Redis for gene computing purposes.
Scenarios with high demanding of network packet receive and send processing, such as video danmaku, live streaming, games, etc.
Instance Requirements
MA5 instances can be used as monthly subscription instances as well as pay-as-you-go billing instances.
MA5 instances can only be launched in a Virtual Private Cloud.
It is recommended to pair with the TencentOS Server operating system for optimal application performance of the instance.
Refer to the specifications below to see the sizes of MA5 instances available for purchase. Ensure the size of the MA5 instance you choose meets the minimum CPU and memory requirements of your operating system and application. In many use cases, operating systems with GUIs that consume a lot of memory and CPU resources (such as Windows) may need larger instance sizes. As your workload's memory and CPU needs increase over time, you can scale to higher configurations or choose other types of instances.
Dependent on the support of the operating system kernel version and the runtime environment.
|
MA5.LARGE32 | 4 | 32 | 300,000 | 250,000 | 4 | 1.5/10 | 1.5 | 15,000 | - |
MA5.2XLARGE64 | 8 | 64 | 700,000 | 250,000 | 8 | 3/10 | 2 | 20,000 | - |
MA5.4XLARGE128 | 16 | 128 | 1,400,000 | 500,000 | 16 | 5/10 | 2.5 | 30,000 | - |
MA5.8XLARGE256 | 32 | 256 | 2,800,000 | 1,000,000 | 32 | 10/25 | 3 | 40,000 | - |
MA5.16XLARGE512 | 64 | 512 | 5,600,000 | 2,000,000 | 48 | 20/25 | 4 | 50,000 | - |
MEM-optimized MA4
The MEM-optimized MA4 instance is the latest generation of memory-optimized instances. Based on a newly optimized virtualization platform, it is designed to deliver fast and stable performance for workloads processing large datasets in memory. It is the optimal choice for high memory computing applications.
Instance Features
The new generation of Tencent Cloud self-developed Star Lake two-way server is equipped with the AMD EPYC™ Genoa processor.
Offers a variety of processor to memory ratios, such as 1:8.
Purchases the same-size memory at the lowest price.
The network performance of instances corresponds to their specifications. Higher specifications result in stronger network forwarding performance and higher private network bandwidth limits.
Supports the configuration to disable or enable Hyper-Threading.
Use Cases
The MEM-optimized MA4 instance is highly suitable for the following scenarios:
High-performance databases, distributed memory caching, and other applications that require extensive memory operations, searches, and computations.
Users who build their own Hadoop clusters or use Redis for gene computing purposes.
Scenarios with high demanding of network packet receive and send processing, such as video danmaku, live streaming, games, etc.
Instance Requirements
MA4 instances can be used as monthly subscription instances as well as pay-as-you-go billing instances.
MA4 instances can only be launched in a Virtual Private Cloud.
It is recommended to pair with the TencentOS Server operating system for optimal application performance of the instance.
Refer to the specifications below to see the sizes of MA4 instances available for purchase. Ensure the size of the MA4 instance you choose meets the minimum CPU and memory requirements of your operating system and application. In many use cases, operating systems with GUIs that consume a lot of memory and CPU resources (such as Windows) may need larger instance sizes. As your workload's memory and CPU needs increase over time, you can scale to higher configurations or choose other types of instances.
Depends on the support from the instance's operating system kernel version and runtime environment. When PPS exceeds 10 million and the bandwidth exceeds 50 Gbps, the kernel protocol stack can cause significant network performance loss. In such cases, the bandwidth values tested by netperf may not meet expectations. The DPDK method can be used to overcome the differences in the cloud server's kernel protocol stack, getting the instance's real network performance. For testing methods, see high-throughput network performance testing. |
MA4.LARGE32 | 4 | 32 | 400,000 | 250,000 | 4 | 1.5 | 2 | 30,000 | - |
MA4.2XLARGE64 | 8 | 64 | 900,000 | 300,000 | 8 | 2 | 2.5 | 40,000 | - |
MA4.4XLARGE128 | 16 | 128 | 1,800,000 | 600,000 | 16 | 4 | 3 | 50,000 | - |
MA4.8XLARGE256 | 32 | 256 | 3,700,000 | 1,300,000 | 32 | 8 | 4 | 60,000 | - |
MA4.16XLARGE512 | 64 | 512 | 7,500,000 | 2,600,000 | 48 | 17 | 6 | 90,000 | - |
MEM-optimized MA3
The MEM-optimized MA3 instance is the latest generation of memory-optimized instances. Based on a newly optimized virtualization platform, it is designed to deliver fast and stable performance for workloads processing large datasets in memory. It is the optimal choice for high memory computing applications.
Instance Features
The new generation of Tencent Cloud self-developed Star Lake two-way server is equipped with the AMD EPYC™ Milan processor.
Offers a variety of processor to memory ratios, such as 1:8.
Purchases the same-size memory at the lowest price.
The network performance of instances corresponds to their specifications. Higher specifications result in stronger network forwarding performance and higher private network bandwidth limits.
Supports the configuration to disable or enable Hyper-Threading.
Use Cases
The MEM-optimized MA3 instance is highly suitable for the following scenarios:
High-performance databases, distributed memory caching, and other applications that require extensive memory operations, searches, and computations.
Users who build their own Hadoop clusters or use Redis for gene computing purposes.
Scenarios with high demanding of network packet receive and send processing, such as video danmaku, live streaming, games, etc.
Instance Requirements
MA3 instances can be used as monthly subscription instances as well as pay-as-you-go billing instances.
MA3 instances can only be launched in a Virtual Private Cloud.
It is recommended to pair with the TencentOS Server operating system for optimal application performance of the instance.
Refer to the specifications below to see the sizes of MA3 instances available for purchase. Ensure the size of the MA3 instance you choose meets the minimum CPU and memory requirements of your operating system and application. In many use cases, operating systems with GUIs that consume a lot of memory and CPU resources (such as Windows) may need larger instance sizes. As your workload's memory and CPU needs increase over time, you can scale to higher configurations or choose other types of instances.
|
MA3.SMALL8 | 1 | 8 | 250,000 | 1 | 1.5 | 2.55GHz | - |
MA3.MEDIUM16 | 2 | 16 | 300,000 | 2 | 1.5 | 2.55GHz | - |
MA3.LARGE32 | 4 | 32 | 500,000 | 4 | 2 | 2.55GHz | - |
MA3.2XLARGE64 | 8 | 64 | 800,000 | 8 | 4 | 2.55GHz | - |
MA3.4XLARGE128 | 16 | 128 | 1,500,000 | 16 | 7 | 2.55GHz | - |
MA3.8XLARGE256 | 32 | 256 | 2,500,000 | 32 | 14 | 2.55GHz | - |
Memory Optimized M6
As the latest generation of memory optimized instances, M6 instances are powered by an all-new optimized virtualization platform and designed to deliver fast and stable performance for workloads that process large data sets in memory. They are ideal for applications that require high in-memory computing performance.
Features
A new-generation Star Lake two-way server developed by Tencent Cloud, with the 3rd generation Intel® Xeon® scalable processor.
Intel® Xeon® Ice Lake processor, with a CPU clock rate of 2.7 GHz and a turbo frequency of 3.3 GHz.
Intel® Optane™ persistent memory for much better cloud database performance and significantly improved memory capacity and write performance.
CPU/RAM ratio 1:8.
Lowest price per GB of memory among instance types.
The network performance of an instance depends on its specification. A higher specification means a greater network forwarding performance and a higher private network bandwidth cap.
Use Cases
These instances are ideal for:
Applications that require memory-intensive operations, searches, and computations, such as high-performance databases and distributed in-memory caching.
External Hadoop clusters or Redis for fields such as computational genomics.
Scenarios that require sending and receiving massive network packets, such as video on-screen comments, live video broadcasting, and gaming.
Requirements
Supports pay-as-you-go.
Supports only VPC.
See below for available M6 specifications:
|
M6.SMALL8 | 1 | 8 | 250,000 | 250,000 | 1 | 1.5 | 2.7 GHz | - |
M6.MEDIUM16 | 2 | 16 | 300,000 | 250,000 | 2 | 2 | 2.7 GHz | - |
M6.LARGE32 | 4 | 32 | 600,000 | 500,000 | 4 | 4 | 2.7 GHz | - |
M6.2XLARGE64 | 8 | 64 | 1,200,000 | 1,000,000 | 8 | 7 | 2.7 GHz | - |
M6.4XLARGE128 | 16 | 128 | 2,500,000 | 2,000,000 | 16 | 13 | 2.7 GHz | - |
M6.8XLARGE256 | 32 | 256 | 5,000,000 | 4,000,000 | 32 | 26 | 2.7 GHz | - |
M6.16XLARGE512 | 64 | 512 | 10,000,000 | 8,000,000 | 48 | 52 | 2.7 GHz | - |
M6.31MEDIUM470 | 62 | 470 | 10,000,000 | 8,000,000 | 48 | 50 | 2.7 GHz | - |
M6.31XLARGE940 | 124 | 940 | 19,000,000 | 16,000,000 | 48 | 100 | 2.7 GHz | - |
Security-enhanced Memory Optimized M6ce
As the latest generation of memory optimized instances, M6ce instances are powered by an all-new optimized virtualization platform and designed to deliver fast and stable performance for workloads that process large data sets in memory. They are ideal for applications that require high in-memory computing performance.
Note:
This instance type is now only available to beta users. Contact your account manager to purchase it.
Features
A new-generation Star Lake two-way server developed by Tencent Cloud, with the 3rd generation Intel® Xeon® scalable processor.
Intel® Xeon® Ice Lake processor, with a CPU clock rate of 2.7 GHz and a turbo frequency of 3.3 GHz.
Intel® SGX encrypted computing, with a single instance containing up to 428 GB encrypted memory, ensuring the confidentiality and security of critical data and codes.
The processor-to-memory ratio is 1: 8. The encrypted memory accounts for about 50% of the memory.
Lowest price per GB of memory among instance types.
The network performance of an instance depends on its specification. A higher specification means a greater network forwarding performance and a higher private network bandwidth cap.
Use Cases
These instances are ideal for:
Data sharing and computing, protecting confidential data shared between different users or vendors.
Blockchain applications, enhancing the privacy and security of transactions and key storage, etc.
Scenarios with high security and reliability requirements, such as finance, government agencies, medical care, etc.
Confidential computing scenarios and data encryption applications.
Requirements
Supports pay-as-you-go.
Supports only VPC.
See below for available M6ce specifications:
Note:
If you use the key bound to hardware to encrypt data (such as SGX Sealing) in Intel SGX Enclave, you cannot decrypt the corresponding data once the host changes in the following scenarios. It is recommended that you back up data in the application layer to ensure the application reliability. Scenarios such as host failure, adjustment of instance types, no charges when shutdown, modification of instance placement group, etc., may lead to host changes.
|
M6ce.MEDIUM16 | 2 | 16 | 8 | 300,000 | 250,000 | 2 | 2 | 2.7/3.3GHz | - |
M6ce.LARGE32 | 4 | 32 | 16 | 600,000 | 500,000 | 4 | 4 | 2.7/3.3GHz | - |
M6ce.2XLARGE64 | 8 | 64 | 32 | 1,200,000 | 1,000,000 | 8 | 7 | 2.7/3.3GHz | - |
M6ce.4XLARGE128 | 16 | 128 | 64 | 2,500,000 | 2,000,000 | 16 | 13 | 2.7/3.3GHz | - |
M6ce.8XLARGE256 | 32 | 256 | 128 | 5,000,000 | 4,000,000 | 32 | 26 | 2.7/3.3GHz | - |
M6ce.31MEDIUM428 | 62 | 428 | 214 | 10,000,000 | 8,000,000 | 48 | 50 | 2.7/3.3GHz | - |
M6ce.31XLARGE856 | 124 | 856 | 428 | 19,000,000 | 8,000,000 | 48 | 100 | 2.7/3.3GHz | - |
Memory Optimized M5
As the latest generation of memory optimized instances, M5 instances are powered by an all-new optimized virtualization platform and designed to deliver fast and stable performance for workloads that process large data sets in memory. They are ideal for applications that require high in-memory computing performance.
Features
Intel® Xeon® Cascade Lake or Intel® Xeon® Cooper Lake processor, with a CPU clock rate of 2.5 GHz and turbo frequency of 3.1 GHz.
New Intel Advanced Vector Extension (AVX-512) instruction set.
CPU/RAM ratio 1:8.
Lowest price per GB of memory among instance types.
The network performance of an instance depends on its specification. A higher specification means a greater network forwarding performance and a higher private network bandwidth cap.
Supports the configuration to disable or enable Hyper-Threading.
Application Scenarios
These instances are ideal for:
Applications that require memory-intensive operations, searches, and computations, such as high-performance databases and distributed in-memory caching.
Self-built Hadoop clusters or Redis for fields such as computational genomics.
Scenarios that require massive send/receive packets, such as on-screen comments, live video broadcasting, and gaming.
Requirements
Supports pay-as-you-go.
Supports only VPC.
See below for available M5 specifications:
|
M5.SMALL8 | 1 | 8 | 250,000 | 250,000 | 1 | 1.5 | 2.5GHz | - |
M5.MEDIUM16 | 2 | 16 | 300,000 | 250,000 | 2 | 1.5 | 2.5GHz | - |
M5.LARGE32 | 4 | 32 | 500,000 | 250,000 | 2 | 1.5 | 2.5GHz | - |
M5.2XLARGE64 | 8 | 64 | 800,000 | 250,000 | 2 | 3.0 | 2.5GHz | - |
M5.3XLARGE96 | 12 | 96 | 1,000,000 | 250,000 | 3 | 5.0 | 2.5GHz | - |
M5.4XLARGE128 | 16 | 128 | 1,500,000 | 300,000 | 4 | 6.0 | 2.5GHz | - |
M5.8XLARGE256 | 32 | 256 | 2,500,000 | 600,000 | 8 | 12.0 | 2.5GHz | - |
M5.16XLARGE512 | 64 | 512 | 5,000,000 | 1,200,000 | 16 | 23.0 | 2.5GHz | - |
Memory Optimized MA2
As the latest generation of memory optimized instances, MA2 instances are powered by an all-new optimized virtualization platform and designed to deliver fast and stable performance for workloads that process large data sets in memory. They are ideal for applications that require high in-memory computing performance.
Features
Provides high performance with high reliability, security, and stability based on the Star Lake servers developed by Tencent Cloud.
Comes with AMD EPYC™ ROME processor, with a CPU clock rate of 2.6 GHz and turbo frequency of 3.3 GHz.
CPU/RAM ratio 1:8.
Lowest price per GB of memory among instance types.
The network performance of an instance depends on its specification. A higher specification means a greater network forwarding performance and a higher private network bandwidth cap.
Use Cases
Memory Optimized MA2 instances are applicable to the following scenarios:
Applications that require extensive memory operations, searches, and computing, such as high-performance databases and distributed memory caching.
External Hadoop clusters or Redis for fields such as computational genomics.
Scenarios that require sending and receiving massive network packets, such as video on-screen comments, live video broadcasting, and gaming.
Requirements
Supports pay-as-you-go.
Supports only VPC.
See below for available MA2 specifications:
|
MA2.SMALL8 | 1 | 8 | 250,000 | 250,000 | 1 | 1.5 | 2.6GHz | - |
MA2.LARGE32 | 4 | 32 | 500,000 | 250,000 | 4 | 1.5 | 2.6GHz | - |
MA2.2XLARGE64 | 8 | 64 | 700,000 | 250,000 | 8 | 1.5 | 2.6GHz | - |
MA2. 2XLARGE384 | 8 | 384 | 700,000 | 250,000 | 8 | 1.5 | 2.6GHz | - |
MA2.4 XLARGE128 | 16 | 128 | 1,000,000 | 300,000 | 16 | 3 | 2.6GHz | - |
MA2.8 XLARGE256 | 32 | 256 | 1,400,000 | 700,000 | 32 | 5 | 2.6GHz | - |
MA2.12XLARGE384 | 48 | 384 | 2,100,000 | 1,000,000 | 48 | 7 | 2.6GHz | - |
Memory Optimized M4
M4 instances are designed to deliver fast performance for workloads that process large data sets in memory. They are ideal for applications that require high in-memory computing performance.
As a new generation of memory optimized instances, M4 instances come with new Xeon® Skylake processors with the latest DDR4 memory. They are network optimized by default, offering a private network throughput up to 6,000,000 pps, and support for ultra-high private network bandwidth.
Application Scenarios
These instances are an ideal choice for:
Applications that require extensive memory operations, searches, and computations, such as high-performance databases and distributed memory caching.
Users who build their own Hadoop clusters or Redis to use in fields such as computational genomics.
Scenarios that require sending and receiving massive network packets, such as video on-screen comments, live video broadcasting, and gaming.
Features
2.4 GHz Intel® Xeon® Skylake 6148 processor, offering stable computing performance.
New Intel Advanced Vector Extension (AVX-512) instruction set.
The latest generation of 6-channel DDR4 memory with a bandwidth of 2,666 MT/s.
Higher specification, M4.16XLARGE512, offering 64 vCPUs and 512 GB memory.
Supported CPU/RAM ratios: 1:8 and 1:12.
Priced lower than any other memory-optimized instances with the same memory.
The network performance of an instance depends on its specification. A higher specification means a greater network forwarding performance and a higher private network bandwidth cap.
Requirements
Supports pay-as-you-go.
Supports only VPC.
See below for available M4 specifications:
|
M4.SMALL8 | 1 | 8 | 250,000 | 1 | 1.5 | 2.4GHz | - |
M4.MEDIUM16 | 2 | 16 | 300,000 | 2 | 1.5 | 2.4GHz | - |
M4.LARGE32 | 4 | 32 | 500,000 | 2 | 1.5 | 2.4GHz | - |
M4.2XLARGE64 | 8 | 64 | 800,000 | 2 | 3.0 | 2.4GHz | - |
M4.3XLARGE96 | 12 | 96 | 1,000,000 | 3 | 4.0 | 2.4GHz | - |
M4.3XLARGE144 | 12 | 144 | 1,000,000 | 3 | 4.0 | 2.4GHz | - |
M4.4XLARGE128 | 16 | 128 | 1,500,000 | 4 | 6.0 | 2.4GHz | - |
M4.4XLARGE192 | 16 | 192 | 1,500,000 | 4 | 6.0 | 2.4GHz | - |
M4.8XLARGE256 | 32 | 256 | 2,500,000 | 8 | 11.0 | 2.4GHz | - |
M4.8XLARGE384 | 32 | 384 | 2,500,000 | 8 | 11.0 | 2.4GHz | - |
M4.16XLARGE512 | 64 | 512 | 5,000,000 | 16 | 22.0 | 2.4GHz | - |
M4.18XLARGE648 | 72 | 648 | 6,000,000 | 16 | 24.0 | 2.4GHz | - |
Memory Optimized M3
M3 instances are designed to deliver fast performance for workloads that process large data sets in memory. They are ideal for applications that require high in-memory computing performance.
M3 instances are powered by new Intel® Xeon® Skylake processors with the latest DDR4 memory, and support up to 10 Gbps of private network bandwidth.
Application Scenarios
These instances are an ideal choice for:
Applications that require extensive memory operations, searches, and computations, such as high-performance databases and distributed memory caching.
Users who build their own Hadoop clusters or Redis to use in fields such as computational genomics.
Features
2.5 GHz Intel® Xeon® Skylake 6133 processor, offering stable computing performance.
The latest generation of 6-channel DDR4 memory with a bandwidth of 2,666 MT/sec.
Higher specification, M3.16XLARGE512, offering 64 vCPUs and 512 GB memory.
Supported CPU/RAM ratios: 1:8 and 1:12.
Priced lower than any other memory-optimized instances with the same memory.
The network performance of an instance depends on its specification. A higher specification means a greater network forwarding performance and a higher private network bandwidth cap.
Requirements
Supports pay-as-you-go.
Supports both classic network and VPC.
See below for available M3 specifications:
|
M3.SMALL8 | 1 | 8 | 300,000 | 1 | 1.5 | 2.5 GHz | - |
M3.MEDIUM16 | 2 | 16 | 400,000 | 2 | 1.5 | 2.5 GHz | - |
M3.LARGE32 | 4 | 32 | 800,000 | 4 | 1.5 | 2.5 GHz | - |
M3.2XLARGE64 | 8 | 64 | 1,200,000 | 8 | 1.5 | 2.5GHz | - |
M3.3XLARGE96 | 12 | 96 | 1,200,000 | 12 | 1.5 | 2.5 GHz | - |
M3.3XLARGE144 | 12 | 144 | 1,200,000 | 12 | 1.5 | 2.5 GHz | - |
M3.4XLARGE128 | 16 | 128 | 1,200,000 | 16 | 2.0 | 2.5 GHz | - |
M3.4XLARGE192 | 16 | 192 | 1,200,000 | 16 | 2.0 | 2.5 GHz | - |
M3.8XLARGE256 | 32 | 256 | 1,200,000 | 16 | 4.0 | 2.5 GHz | - |
M3.8XLARGE384 | 32 | 384 | 1,200,000 | 16 | 4.0 | 2.5 GHz | - |
M3.16XLARGE512 | 64 | 512 | 1,200,000 | 16 | 8.0 | 2.5 GHz | - |
Memory Optimized M2
M2 instances are designed to deliver fast performance for workloads that process large data sets in memory. They feature a large memory, making them ideal for applications that require high in-memory computing performance.
Application Scenarios
These instances are ideal for:
Applications that require extensive memory operations, searches, and computations, such as high-performance databases and distributed memory caching.
Users who build their own Hadoop clusters or Redis to use in fields such as computational genomics.
Features
2.4 GHz Intel® Xeon® E5-2680v4 processor with DDR4 memory.
Memory of up to 448 GB is available. The M2.14XLARGE448 model offers 56 vCPUs and 448 GB memory.
CPU/RAM ratio 1:8.
Priced lower than any other memory-optimized instances with the same memory.
Requirements
M2 instances are pay-as-you-go. They can also be used as production instances of memory optimized host HM20 in CDHs.
Supports only VPC.
See below for available M2 specifications:
|
M2.SMALL8 | 1 | 8 | 200,000 | 1 | 1.5 | 2.4 GHz | - |
M2.MEDIUM16 | 2 | 16 | 250,000 | 2 | 1.5 | 2.4 GHz | - |
M2.LARGE32 | 4 | 32 | 450,000 | 4 | 1.5 | 2.4 GHz | - |
M2.2XLARGE64 | 8 | 64 | 500,000 | 8 | 1.5 | 2.4 GHz | - |
M2.3XLARGE96 | 12 | 96 | 500,000 | 8 | 2.5 | 2.4 GHz | - |
M2.4XLARGE128 | 16 | 128 | 500,000 | 8 | 3.0 | 2.4 GHz | - |
M2.6XLARGE192 | 24 | 192 | 700,000 | 8 | 4.5 | 2.4GHz | - |
M2.8XLARGE256 | 32 | 256 | 700,000 | 8 | 6.0 | 2.4GHz | - |
M2.12XLARGE384 | 48 | 384 | 700,000 | 8 | 9.0 | 2.4GHz | - |
M2.14XLARGE448 | 56 | 448 | 700,000 | 8 | 10.0 | 2.4GHz | - |
Memory Optimized M1
M1 instances come with approximately 1:8 CPU to memory ratio. They are well suited for applications that require memory-intensive operations, searches, and computations, such as high-performance databases and distributed in-memory caching.
Features
2.3 GHz Intel Xeon® E5-2670 v3 processor with DDR3 memory, providing more instance sizes with stronger computing capacities.
Golden CPU to memory ratio for memory-intensive applications, satisfying the needs for large-scale business deployment.
Application Scenarios
These instances are ideal for:
Applications that require memory-intensive operations, searches, and computations, such as high-performance databases and distributed in-memory caching.
Self-built Hadoop clusters or Redis for fields such as computational genomics.
Requirements
Supports pay-as-you-go.
Supports both classic network and VPC.
In the M1 instance list, "-" indicates that, for this specification, the send/receive packets and CPU clock rate are not guaranteed. If you have a strict performance requirement, please choose models with performance guarantee.
See below for available M1 specifications:
|
M1.SMALL8 | 1 | 8 | - | 1 | 1.5 | 2.3GHz | - |
M1.MEDIUM16 | 2 | 16 | - | 2 | 1.5 | 2.3GHz | - |
M1.LARGE32 | 4 | 32 | - | 4 | 1.5 | 2.3GHz | - |
M1.2XLARGE64 | 8 | 64 | - | 8 | 2.0 | 2.3GHz | - |
M1.3XLARGE96 | 12 | 96 | - | 8 | 2.5 | 2.3GHz | - |
M1.4XLARGE128 | 16 | 128 | - | 8 | 3.5 | 2.3GHz | - |
M1.6XLARGE192 | 24 | 192 | - | 8 | 5.0 | 2.3GHz | - |
M1.8XLARGE256 | 32 | 256 | - | 8 | 7.0 | 2.3GHz | - |
M1.12XLARGE368 | 48 | 368 | - | 8 | 10.0 | 2.3GHz | - |
Note:
In the M1 instance list, "-" indicates that, for this specification, the send/receive packets and CPU clock rate are not guaranteed. If you have a strict performance requirement, please choose models with performance guarantee.
High I/O Family
This family features high random IOPS, high throughput and low latency, making it suitable for I/O-intensive applications that require high disk read/write performance and low latency, such as high-performance databases.
Note:
ITA5、IT3 and IT5 instances use local disk as the data disk, which may lose data (e.g., when the host crashes). If your application cannot guarantee data reliability, we recommend you choose an instance that can use cloud disks as the data disk.
High I/O ITA5
Note:
This instance specification family is in Beta Testing, and we welcome your suggestions and feedback.
High I/O Instance Family
The High I/O ITA5 Instance is the latest generation of high I/O instances designed specifically for I/O-intensive workloads. Based on NVMe SSD instance storage, it offers low latency, ultra-high IOPS, and high throughput storage resources at a lower cost. Suitable for high-performance relational databases, Elasticsearch, and other I/O-intensive services.
Instance Characteristics
The new generation of Tencent Cloud's self-developed StarSea dual-socket server, equipped with the AMD EPYC™ Bergamo processor.
Equipped with AMD EPYC™ Bergamo Processor, Turbo Boost up to 3.1GHz.
Instance network performance is matched to specifications; higher specifications enable stronger network forwarding performance and higher internal network bandwidth limits.
Utilizing NVMe SSD for instance storage, it provides low latency and ultra-high IOPS.
Application scenario
High-performance databases, NoSQL databases (e.g., MongoDB), clustered databases.
Online Transaction Processing (OLTP) systems, Elasticsearch search, and other I/O-intensive applications requiring low latency.
Instance Requirements
If the local hard disk is damaged, we support online disk replacement operations.
If a cloud server instance has already experienced downtime, we will inform you and proceed with maintenance operations.
An ITA5 instance not having monitoring components installed means the platform cannot monitor the instance as thoroughly. If the instance fails, normal notifications cannot be sent, Please activate cloud monitoring during purchasing.
ITA5 instances can be used as annual and monthly subscription instances and on-demand billing instances.
Only in Virtual Private Cloud can ITA5 instances be launched.
ITA5 instances do not support adjusting configuration or the 'shutdown not charged' feature.
ITA5 instances support purchasing configuration; please see the instance specifications below.
The instance supports up to 160G of network bandwidth, depending on the instance kernel version and running environment support. When pps exceeds 10 million and bandwidth is greater than 50Gbps, the kernel protocol stack causes significant network performance loss. In such cases, the bandwidth measured by netperf testing may not meet expectations. The DPDK method can be used to shield the differences of the cloud service kernel protocol stack, accessing the true network performance of the instance. For testing methods, please refer to High-throughput network performance testing. |
ITA5.4XLARGE64 | 16 | 64 | 1.4 million | 500,000 | 16 | 5/10 | 1 × 7140GB local NVMe SSD drive |
ITA5.8XLARGE128 | 32 | 128 | 2.8 million | 1 million | 32 | 10/25 | 2 × 7140GB local NVMe SSD drive |
ITA5.16XLARGE256 | 64 | 256 | 5.6 million | 2 million | 48 | 20/25 | 4 × 7140GB Local NVMe SSD drives |
ITA5.32XLARGE512 | 128 | 512 | 11.2 million | 4 million | 48 | 40/- | 8 × 7140GB Local NVMe SSD drives |
ITA5.64XLARGE1024 | 256 | 1024 | 22.5 million | 8 million | 48 | 80/- | 16 × 7140GB Local NVMe SSD drives |
ITA5.128XLARGE2304 | 512 | 2304 | 45 million | 16 million | 48 | 160/- | 24 × 7140GB Local NVMe SSD drives |
High I/O IT5
IT5 instances, based on NVMe SSD storage, are designed for I/O-intensive workloads. They come with storage resources featuring low latency, ultra-high IOPS and high throughput. They offer an IOPS of up to 2.05 million and a throughput of up to 11 GB/s, allowing for an ultra-high IOPS at a low cost. This instance type is suitable for I/O-intensive applications including high-performance relational databases, Elasticsearch, etc.
Application Scenarios
High-performance databases, NoSQL databases (e.g. MongoDB), and clustered databases.
I/O intensive applications that require low latency, such as online transaction processing (OLTP) systems, and Elasticsearch.
Features
2.5 GHz Intel® Xeon® Cascade Lake processor, offering stable computing performance.
The latest generation of 6-channel DDR4 memory.
Supports up to 23 Gbps of private network bandwidth to meet extremely high private network transmission requirements.
NVMe SSD is used for instance storage, offering low latency and ultra-high IOPS.
Up to 650,000 random read IOPS (block size of 4 KB), and up to 2.8 GB/s sequential read throughput (block size of 128 KB) for a single disk.
Up to 2.05 million random read IOPS (block size of 4 KB), and up to 11 GB/s sequential read throughput (block size of 128 KB) for a CVM.
Requirements
If the local disk is damaged, you will need to shut down the CVM instance for us to replace the local disk.
If the CVM instance crashes, we will notify you and perform fixes.
If Agent has not been installed, IT5 instances cannot be monitored. You will not receive a notification when the CVM instance fails, which is very risky. For more information about how to install Agent, see Installing CVM Agents. Supports pay-as-you-go.
Supports only VPC.
The configuration of IT5 instances cannot be changed.
See below for available IT5 specifications:
|
IT5.4XLARGE64 | 16 | 64 | 1,500,000 | 4 | 6 | 2.5GHz | 1 x 3570 GB local NVMe SSD |
IT5.8XLARGE128 | 32 | 128 | 2,500,000 | 8 | 12 | 2.5GHz | 2 x 3570 GB local NVMe SSDs |
IT5.16XLARGE256 | 64 | 256 | 5,000,000 | 16 | 23 | 2.5GHz | 4 x 3570 GB local NVMe SSDs |
High I/O IT3
IT3 instances, based on NVMe SSD storage, are designed for I/O-intensive workloads. They come with storage resources featuring low latency, ultra-high IOPS and high throughput. They offer an IOPS of up to 1.8 million and a throughput of up to 11 GB/s, allowing for an ultra-high IOPS at a low cost. This instance type is suitable for I/O-intensive applications including high-performance relational databases, Elasticsearch, etc.
IT3 instances feature inexpensive and intensive storage. They can provide each CPU core with higher IOPS and larger private network bandwidth.
Application Scenarios
High-performance databases, NoSQL databases (e.g. MongoDB), and clustered databases.
I/O intensive applications that require low latency, such as online transaction processing (OLTP) systems, and Elasticsearch.
Features
2.5 GHz Intel® Xeon® Skylake 6133 processor, offering stable computing performance.
The latest generation of 6-channel DDR4 memory.
Supports up to 23 Gbps of private network bandwidth to meet extremely high private network transmission requirements.
NVMe SSD is used for instance storage, offering low latency and ultra-high IOPS.
Up to 620,000 random read IOPS (block size of 4 KB), and up to 2.9 GB/s sequential read throughput (block size of 128 KB) for a single disk.
Up to 1.8 million random read IOPS (block size of 4 KB), and up to 11 GB/s sequential read throughput (block size of 128 KB) for a CVM.
Requirements
If the local disk is damaged, you will need to shut down the CVM instance for us to replace the local disk.
If the CVM instance crashes, we will notify you and perform fixes.
If Agent has not been installed, IT3 instances cannot be monitored. You will not receive a notification when the CVM instance fails, which is very risky. For more information about how to install Agent, see Installing CVM Agents. Supports pay-as-you-go.
Supports only VPC.
The configuration of IT3 instances cannot be changed.
See below for available IT3 specifications:
|
IT3.4XLARGE64 | 16 | 64 | 1,500,000 | 4 | 6 | 2.5GHz | 1 × 3720 GB local NVMe SSD |
IT3.8XLARGE128 | 32 | 128 | 2,500,000 | 8 | 12 | 2.5GHz | 2 × 3720 GB local NVMe SSDs |
IT3.16XLARGE256 | 64 | 256 | 5,000,000 | 16 | 23 | 2.5GHz | 4 × 3720 GB local NVMe SSDs |
Big Data Family
The big data family is equipped with massive storage resources, features high throughput, and is suitable for throughput-intensive applications such as Hadoop distributed computing, massive log processing, distributed file systems, and large data warehouses.
Note:
D3 and D2 instances use local disk as the data disk, which may lose data (e.g., when the host crashes). If your application cannot guarantee data reliability, we recommend you choose an instance that can use cloud disks as the data disk.
Big Data D3
As the latest generation of big data instances, D3 instances are equipped with massive storage resources, and carry up to 94 TB SATA HDD local storage, making them suitable for throughput-intensive services, such as Hadoop distributed computing and parallel data processing.
Application Scenarios
Distributed computing services such as Hadoop MapReduce/HDFS/Hive/HBase.
Business scenarios such as Elasticsearch, log processing, and large data warehouse.
Internet, finance, and industries that require big data computing and storage analysis, as well as applications that require massive data storage and computing.
Features
2.5 GHz Intel® Xeon® Cascade Lake processor with DDR4 memory.
Instances carry up to 24 local disks of 4 TB and up to 94 TB of HDD local storage.
At least 190 MB/s sequential read throughput performance for a single disk.
Millisecond read/write latency.
CPU/RAM ratio 1:4, tailored for the big data scenarios.
Requirements
If the local disk is damaged, you will need to shut down the CVM instance for us to replace the local disk.
We will notify you and perform fixes if the CVM instance crashes.
If Agent has not been installed, D3 instances cannot be monitored. You will not receive a notification when the CVM instance fails, which is very risky. For more information about how to install Agent, see Installing CVM Agents. Supports pay-as-you-go.
Supports only VPC.
The configuration of D3 instances cannot be changed.
See below for available D3 specifications:
|
D3.2XLARGE32 | 8 | 32 | 800,000 | 250,000 | 2 | 4.0 | 2.5GHz | 4 x 3720 GB local SATA HDDs |
D3.4XLARGE64 | 16 | 64 | 1,500,000 | 300,000 | 4 | 7.0 | 2.5 GHz | 8 x 3720 GB local SATA HDDs |
D3.8XLARGE128 | 32 | 128 | 2,500,000 | 600,000 | 8 | 14.0 | 2.5 GHz | 12 x 3720 GB local SATA HDDs |
D3.16XLARGE256 | 64 | 256 | 5,000,000 | 1,200,000 | 12 | 27.0 | 2.5GHz | 24 x 3720 GB local SATA HDDs |
D3.21XLARGE320 | 84 | 320 | 6,000,000 | 1,600,000 | 16 | 32.0 | 2.5 GHz | 24 x 3720 GB local SATA HDDs |
Big Data D2
D2 instances are equipped with massive storage resources, and carry up to 144 TB SATA HDD local storage, making them suitable for throughput-intensive services, such as Hadoop distributed computing and parallel data processing.
Application Scenarios
Distributed computing services such as Hadoop MapReduce/HDFS/Hive/HBase
Business scenarios such as Elasticsearch, log processing, and large data warehouse.
Internet, finance, and industries that require big data computing and storage analysis, as well as applications that require massive data storage and computing.
Features
2.4 GHz Intel® Xeon® Skylake 6148 processor with DDR4 memory.
Instances carry up to 12 local disks of 12 TB and up to 144 TB of HDD local storage
For a single disk, the sequential read throughput is 220+ MB/s and sequential write throughput is 220+ MB/s (128 KB block size and depth of 32)
For the CVM, the throughput can reach up to 2.8 GB/s (block size of 128 KB and queue depth of 32).
Read/write latency is as low as 2-5 ms
Higher specification, D2.19XLARGE320, offering 76 vCPUs and 320 GB of memory.
Local storage with a unit price as low as 1/10 of S2, making its total cost close to that of a self-built Hadoop clusters in IDC.
CPU/RAM ratio 1:4, tailored for the big data scenarios.
Requirements
If the local disk is damaged, you will need to shut down the CVM instance for us to replace the local disk.
If the CVM instance crashes, we will notify you and perform fixes.
Supports pay-as-you-go.
Supports only VPC.
The configuration of D2 instances cannot be changed.
See below for available D2 specifications:
|
D2.2XLARGE32 | 8 | 32 | 800,000 | 2 | 3.0 | 2.4GHz | 1 x 11176 GB local SATA HDD |
D2.4XLARGE64 | 16 | 64 | 1,500,000 | 4 | 6.0 | 2.4GHz | 2 x 11176 GB local SATA HDDs |
D2.6XLARGE96 | 24 | 96 | 2,000,000 | 6 | 8.0 | 2.4GHz | 3 x 11176 GB local SATA HDDs |
D2.8XLARGE128 | 32 | 128 | 2,500,000 | 8 | 11.0 | 2.4GHz | 4 x 11176 GB local SATA HDDs |
D2.16XLARGE256 | 64 | 256 | 5,000,000 | 16 | 22.0 | 2.4GHz | 8 x 11176 GB local SATA HDDs |
D2.19XLARGE320 | 76 | 320 | 6,000,000 | 16 | 25.0 | 2.4GHz | 12 x 11176 GB local SATA HDDs |
Computing Instance Family
This family provides the highest single-core computing performance with a turbo frequency up to 3.8 GHz. It is suitable for compute-intensive applications such as batch processing, high performance computing, and dedicated game servers.
Compute Optimized C6
As the latest generation of computing instances, C6 instances are powered by an all-new virtualization platform and provide stable and reliable high-performance computing services for greater bandwidth and lower latency. These instances have the most powerful processors and the best cost performance among CVMs. They are ideal for applications that require high computing performance and high-concurrence reads/writes.
C6 instances come with new Intel® Xeon® processors, and support up to 100 Gbps of private network bandwidth.
Note:
This instance type is now only available to beta users. Contact your account manager to purchase it.
Features
A new-generation Star Lake two-way server developed by Tencent Cloud, with the 3rd generation Intel® Xeon® scalable processor.
Intel® Xeon® Ice Lake processor, with a CPU clock rate of 3.2 GHz and a turbo frequency of 3.5 GHz.
Supported CPU/RAM ratios: 1:2 and 1:4.
Supports up to 100 Gbps of private network bandwidth, providing ultra-high packet throughput to meet high private network transmission requirements.
Supports all kinds of cloud disks.
Supports the configuration to disable or enable Hyper-Threading.
Use Cases
Compute Optimized C6 instances are applicable to the following scenarios:
Batch processing workloads and high performance computing (HPC).
High-traffic Web frontend server.
Other compute-intensive services such as massively multiplayer online (MMO) game servers.
Requirements
Supports pay-as-you-go.
Supports only VPC.
See below for available C6 specifications:
|
C6.LARGE8 | 4 | 8 | 800,000 | 600,000 | 4 | 5 | 3.2 GHz | - |
C6.LARGE16 | 4 | 16 | 800,000 | 600,000 | 4 | 5 | 3.2 GHz | - |
C6.2XLARGE16 | 8 | 16 | 1,600,000 | 1,300,000 | 8 | 9 | 3.2 GHz | - |
C6.2XLARGE32 | 8 | 32 | 1,600,000 | 1,300,000 | 8 | 9 | 3.2 GHz | - |
C6.4XLARGE32 | 16 | 32 | 3,300,000 | 2,700,000 | 16 | 18 | 3.2 GHz | - |
C6.4XLARGE64 | 16 | 64 | 3,300,000 | 2,700,000 | 16 | 18 | 3.2 GHz | - |
C6.8XLARGE128 | 32 | 128 | 6,600,000 | 5,500,000 | 32 | 35 | 3.2 GHz | - |
C6.23MEDIUM216 | 46 | 216 | 9,500,000 | 8,000,000 | 46 | 50 | 3.2 GHz | - |
C6.16XLARGE256 | 64 | 256 | 13,000,000 | 11,000,000 | 48 | 70 | 3.2 GHz | - |
C6.20XLARGE320 | 80 | 320 | 16,000,000 | 13,900,000 | 48 | 87 | 3.2 GHz | - |
C6.23XLARGE432 | 92 | 432 | 19,000,000 | 16,000,000 | 48 | 100 | 3.2 GHz | - |
Compute Optimized C5
As the latest generation of computing instances, C5 instances are powered by an all-new virtualization platform to provide stable and reliable high-performance computing services for greater bandwidth and lower latency. These instances have the most powerful processors and the best cost performance among CVMs. They are ideal for applications that require high computing performance and high-concurrence reads/writes.
C5 instances come with the latest Xeon® Cooper Lake processors.
Note:
This instance type is now only available to beta users. Contact your account manager to purchase it.
Features
Intel® Xeon® Cooper Lake processor, with a base frequency of 3.4 GHz and turbo frequency of 3.8 GHz.
New Intel Brain Floating Point 16-bit (blfoat16) instruction set.
Supported CPU/RAM ratios: 1:2 and 1:4.
The network performance of an instance depends on its specification. A higher specification means a greater network forwarding performance and a higher private network bandwidth cap.
Supports all kinds of cloud disks.
Supports the configuration to disable or enable Hyper-Threading.
Application Scenarios
These instances are ideal for:
Batch processing workloads and high performance computing (HPC).
High-traffic Web frontend server.
Other compute-intensive services such as massively multiplayer online (MMO) game servers.
Requirements
Supports pay-as-you-go.
Supports both classic network and VPC.
See below for available C5 specifications:
|
C5.LARGE8 | 4 | 8 | 500,000 | 250,000 | 4 | 1.5 | 3.4GHz | - |
C5.LARGE16 | 4 | 16 | 500,000 | 250,000 | 4 | 1.5 | 3.4GHz | - |
C5.2XLARGE16 | 8 | 16 | 800,000 | 250,000 | 8 | 3.0 | 3.4GHz | - |
C5.2XLARGE32 | 8 | 32 | 800,000 | 250,000 | 8 | 3.0 | 3.4GHz | - |
C5.4XLARGE32 | 16 | 32 | 1,500,000 | 300,000 | 8 | 6.0 | 3.4GHz | - |
C5.4XLARGE64 | 16 | 64 | 1,500,000 | 300,000 | 8 | 6.0 | 3.4GHz | - |
C5.8XLARGE64 | 32 | 64 | 2,500,000 | 600,000 | 16 | 12.0 | 3.4GHz | - |
C5.8XLARGE128 | 32 | 128 | 2,500,000 | 600,000 | 16 | 12.0 | 3.4GHz | - |
C5.12XLARGE96 | 48 | 96 | 4,000,000 | 900,000 | 24 | 18.0 | 3.4GHz | - |
C5.12XLARGE192 | 48 | 192 | 4,000,000 | 900,000 | 24 | 18.0 | 3.4GHz | - |
C5.13XLARGE184 | 52 | 184 | 4,000,000 | 1,000,000 | 32 | 19.0 | 3.4GHz | - |
C5.16XLARGE256 | 64 | 256 | 5,000,000 | 1,200,000 | 32 | 24.0 | 3.4GHz | - |
C5.26XLARGE368 | 104 | 368 | 6,000,000 | 2,000,000 | 32 | 36.0 | 3.4GHz | - |
Compute Optimized C4
C4 instances have up to 25 Gbps of private network bandwidth for greater bandwidth and lower latency. These instances have the most powerful processors and the best cost performance among CVMs. They are ideal for applications that require high computing performance and high-concurrence reads/writes.
C4 instances are equipped with the latest Xeon® Cascade Lake processors, and support up to 25 Gbps of private network bandwidth.
Use Cases
These instances are an ideal choice for:
Batch processing workloads and high performance computing (HPC).
High-traffic Web frontend server.
Other compute-intensive services such as massively multiplayer online (MMO) game servers.
Features
3.2 GHz Intel® Xeon® Cascade Lake processor, with a turbo frequency 3.7 GHz.
New Intel Advanced Vector Extension (AVX-512) instruction set.
Supports up to 25 Gbps of private network bandwidth to meet extremely high private network transmission requirements.
Supported CPU/RAM ratios: 1:2 and 1:4.
The network performance of an instance depends on its specification. A higher specification means a greater network forwarding performance and a higher private network bandwidth cap.
Supports all kinds of cloud disks.
Supports the configuration to disable or enable Hyper-Threading.
Requirements
Supports pay-as-you-go.
Supports both classic network and VPC.
See below for available C4 specifications:
|
C4.LARGE8 | 4 | 8 | 600,000 | 4 | 2.0 | 3.2GHz | - |
C4.LARGE16 | 4 | 16 | 600,000 | 4 | 2.0 | 3.2GHz | - |
C4.2XLARGE16 | 8 | 16 | 1,000,000 | 8 | 4.0 | 3.2GHz | - |
C4.2XLARGE32 | 8 | 32 | 1,000,000 | 8 | 4.0 | 3.2GHz | - |
C4.4XLARGE64 | 16 | 64 | 1,000,000 | 16 | 7.0 | 3.2GHz | - |
C4.8XLARGE174 | 32 | 174 | 1,000,000 | 16 | 13.0 | 3.2GHz | - |
C4.16XLARGE348 | 64 | 348 | 1,000,000 | 16 | 25.0 | 3.2GHz | - |
Compute Network-optimized CN3
CN3 instances have up to 25 Gbps of private network bandwidth for greater bandwidth and lower latency. These instances have the most powerful processors and the best cost performance among CVMs. They are ideal for applications that require high computing performance and high-concurrence reads/writes.
Compute CN3 instances are equipped with the new Xeon® Skylake processors and support up to 25 Gbps of private network bandwidth, which is 2.5 times greater than Compute C3.
Application Scenarios
These instances are an ideal choice for:
Batch processing workloads and high performance computing (HPC)
High-traffic Web frontend server
Other compute-intensive services such as massively multiplayer online (MMO) game servers
Features
3.2 GHz Intel Xeon® Skylake 6146 processors
New Intel Advanced Vector Extension (AVX-512) instruction set
Supports up to 25 Gbps of private network bandwidth to meet extremely high private network transmission requirements
The latest generation of 6-channel DDR4 memory with a memory bandwidth of 2,666 MT/s.
Supported CPU/RAM ratios: 1:2 and 1:4
The network performance of an instance depends on its specification. A higher specification means a greater network forwarding performance and a higher private network bandwidth cap.
Support all types of cloud disks
Requirements
Supports pay-as-you-go.
Supports both classic network and VPC.
See below for available CN3 specifications:
|
CN3.LARGE8 | 4 | 8 | 600,000 | 4 | 3.0 | 3.2 GHz | - |
CN3.LARGE16 | 4 | 16 | 600,000 | 4 | 3.0 | 3.2 GHz | - |
CN3.2XLARGE16 | 8 | 16 | 1,000,000 | 8 | 5.0 | 3.2 GHz | - |
CN3.2XLARGE32 | 8 | 32 | 1,000,000 | 8 | 5.0 | 3.2 GHz | - |
CN3.4XLARGE32 | 16 | 32 | 1,000,000 | 16 | 9.0 | 3.2 GHz | - |
CN3.4XLARGE64 | 16 | 64 | 1,000,000 | 16 | 9.0 | 3.2 GHz | - |
CN3.8XLARGE64 | 32 | 64 | 1,000,000 | 16 | 17.0 | 3.2 GHz | - |
CN3.8XLARGE128 | 32 | 128 | 1,000,000 | 16 | 17.0 | 3.2 GHz | - |
CN3.12XLARGE160 | 48 | 160 | 1,000,000 | 16 | 25.0 | 3.2 GHz | - |
Compute C3
C3 instances have the most powerful processors and the best cost performance among CVMs. They are ideal for applications that require high computing performance and high-concurrence reads/writes.
Compute C3 instances are equipped with the latest Xeon® Skylake processors with the latest DDR4 memory and support for higher private network bandwidth.
Application Scenarios
These instances are an ideal choice for:
Batch processing workloads and high performance computing (HPC).
High-traffic Web frontend server.
Other compute-intensive services such as massively multiplayer online (MMO) game servers.
Features
3.2 GHz Intel Xeon® Skylake 6146 processors.
New Intel Advanced Vector Extension (AVX-512) instruction set.
The latest generation of 6-channel DDR4 memory with a memory bandwidth of 2,666 MT/s.
Supported CPU/RAM ratios: 1:2 and 1:4.
The network performance of an instance depends on its specification. A higher specification means a greater network forwarding performance and a higher private network bandwidth cap.
Support all types of cloud disks.
Requirements
Supports pay-as-you-go.
Supports both classic network and VPC.
See below for available C3 specifications:
|
C3.LARGE8 | 4 | 8 | 600,000 | 2 | 2.5 | 3.2 GHz | - |
C3.LARGE16 | 4 | 16 | 600,000 | 2 | 2.5 | 3.2 GHz | - |
C3.2XLARGE16 | 8 | 16 | 1,000,000 | 2 | 3.0 | 3.2 GHz | - |
C3.2XLARGE32 | 8 | 32 | 1,000,000 | 2 | 3.0 | 3.2 GHz | - |
C3.4XLARGE32 | 16 | 32 | 1,000,000 | 4 | 4.5 | 3.2 GHz | - |
C3.4XLARGE64 | 16 | 64 | 1,000,000 | 4 | 4.5 | 3.2 GHz | - |
C3.8XLARGE64 | 32 | 64 | 1,000,000 | 8 | 8.0 | 3.2 GHz | - |
C3.8XLARGE128 | 32 | 128 | 1,000,000 | 8 | 8.0 | 3.2 GHz | - |
Compute C2
C2 instances are optimized with high-performance processors and deliver high cost performance. They are ideal for applications that require high computing performance and high-concurrence reads/writes.
Application Scenarios
These instances are an ideal choice for:
Batch processing workloads.
High-traffic Web servers, massively multiplayer online (MMO) game servers.
High-performance computing (HPC) and other compute-intensive applications.
Features
3.2 GHz Intel Xeon® E5-2667v4 processors with up to 3.6 GHz of turbo frequency; DDR4 memory.
Supported CPU/RAM ratios: 1:2 and 1:4.
The network performance of an instance depends on its specification. A higher specification means a greater network forwarding performance and a higher private network bandwidth cap.
Support all types of cloud disks.
Requirements
C2 instances are pay-as-you-go, and can also be used as production instances of computing host HC20 in CDHs.
Supports both classic network and VPC.
See below for available C2 specifications:
|
C2.LARGE8 | 4 | 8 | 550,000 | 4 | 2.5 | 3.2 GHz | - |
C2.LARGE16 | 4 | 16 | 550,000 | 4 | 2.5 | 3.2 GHz | - |
C2.LARGE32 | 4 | 32 | 550,000 | 4 | 2.5 | 3.2 GHz | - |
C2.2XLARGE16 | 8 | 16 | 550,000 | 8 | 3.5 | 3.2 GHz | - |
C2.2XLARGE32 | 8 | 32 | 550,000 | 8 | 3.5 | 3.2 GHz | - |
C2.4XLARGE32 | 16 | 32 | 850,000 | 8 | 6.0 | 3.2 GHz | - |
C2.4XLARGE64 | 16 | 64 | 850,000 | 8 | 6.0 | 3.2 GHz | - |
C2.8XLARGE96 | 32 | 96 | 850,000 | 8 | 10.0 | 3.2 GHz | - |
BeFast Instance Family
BeFast 1
BeFast 1 instances are of high performance-cost ratio and customized for small and medium-sized businesses. They can provide cost-effective, balanced and stable computing, memory and network resources. This instance family uses Tencent Cloud's intelligent scheduling algorithm for dynamic resource management, continuously providing stable computing power and ensuring resource supply for applications. It supports processor-to-memory ratios of 1:1, 1:2, and 1:4.
BeFast 1 instances offer the same user experience, computing power assurance, resource supply, and service support as standard instances. The underlying layer is adaptive to multiple generations of servers. The benchmark vCPU computing power is on par with that of the 5th-generation enterprise-level instances (such as S5, SA2), and the maximum vCPU computing power is on par with that of the latest generation of enterprise-level instances. They are suitable for business scenarios compatible with different CPU models.
Application Scenarios
BeFast 1 instances are quite suitable for the following scenarios:
Small and medium-sized enterprise-level applications.
Small and medium-sized database systems, caches, search clusters.
Computing clusters, and memory-dependent data processing.
Features
Cost-effective, with the lowest unit price among all other families of instances in specification comparison.
CPU clock rate is not less than 2.25 GHz. CPU/RAM ratio supports 1:1/1:2/1:4.
The network performance of instances corresponds to their specifications. Higher specifications result in stronger network forwarding performance and higher private network bandwidth limits.
Note:
Instances of this family are randomly deployed on different processor platforms. During the lifecycle of an instance, it may be migrated to another processor platform. Since there are clear performance differences among businesses across different platforms, it is recommended that you purchase standard instances if you have strong needs for business consistency, .
Requirements
BeFast 1 instances support monthly subscription and pay-as-you-go.
BeFast 1 instances can only be launched in VPCs.
It is recommended to pair with the TencentOS Server operating system for optimal application performance of the instance.
See the specifications below to learn the sizes of BeFast 1 instances available for purchase. Ensure the size of the BeFast 1 instance you choose meets the minimum CPU and memory requirements of your operating system and applications. In many cases, GUI operating system (such as Windows) that consumes extensive memory and CPU resources may need higher specifications. As the needs of your workload for memory and CPU increase, you can choose higher specifications or other instance types.
|
BF1.MEDIUM2 | 2 | 2 | 250,000 or more | 250,000 or more | 2 | 1.5 or higher | - |
BF1.MEDIUM4 | 2 | 4 | 250,000 or more | 250,000 or more | 2 | 1.5 or higher | - |
BF1.MEDIUM8 | 2 | 8 | 250,000 or more | 250,000 or more | 2 | 1.5 or higher | - |
BF1.LARGE4 | 4 | 4 | 300,000 or more | 250,000 or more | 2 | 1.5 or higher | - |
BF1.LARGE8 | 4 | 8 | 300,000 or more | 250,000 or more | 2 | 1.5 or higher | - |
BF1.LARGE16 | 4 | 16 | 300,000 or more | 250,000 or more | 2 | 1.5 or higher | - |
BF1.2XLARGE8 | 8 | 8 | 600,000 or more | 250,000 or more | 2 | 1.5 or higher | - |
BF1.2XLARGE16 | 8 | 16 | 600,000 or more | 250,000 or more | 2 | 1.5 or higher | - |
BF1.2XLARGE32 | 8 | 32 | 600,000 or more | 250,000 or more | 2 | 1.5 or higher | - |
BF1.4XLARGE16 | 16 | 16 | 1.3 million or more | 500,000 or more | 4 | 3 or higher | - |
BF1.4XLARGE32 | 16 | 32 | 1.3 million or more | 500,000 or more | 4 | 3 or higher | - |
BF1.4XLARGE64 | 16 | 64 | 1.3 million or more | 500,000 or more | 4 | 3 or higher | - |
BF1.8XLARGE64 | 32 | 64 | 2.6 million or more | 1 million or more | 8 | 5 or higher | - |
BF1.8XLARGE128 | 32 | 128 | 2.6 million or more | 1 million or more | 8 | 5 or higher | - |
BF1.12XLARGE96 | 48 | 96 | 3.9 million or more | 1.5 million or more | 12 | 7 or higher | - |
BF1.12XLARGE192 | 48 | 192 | 3.9 million or more | 1.5 million or more | 12 | 7 or higher | - |
BF1.16XLARGE128 | 64 | 128 | 5.2 million or more | 2 million or more | 16 | 9 or higher | - |
BF1.16XLARGE256 | 64 | 256 | 5.2 million or more | 2 million or more | 16 | 9 or higher | - |
Heterogeneous Computing Instance Family
This family is equipped with heterogeneous hardware such as GPU and FPGA to deliver real-time, fast parallel computing and floating-point computing capabilities. It is suitable for high-performance applications such as deep learning, scientific computing, video encoding/decoding, and graphics workstations.
The AMD GPU instances use AMD FirePro S7150 to provide outstanding graphics processing capability. It is the best choice for applications such as remote desktop, 3D rendering, and cloud gaming.
NVIDIA GPU instances use NVIDIA Tesla GPUs, including the previous generation M40, the current mainstream choice P4/P40, and the latest generation V100, to provide excellent general-purpose computing capability, making this the top choice for applications such as deep learning training/reasoning and scientific computing. NVIDIA GPU Instances >