Overview
The image hosting service provides various features such as image storage, processing, and distribution to sustain countless blog sites and community forums worldwide on the backend. COS is a distributed storage service launched by Tencent Cloud to store massive numbers of files, with higher performance and reliability guaranteed. You can use COS to set up an image hosting service.
The strengths of COS in the image hosting scenarios include:
Low costs: The unit price of storage is low, and you only need to pay for what you use.
Unrestricted speed: Upload and download speeds are not restricted, so users no longer need to wait for slow loading, enjoying a better access experience.
High availability: COS offers an SLA for high availability, where stored data has a guaranteed durability of up to 99.9999999999%.
Unlimited capacity: COS stores high numbers of files in a distributed manner for on-demand capacity use.
Practice Scenario
Scenario 1: Adding images to set up an image hosting service with COS
The following tools are used in this scenario:
PicGo: A tool that supports multiple cloud storage configurations and quickly generates image URLs.
Typora: A lightweight Markdown file editor that supports multiple output formats and allows you to quickly upload local images to an image hosting service.
Directions
1. Install PicGo and set relevant COS parameters.
Note:
PicGo 2.3.1 is used in this scenario. Note that the configuration process may vary by version.
After downloading PicGo from PicGo website and installing it, find Tencent Cloud COS in the image hosting service settings and configure the following parameters: Choose COS version: Select COS v5.
Set Secretld: A developer-owned secret ID used for the project. It can be created and obtained at Manage API Key. Set SecretKey: A developer-owned secret key used for the project. It can be obtained at Manage API Key. Set Bucket: It is a bucket, i.e., a container used for data storage. For more information, see Bucket Overview. Set AppId: It is a unique user-level resource identifier for COS access, which can be obtained on the Manage API Key page. Set Storage Region: It is the region information of the bucket. For enumerated values such as ap-beijing, ap-hongkong, and eu-frankfurt, see Regions and Access Endpoints. Set Storage Path: It is the path where the image is stored in the COS bucket.
Set Custom URL: This parameter is optional. If you have configured a custom origin domain name for the storage space specified above, you can enter it here. For more information, see Enabling Custom Origin Domains. Set URL Suffix: Add a COS data processing parameter to the URL suffix to implement image compression, cropping, format conversion, and other operations. For more information, see Image Processing. 2. Configure Typora (optional).
Note:
If your editing requirement does not involve Markdown, you can skip this step and just use the PicGo tool installed in the previous step as the image hosting tool.
Configure as follows:
1. In Image of Typora's preferences, configure the following:
Select Upload image for When Insert....
In Image Upload Settings, select PicGo.app and set the location of PicGo.exe you just installed.
2. Restart Typora for the settings to take effect.
3. Enter the Typora editor area, drag and drop or paste an image directly to upload it and automatically replace it with a COS file URL. (If it is not automatically replaced with a COS URL after pasting, check whether the server in PicGo is enabled.)
Scenario 2: Quickly migrating images in an image hosting repository to COS
Taking an image hosting service as an example, you can find the local image hosting folder, or download the entire folder from the internet, and then transfer all the images in the folder to a COS bucket. Then, uniformly replace the URL domain name to restore the website.
Directions
Step 1. Download images in the original image hosting service
Log in to the original image hosting website and download the previously uploaded image folder.
Step 2. Create a COS bucket and set up hotlink protection
1. Sign up for a Tencent Cloud account and create a bucket with access permissions of public read/private write as instructed in Creating a Bucket. 2. After the bucket is created, enable hotlink protection in the bucket as instructed in Setting Hotlink Protection to avoid images from being hotlinked. Step 3. Upload the folder to the bucket
In the COS bucket you just created, click Upload Folder to upload the prepared image folder to the bucket.
Note:
If the number of images is high, you can also use COSBrowser to upload images quickly. Step 4. Globally replace the domain name
On the bucket overview page in the COS console, copy the default domain name of the bucket (you can also associate a custom CDN acceleration domain name). Then, use a common code editor to search for and replace the invalid URL prefix globally with the default domain name of the COS bucket.
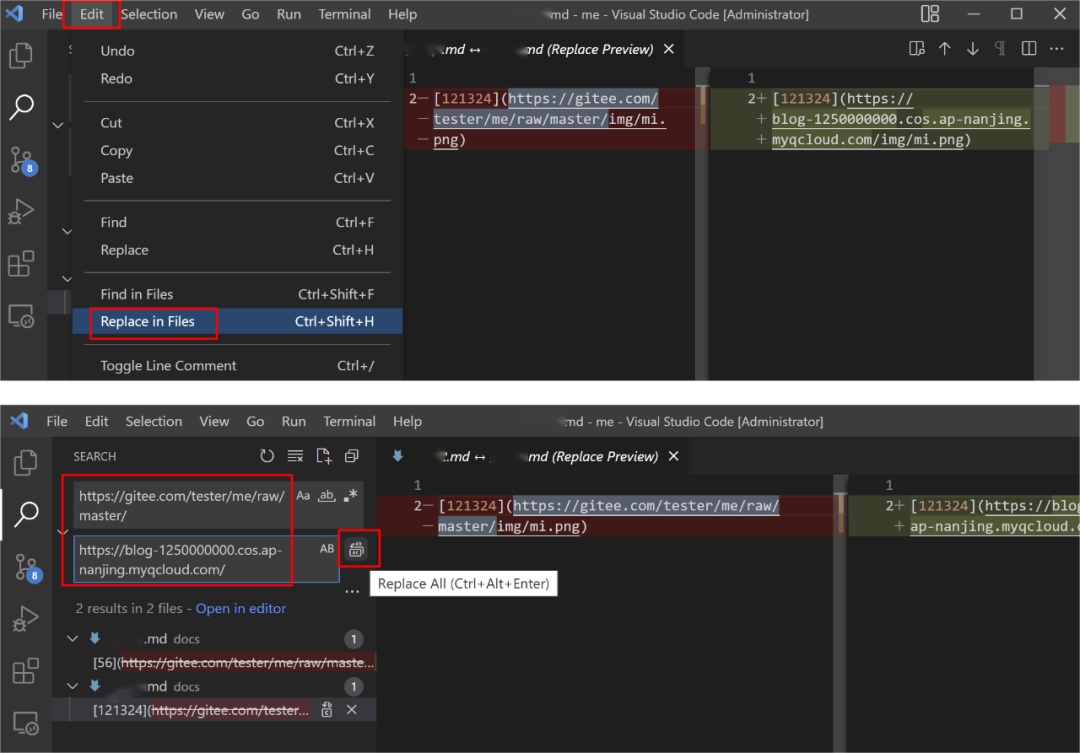
Example search-and-replace with Visual Studio Code:
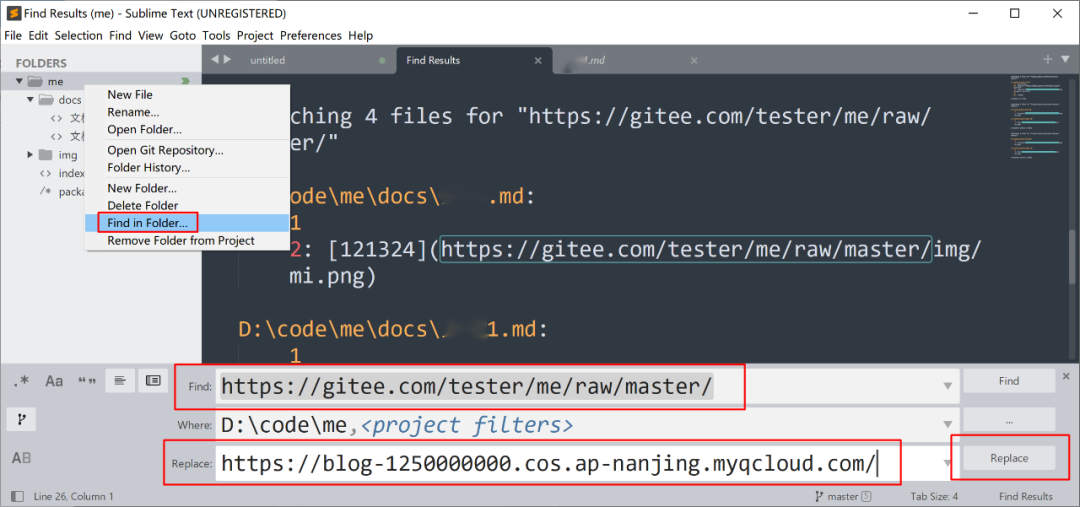
Example search-and-replace with Sublime Text: