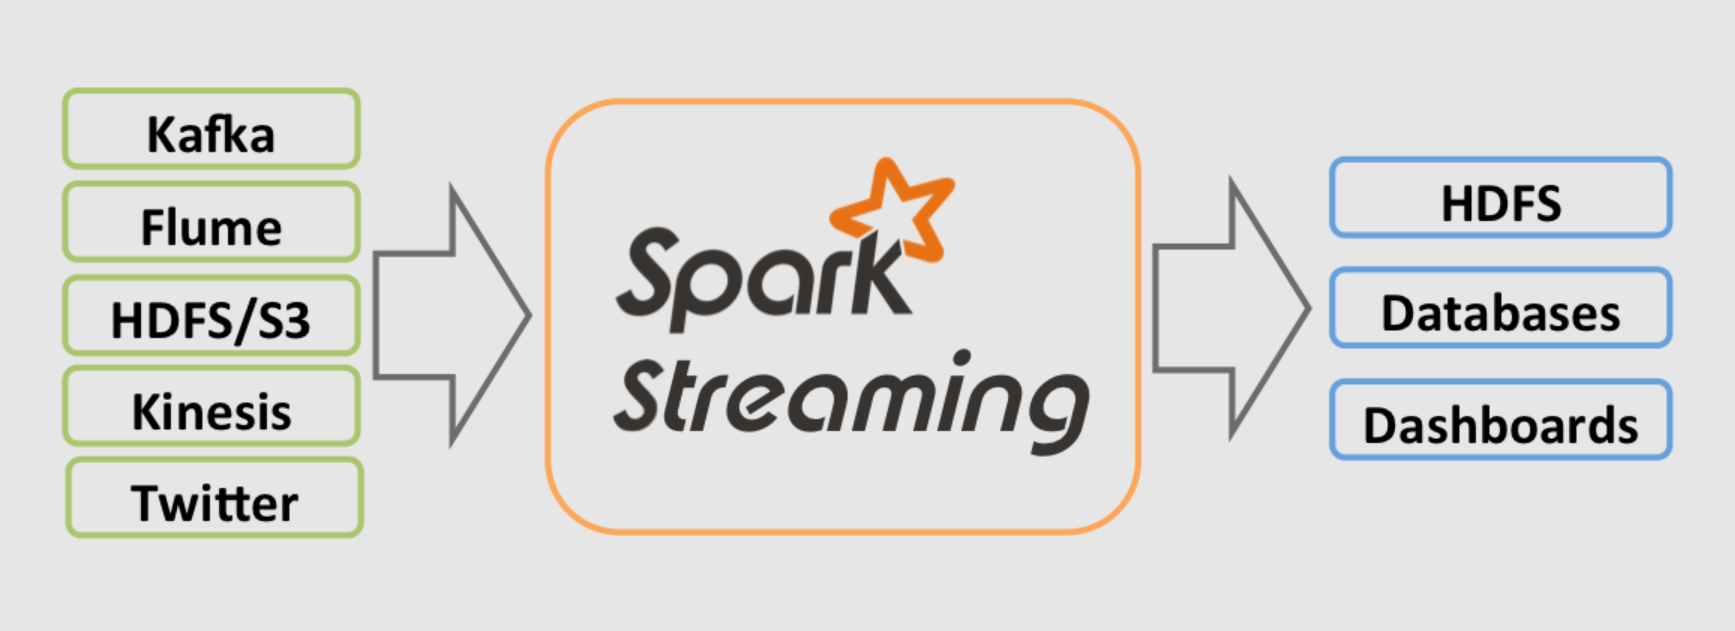
Accessing CKafka via Spark Streaming
Kafka Version | spark-streaming-kafka-0.8 | spark-streaming-kafka-0.10 |
Broker Version | 0.8.2.1 or higher | 0.10.0 or higher |
Api Maturity | Deprecated | Stable |
Language Support | Scala, Java, and Python | Scala and Java |
Receiver DStream | Yes | No |
Direct DStream | Yes | Yes |
SSL / TLS Support | No | Yes |
Offset Commit Api | No | Yes |
Dynamic Topic Subscription | No | Yes |
Operation Steps
Step 1: Obtaining the CKafka Instance Access Address
Step 2: Creating a Topic

Step 3: Preparing the CVM Environment
package | version |
sbt | 0.13.16 |
Hadoop | 2.7.3 |
Spark | 2.1.0 |
protobuf | 2.5.0 |
ssh | Installed on CentOS by default |
Java | 1.8 |
Step 4: Connecting to CKafka
build.sbt:name := "Producer Example"version := "1.0"scalaVersion := "2.11.8"libraryDependencies += "org.apache.kafka" % "kafka-clients" % "0.10.2.1"
producer_example.scala:import java.util.Propertiesimport org.apache.kafka.clients.producer._object ProducerExample extends App {val props = new Properties()props.put("bootstrap.servers", "172.16.16.12:9092") //Private IP address and port in the instance information.props.put("key.serializer", "org.apache.kafka.common.serialization.StringSerializer")props.put("value.serializer", "org.apache.kafka.common.serialization.StringSerializer")val producer = new KafkaProducer[String, String](props)val TOPIC="test" //Specify the topic to be produced.for(i<- 1 to 50){val record = new ProducerRecord(TOPIC, "key", s"hello $i") //Produce a message with the key being key and the value being hello i.producer.send(record)}val record = new ProducerRecord(TOPIC, "key", "the end "+new java.util.Date)producer.send(record)producer.close() //Disconnect at the end.}
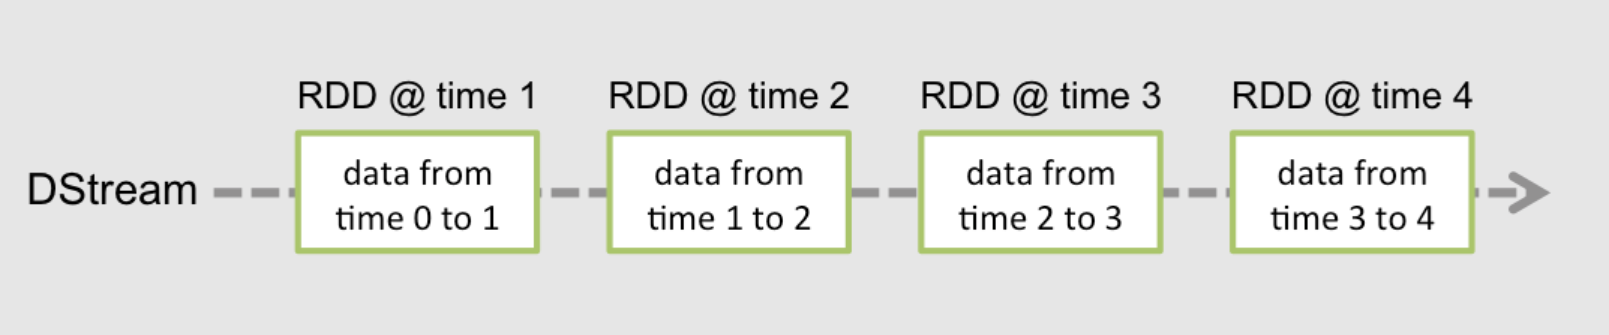
DirectStream
build.sbt:name := "Consumer Example"version := "1.0"scalaVersion := "2.11.8"libraryDependencies += "org.apache.spark" %% "spark-core" % "2.1.0"libraryDependencies += "org.apache.spark" %% "spark-streaming" % "2.1.0"libraryDependencies += "org.apache.spark" %% "spark-streaming-kafka-0-10" % "2.1.0"
DirectStream_example.scala:import org.apache.kafka.clients.consumer.ConsumerRecordimport org.apache.kafka.common.serialization.StringDeserializerimport org.apache.kafka.common.TopicPartitionimport org.apache.spark.streaming.kafka010._import org.apache.spark.streaming.kafka010.LocationStrategies.PreferConsistentimport org.apache.spark.streaming.kafka010.ConsumerStrategies.Subscribeimport org.apache.spark.streaming.kafka010.KafkaUtilsimport org.apache.spark.streaming.kafka010.OffsetRangeimport org.apache.spark.streaming.{Seconds, StreamingContext}import org.apache.spark.SparkConfimport org.apache.spark.SparkContextimport collection.JavaConversions._import Array._object Kafka {def main(args: Array[String]) {val kafkaParams = Map[String, Object]("bootstrap.servers" -> "172.16.16.12:9092","key.deserializer" -> classOf[StringDeserializer],"value.deserializer" -> classOf[StringDeserializer],"group.id" -> "spark_stream_test1","auto.offset.reset" -> "earliest","enable.auto.commit" -> "false")val sparkConf = new SparkConf()sparkConf.setMaster("local")sparkConf.setAppName("Kafka")val ssc = new StreamingContext(sparkConf, Seconds(5))val topics = Array("spark_test")val offsets : Map[TopicPartition, Long] = Map()for (i <- 0 until 3){val tp = new TopicPartition("spark_test", i)offsets.updated(tp , 0L)}val stream = KafkaUtils.createDirectStream[String, String](ssc,PreferConsistent,Subscribe[String, String](topics, kafkaParams))println("directStream")stream.foreachRDD{ rdd=>//Output the obtained message.rdd.foreach{iter =>val i = iter.valueprintln(s"${i}")}//Obtain the offset.val offsetRanges = rdd.asInstanceOf[HasOffsetRanges].offsetRangesrdd.foreachPartition { iter =>val o: OffsetRange = offsetRanges(TaskContext.get.partitionId)println(s"${o.topic} ${o.partition} ${o.fromOffset} ${o.untilOffset}")}}// Start the computationssc.start()ssc.awaitTermination()}}
RDD
build.sbt in the way as detailed above.Click here to view.RDD_example:import org.apache.kafka.clients.consumer.ConsumerRecordimport org.apache.kafka.common.serialization.StringDeserializerimport org.apache.spark.streaming.kafka010._import org.apache.spark.streaming.kafka010.LocationStrategies.PreferConsistentimport org.apache.spark.streaming.kafka010.ConsumerStrategies.Subscribeimport org.apache.spark.streaming.kafka010.KafkaUtilsimport org.apache.spark.streaming.kafka010.OffsetRangeimport org.apache.spark.streaming.{Seconds, StreamingContext}import org.apache.spark.SparkConfimport org.apache.spark.SparkContextimport collection.JavaConversions._import Array._object Kafka {def main(args: Array[String]) {val kafkaParams = Map[String, Object]("bootstrap.servers" -> "172.16.16.12:9092","key.deserializer" -> classOf[StringDeserializer],"value.deserializer" -> classOf[StringDeserializer],"group.id" -> "spark_stream","auto.offset.reset" -> "earliest","enable.auto.commit" -> (false: java.lang.Boolean))val sc = new SparkContext("local", "Kafka", new SparkConf())val java_kafkaParams : java.util.Map[String, Object] = kafkaParams//Pull messages in the corresponding offset range from the partition in order. The request will be blocked if no messages can be pulled, until the specified waiting time elapses or the number of newly produced messages reaches the number for messages to be pulled.val offsetRanges = Array[OffsetRange](OffsetRange("spark_test", 0, 0, 5),OffsetRange("spark_test", 1, 0, 5),OffsetRange("spark_test", 2, 0, 5))val range = KafkaUtils.createRDD[String, String](sc,java_kafkaParams,offsetRanges,PreferConsistent)range.foreach(rdd=>println(rdd.value))sc.stop()}}
Configuring the Environment
Installing sbt
#!/bin/bashSBT_OPTS="-Xms512M -Xmx1536M -Xss1M -XX:+CMSClassUnloadingEnabled -XX:MaxPermSize=256M"java $SBT_OPTS -jar `dirname $0`/bin/sbt-launch.jar "$@"
chmod u+x ./sbt_run.sh
./sbt-run.sh sbt-version
Installing protobuf
./configuremake && make install
protoc --version
Installing Hadoop
useradd -m hadoop -s /bin/bash
Running Environment
Operating System: Ubuntu 24.04.3 LTS / x86_64
Runtime Version: GNU bash, version 5.2.21(1)-release (x86_64-pc-linux-gnu)
visudo
Running Environment
Operating System: Ubuntu 24.04.3 LTS / x86_64
Runtime Version: GNU bash, version 5.2.21(1)-release (x86_64-pc-linux-gnu)
root ALL=(ALL) ALL: hadoop ALL=(ALL) ALL. Save and exit.su hadoop
cd ~/.ssh/ # If the directory does not exist, run ssh localhost once first.ssh-keygen -t rsa # There will be prompts. Simply press Enter.cat id_rsa.pub >> authorized_keys # Add authorization.chmod 600 ./authorized_keys # Modify file permissions.
Running Environment
Operating System: Ubuntu 24.04.3 LTS / x86_64
Runtime Version: GNU bash, version 5.2.21(1)-release (x86_64-pc-linux-gnu)
sudo yum install java-1.8.0-openjdk java-1.8.0-openjdk-devel
vim /etc/profile
export JAVA_HOME=/usr/lib/jvm/java-1.8.0-openjdk-1.8.0.121-0.b13.el6_8.x86_64/jreexport PATH=$PATH:$JAVA_HOME
Running Environment
Operating System: Ubuntu 24.04.3 LTS / x86_64
Runtime Version: GNU bash, version 5.2.21(1)-release (x86_64-pc-linux-gnu)
./bin/hadoop version
vim /etc/profile
export HADOOP_HOME=/usr/local/hadoopexport PATH=$HADOOP_HOME/bin:$PATH
Running Environment
Operating System: Ubuntu 24.04.3 LTS / x86_64
Runtime Version: GNU bash, version 5.2.21(1)-release (x86_64-pc-linux-gnu)
/etc/hadoop/core-site.xml.<configuration><property><name>hadoop.tmp.dir</name><value>file:/usr/local/hadoop/tmp</value><description>Abase for other temporary directories.</description></property><property><name>fs.defaultFS</name><value>hdfs://localhost:9000</value></property></configuration>
/etc/hadoop/hdfs-site.xml.<configuration><property><name>dfs.replication</name><value>1</value></property><property><name>dfs.namenode.name.dir</name><value>file:/usr/local/hadoop/tmp/dfs/name</value></property><property><name>dfs.datanode.data.dir</name><value>file:/usr/local/hadoop/tmp/dfs/data</value></property></configuration>
/etc/hadoop/hadoop-env.sh to the path of Java.export JAVA_HOME=/usr/lib/jvm/java-1.8.0-openjdk-1.8.0.121-0.b13.el6_8.x86_64/jre
Running Environment
Operating System: Ubuntu 24.04.3 LTS / x86_64
Runtime Version: GNU bash, version 5.2.21(1)-release (x86_64-pc-linux-gnu)
./bin/hdfs namenode -format
Exiting with status 0../sbin/start-dfs.sh
NameNode, DataNode, and SecondaryNameNode processes will exist upon successful startup.Installing Spark
Pre-built with user-provided Apache Hadoop option.Hadoop user for operations.cp ./conf/spark-env.sh.template ./conf/spark-env.shvim ./conf/spark-env.sh
export SPARK_DIST_CLASSPATH=$(/usr/local/hadoop/bin/hadoop classpath)
Running Environment
Operating System: Ubuntu 24.04.3 LTS / x86_64
Runtime Version: GNU bash, version 5.2.21(1)-release (x86_64-pc-linux-gnu)
bin/run-example SparkPi
Help and Support
Was this page helpful?
You can also Contact sales or Submit a Ticket for help.
Help us improve! Rate your documentation experience in 5 mins.
Feedback