The batch processing feature of Cloud Object Storage (COS) enables large-scale batch operations on objects in a bucket. It also supports using features such as audio and video transcoding and speech recognition from Cloud Infinite (CI) to perform batch processing on specified files within the bucket. Currently, you can perform batch processing on the following operations:
Copying objects
Restoring archived objects
audio and video transcoding, video matting, text to speech, and other data processing
You can generate an inventory file for the objects on which to perform a batch operation by using either COS inventory (you need to first enable the inventory feature as instructed in Setting Inventory), or the CSV format you specify. COS will then perform this batch operation based on the inventory file. For more information on batch operations, see Batch Operation Overview.
2. On the left sidebar, click Batch Operation to enter the batch operation management page.
3. Click Create Job to create a batch operation job.
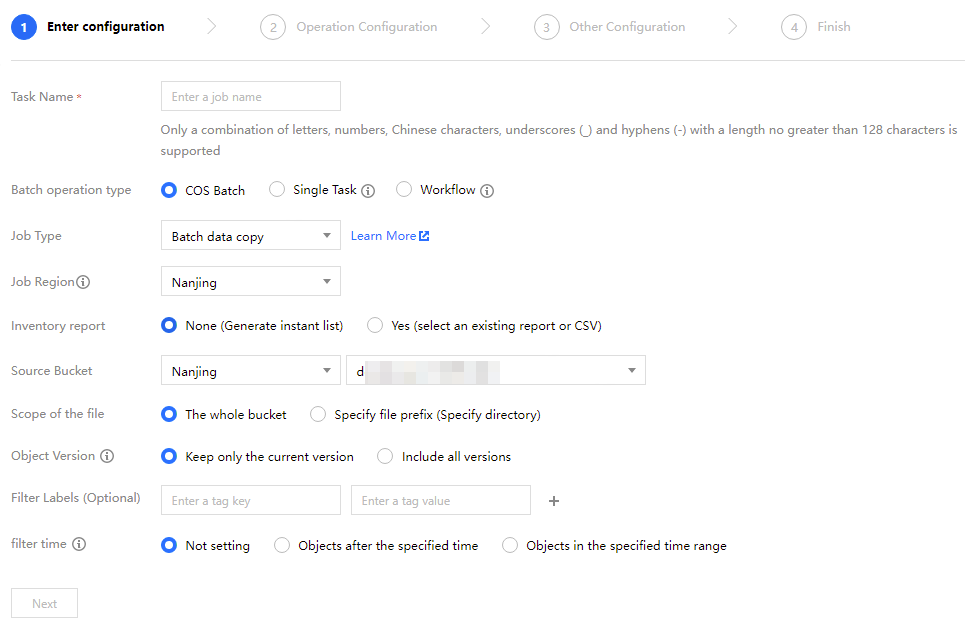
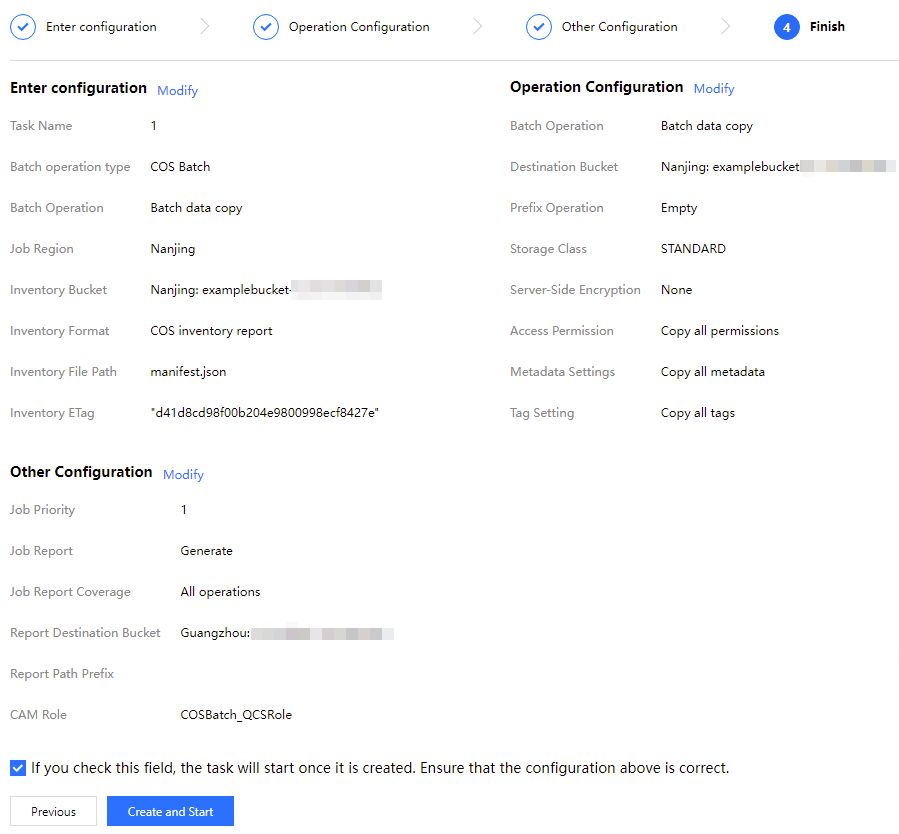
Task name: Custom name for batch tasks.
Batch operation type: Select COS Batch to perform basic operations such as copy and archive, or select Standalone tasks and workflows to use related services of Cloud Infinite.
Job type: When COS Batch is selected, options include batch data copy, batch restore archived objects, and batch delete.
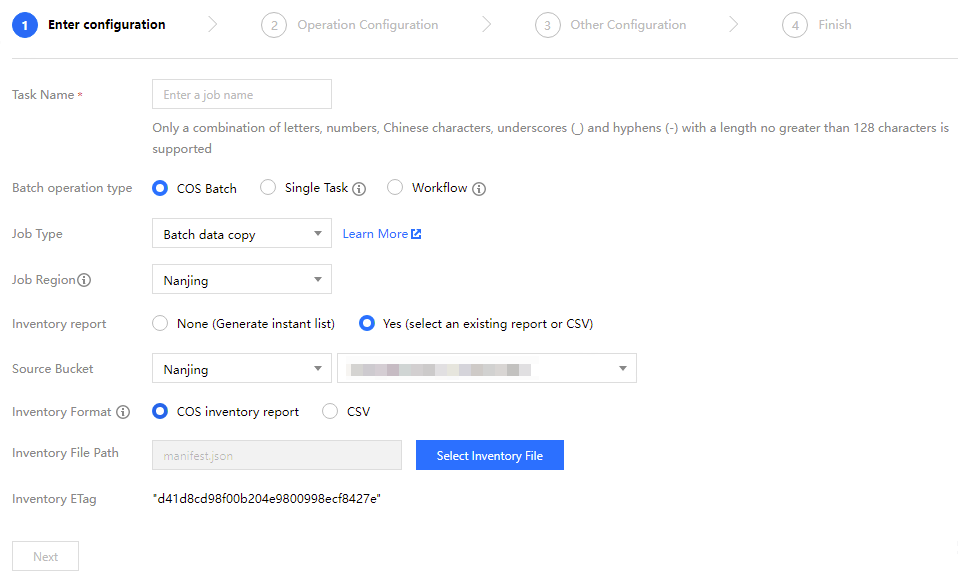
Inventory report
(1) If there is no inventory report: Select none. The system will generate an instant inventory in the selected inventory bucket. You can set inventory information as needed, such as file scope, object version, filtering tag, and filtering time. For more configuration item descriptions, please see Setup Checklist.
(2) If there is an inventory report or CSV: select Yes, and then select the bucket where the inventory is located.
Source Bucket: Select the bucket to store the inventory file.
Note:
Currently, COS batch operation is only available in public cloud regions in Chinese mainland, Silicon Valley region,Sao Paulo and Singapore.
Inventory Format: Select a format for the objects to be inventoried from the following two options:
Inventory Format
Field
Configuration Description
COS inventory report
-
You can use an inventory report generated by COS as the inventory file or create your own inventory file in CSV format.
CSV
Bucket
Bucket name
Key
Name of the object in a bucket. The object name encoded in URL format must be decoded and then can be used properly.
VersionId
Object version ID. If versioning is enabled for a bucket, COS will assign a version ID to each object added to the bucket. If you don't want to inventory the latest version of an object, you can specify a particular version ID.
Inventory File Path: Specify the path of COS inventory report or CSV file in the format: `directory/manifest.json` or `directory/manifest.csv`, respectively. For example, if you have an inventory file stored in the `examplebucket-1250000000` root directory, the inventory path will be `manifest.json`.
Inventory ETag: After selecting the inventory file path, it is automatically generated by the system. ETag (entity tag) is the hash of an object. The ETag only reflects changes to the content of an object, not changes to its metadata. The ETag is not necessarily the MD5 summary of the object data; this depends on how the object is created and the encryption method.
4. Click Next, and configure according to the configuration item description.
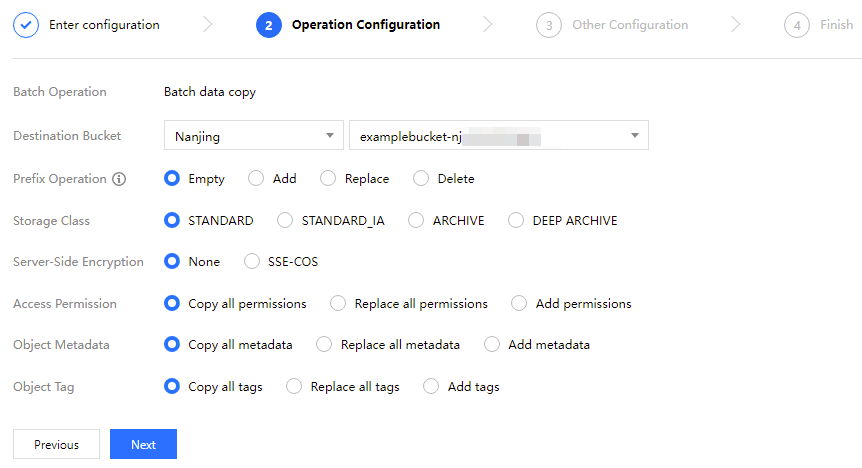
If Batch Data Copy was selected in the previous step, the configuration items are described as follows:
Destination Bucket: Select the bucket to store the object copies.
Prefix Operation: You can choose to add, replace, or delete the prefix on the object copies.
Storage Class: Specify the storage class for object copies. Valid values: STANDARD; STANDARD_IA; ARCHIVE; DEEP ARCHIVE.
Server-Side Encryption: Specify whether to encrypt the object copies. Valid values: None; SSE-COS.
Access Permission: Set access permissions to the object copies. Valid values: Copy all permissions; Replace all permissions; Add new permissions.
Object Metadata: Configure metadata for the object copies. Valid values: Copy all metadata; Replace all metadata; Add new metadata.
Object Tag: Configure tags for the object copies. Valid values: Copy all tags; Replace all tags; Add new tags.
If Batch Restore Archive Type Objects was selected in the previous step, the configuration items are described as follows:
Restoration Mode: You can select either standard or bulk mode. For more information on restoration modes, see Restoring Archived Objects.
Validity: Specify the number of days after which the object copies will expire and be automatically deleted. Value range: 1-365.
If Batch Delete was selected in the previous step, proceed to Step 5.
5. Click Next and configure the following options.
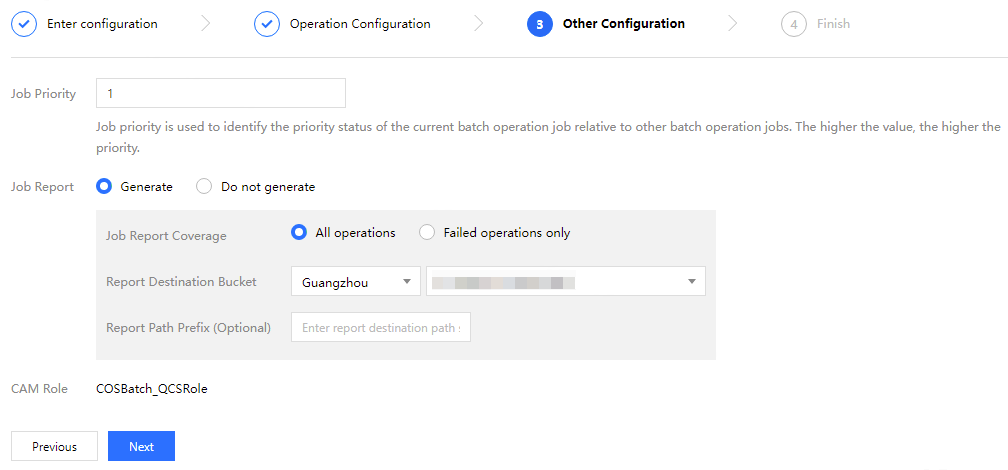
Job Priority: A job of a higher priority will be performed first. The value must be a positive integer. A larger value indicates a higher priority.
Job Report: Select whether to generate a job report.
CAM Role: You can create a CAM role or select an existing role to grant operation permissions to COS.
Note:
For COS to perform batch operations, you need to use a CAM role to grant permissions. For more information on CAM roles, see Role Overview.
6. Click Next, check the batch operation job configuration you set, and select If you select this option, the job will be directly started after creation. Make sure that the above configuration information is correct. as needed.
To modify the information, click Modify or Previous.
7. After confirming that everything is correct, click Create or Create and Start.
Once completed, you can find the new job in the job list. If you want to cancel the job, click Cancel Job under Operation.