Shopify, the world's leading e-commercial SaaS platform, with numbers of merchants building their online shops based on it globally. Meanwhile, according to Gartner, Tencent Cloud Chat became the champion in the Chinese market and one of the most competent providers in Communication Platform as a Service (CPaaS) in the global market.
Naturally, it comes to us to bring you the solution of building the chat widget on your Shopify online store based on Tencent Cloud Chat, in order to convert more online shop visitors to your customers, and deliver personal customer support at any scale no matter where they are from.
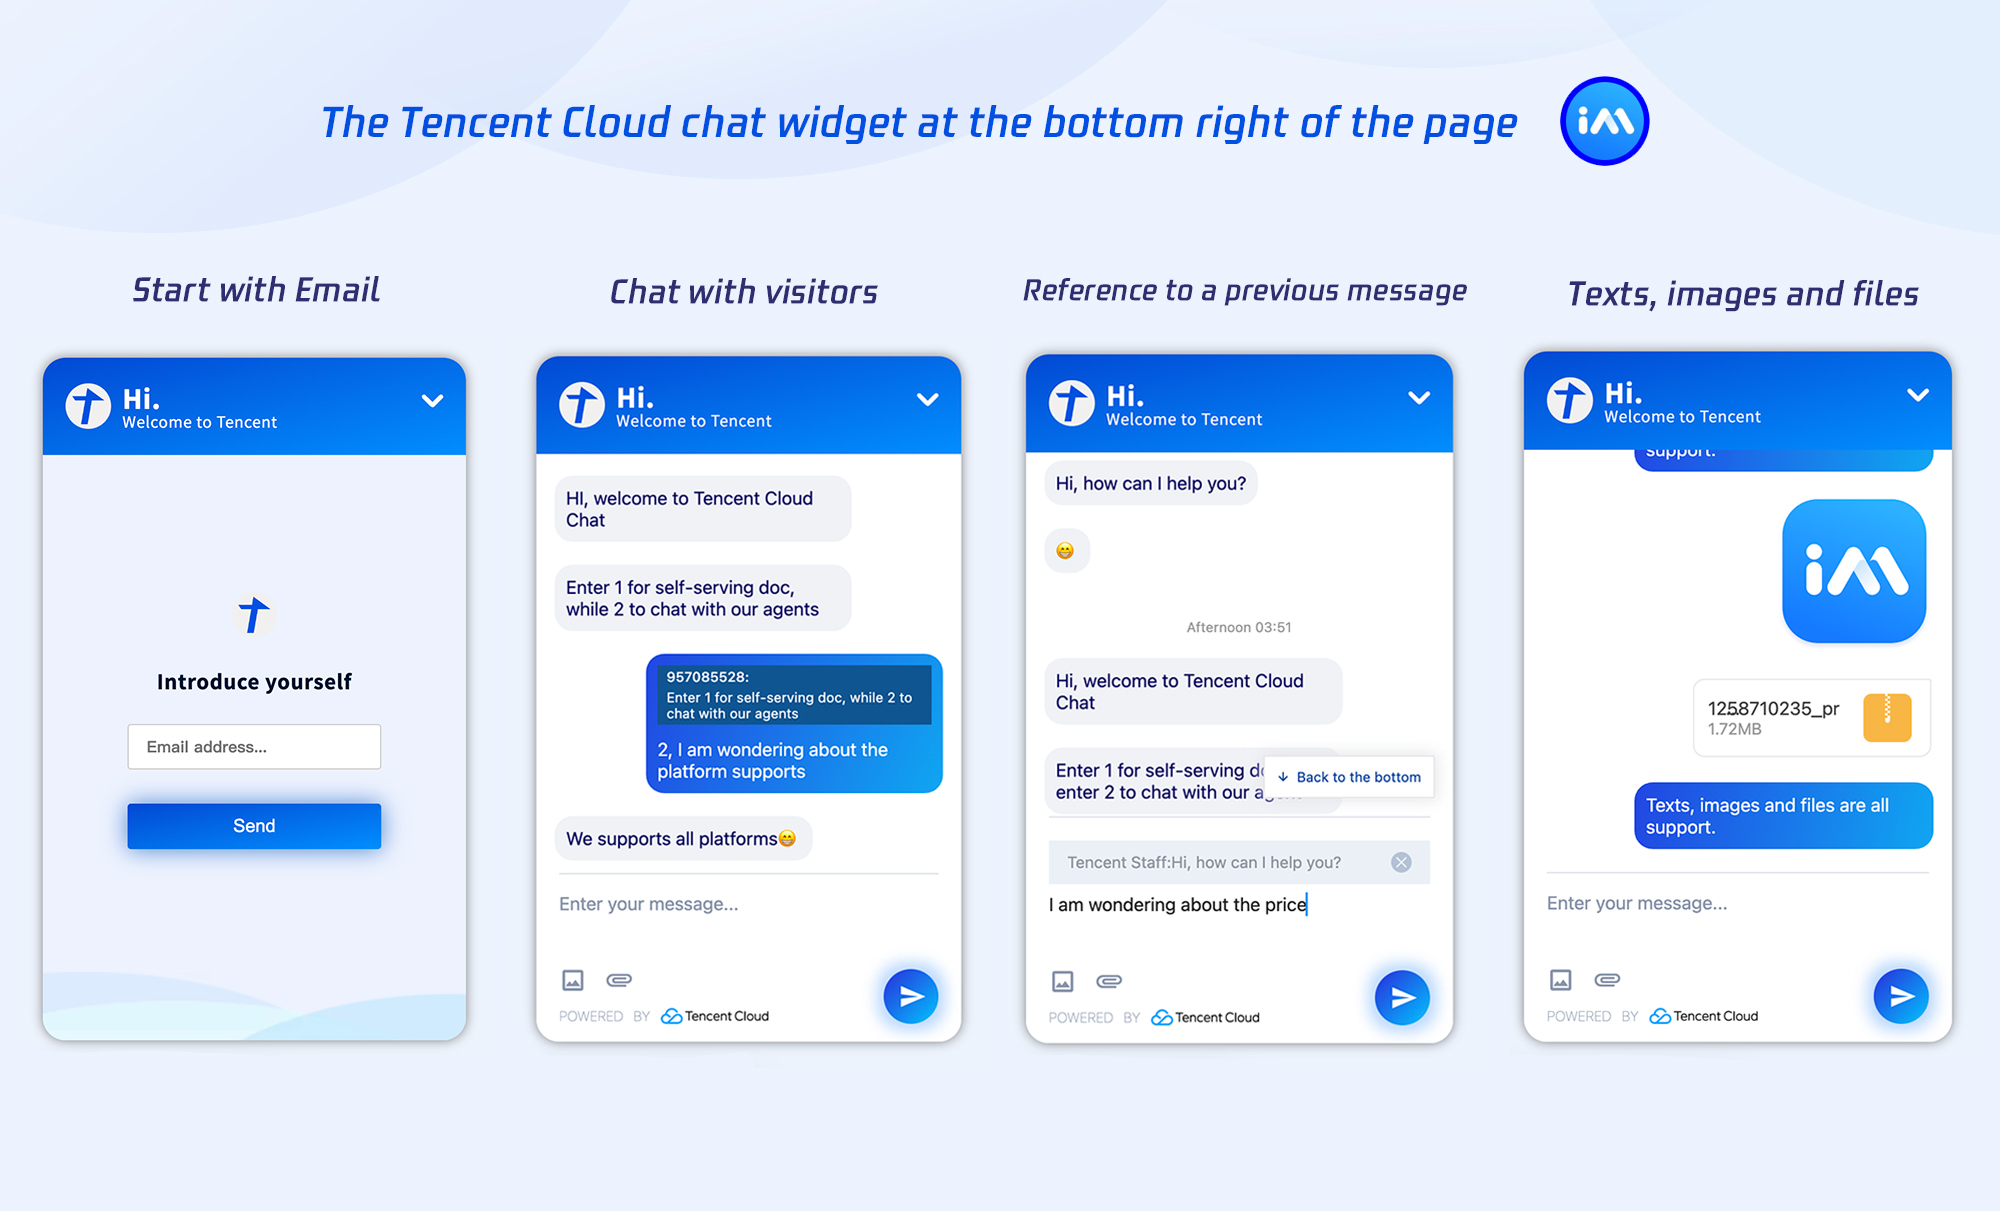
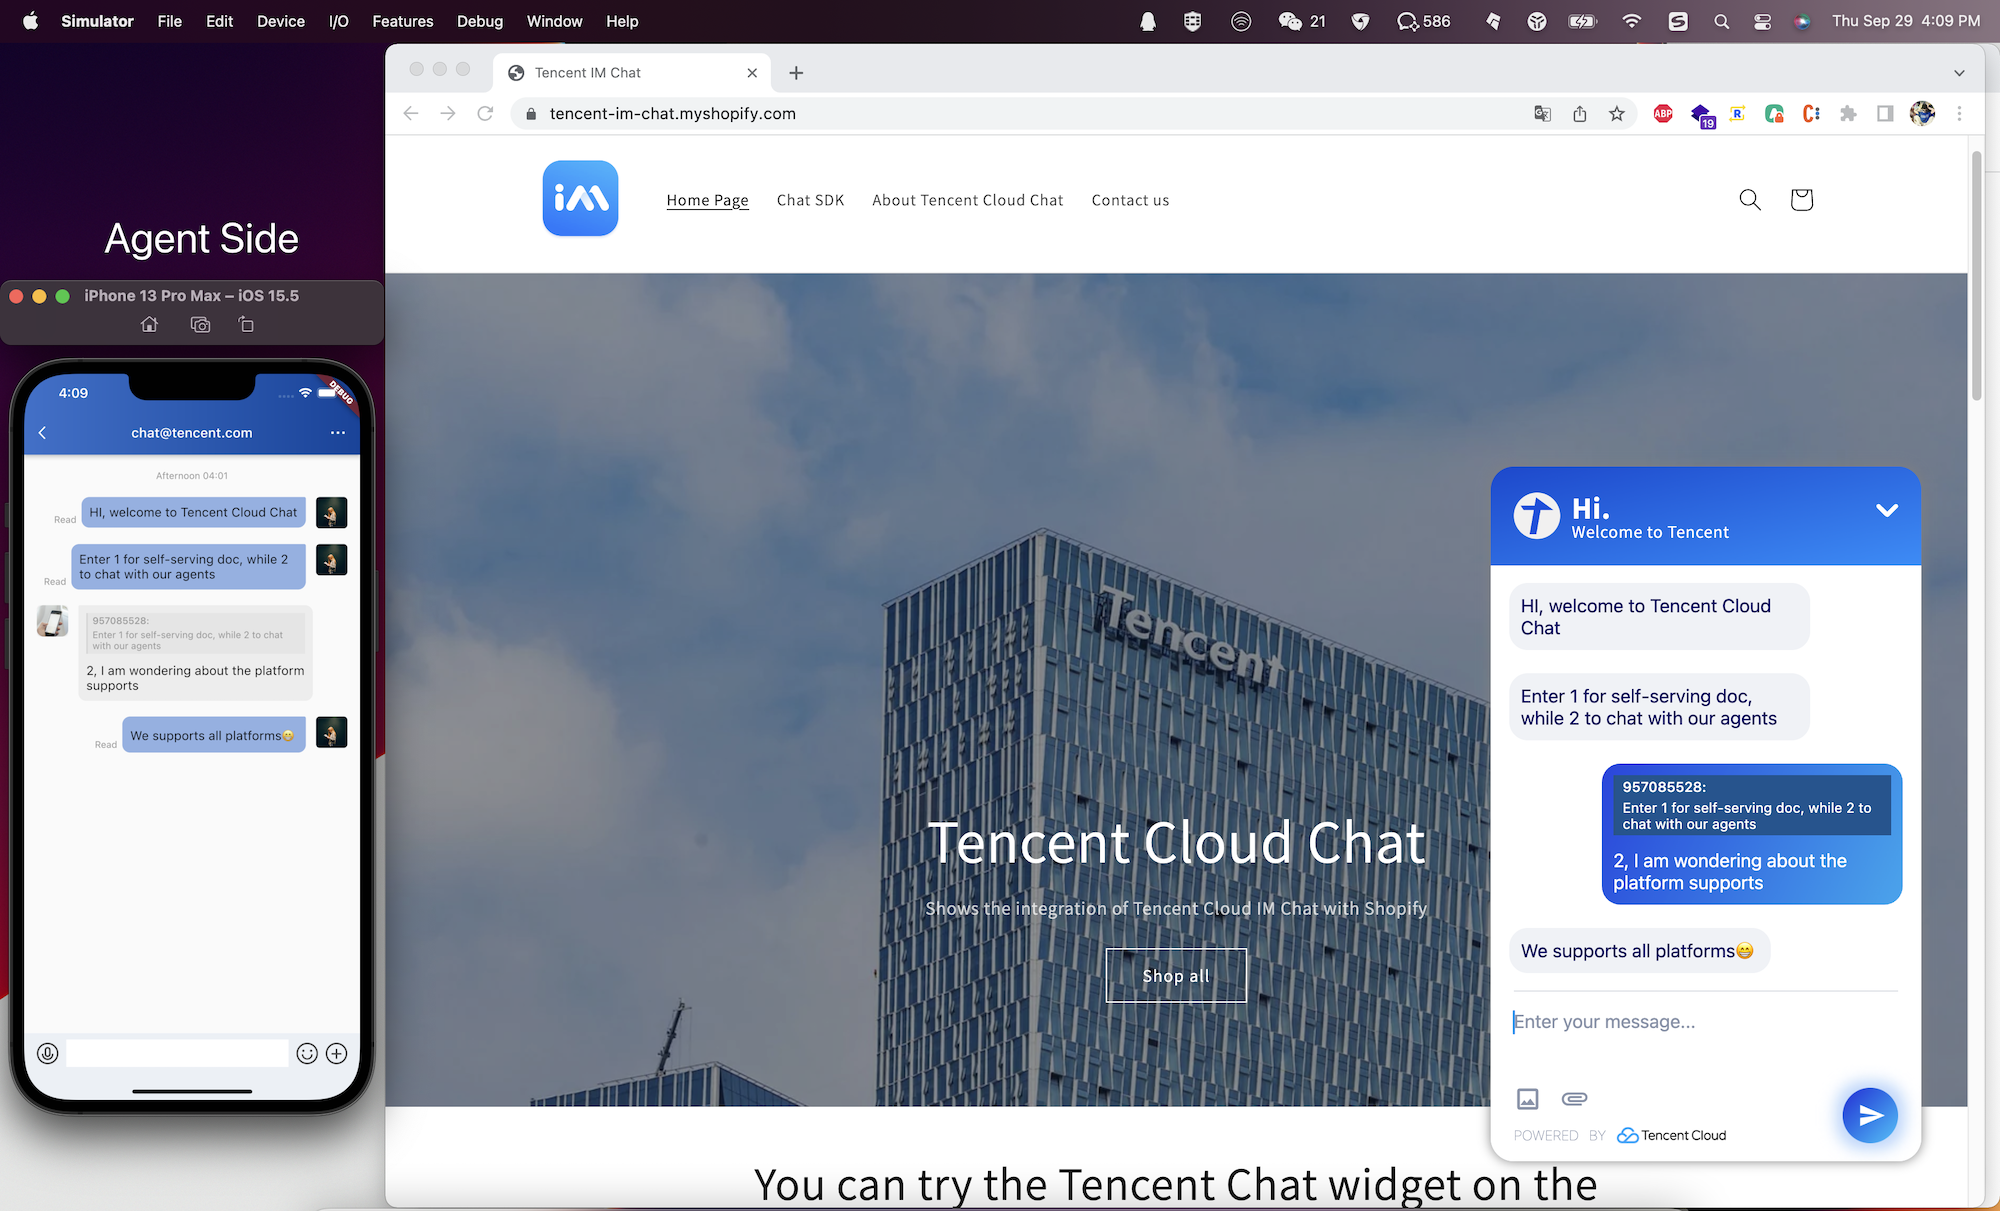
After the integration, the effect is shown below. Also, you can experience it with our Demo, password is tencentim.
What you'll learn
In this tutorial, we will discuss how to build this chat box on your Shopify online store with the codes we provided.
Initialize a Shopify app.
Building this app with the codes, related to the chat module, we provided.
Install this app to your Shopify store.
Enable it to communicate with your existing chat APP, for agent serving purposes.
Note:
For the agent side shows on the left of the picture above, you can implement it with our TUIKit or DEMO easily, or you can build your own APP with our Chat SDK.
You're using the latest version of Chrome or Firefox.
You've installed an Online Store 2.0 theme, such as Dawn, that uses JSON templates.
You have at least Ruby 2.7.5 installed on your system.
Note:
The Shopify Partner account used in this tutorial is only for developing your own app purposes, you don't need to publicize this app to the Shopify App store.
The development store is only for testing and previewing your app while developing, we will guide you to install your app to your online store by the end of this tutorial.
Let's get started
Step 1: Create a new Shopify app
You can create a new Shopify app using an npm, yarn, or pnpm command. Using npm as an example in this tutorial.
1. Navigate to the directory where you want to create your app. Your app will be created in a new subdirectory.
2. Run one of the following commands to create a new app, and select node as the template.
npm init @shopify/app@latest
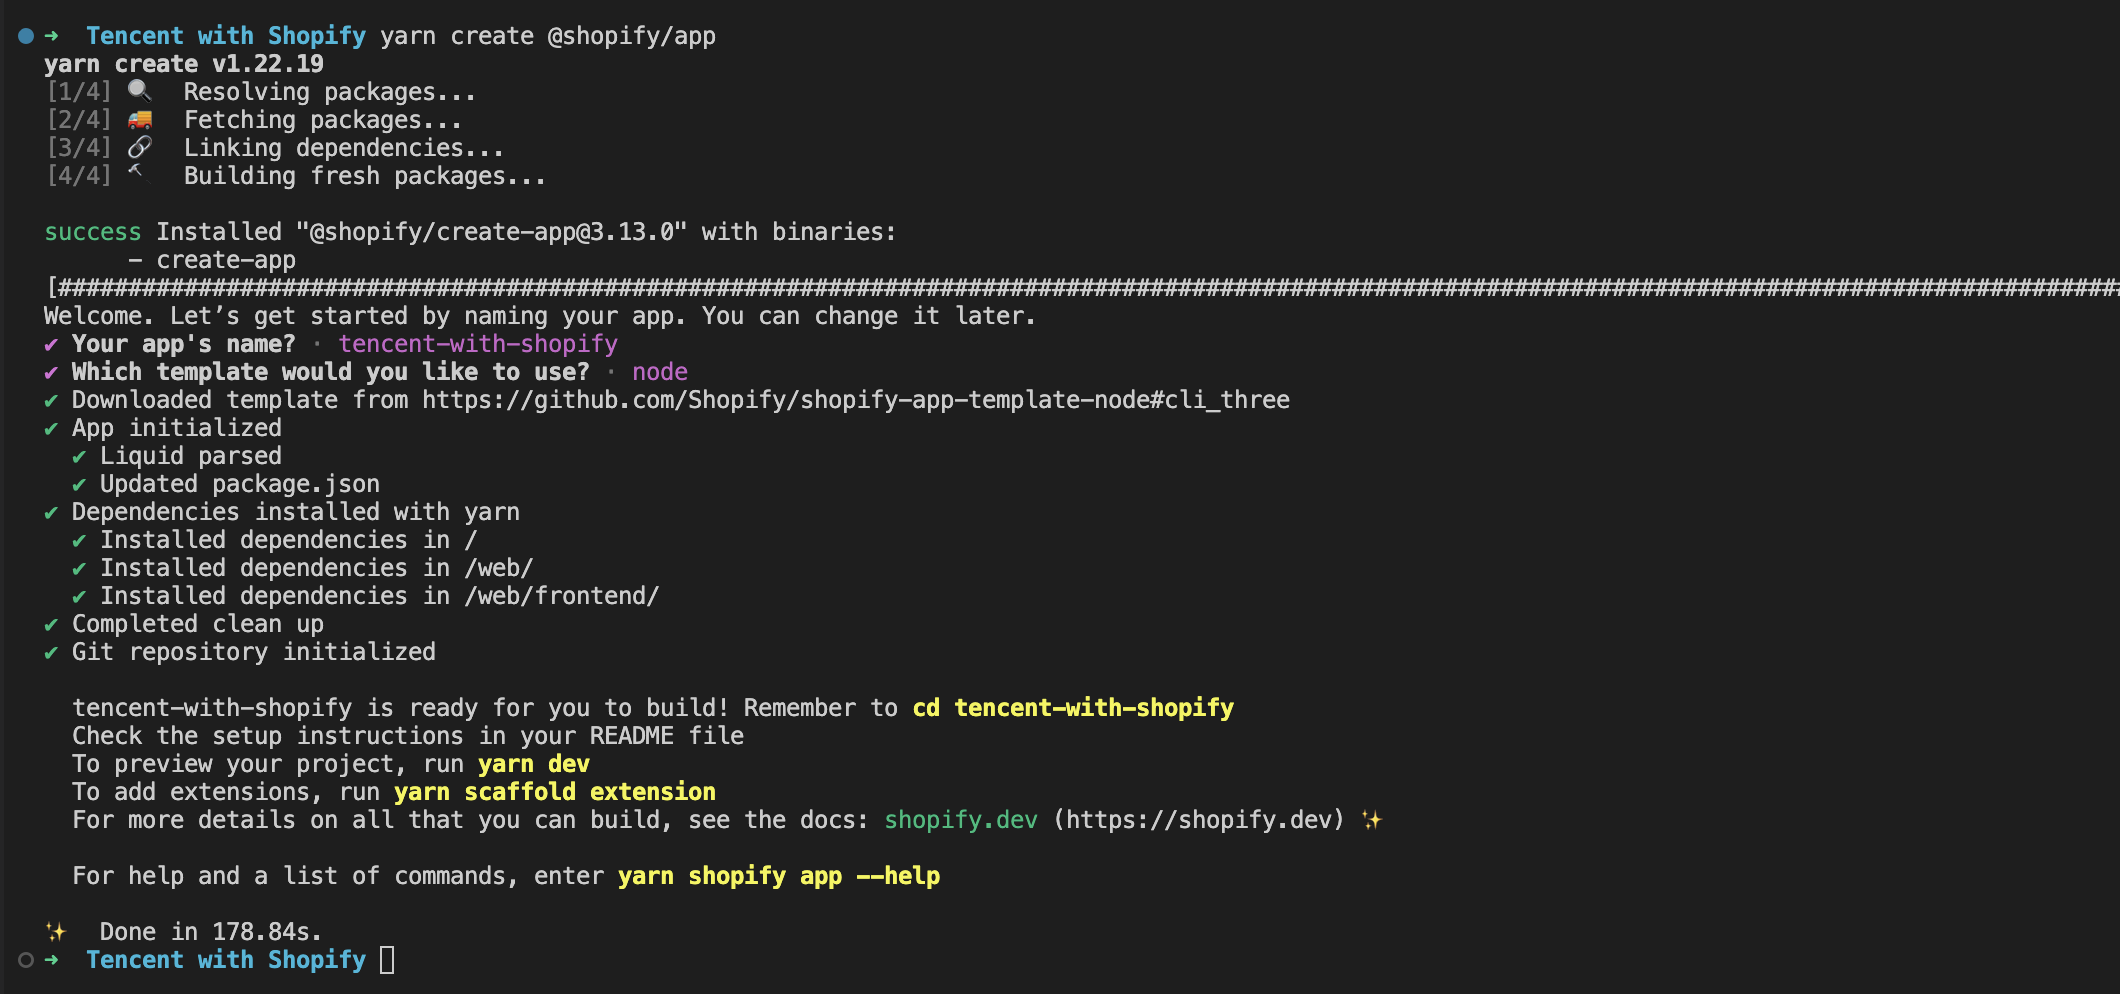
A new app is created, and Shopify CLI is installed along with all of the dependencies that you need to build Shopify apps. Shopify CLI is also added as a dependency in your app's package.json.
The following image shows an app being successfully created in the terminal:
Step 2: Start a local development server
After your app is created, you can work with it by building the app and starting a local development server.
Shopify CLI uses ngrok to create a tunnel that allows your app to be accessed using a unique HTTPS URL. You need to create an ngrok account and auth token to preview your app using Shopify CLI.
1. Navigate to your newly-created app directory.
cd your-app
2. To start a local server for your app, run the following command:
Creating an app in the Partner Dashboard, and connecting your local app files to the app.
Storing your ngrok token, and then creating a tunnel between your local environment and the development store using ngrok.
Note:
If you encounter ngrok errors in your browser when you try to preview your app or app extension, then consider using a tunnel created with your own tunneling software instead. Shopify recommends using Cloudflare Tunnel.
To use your own tunnel, pass your tunnel URL and port to the dev command with the --tunnel-url flag.
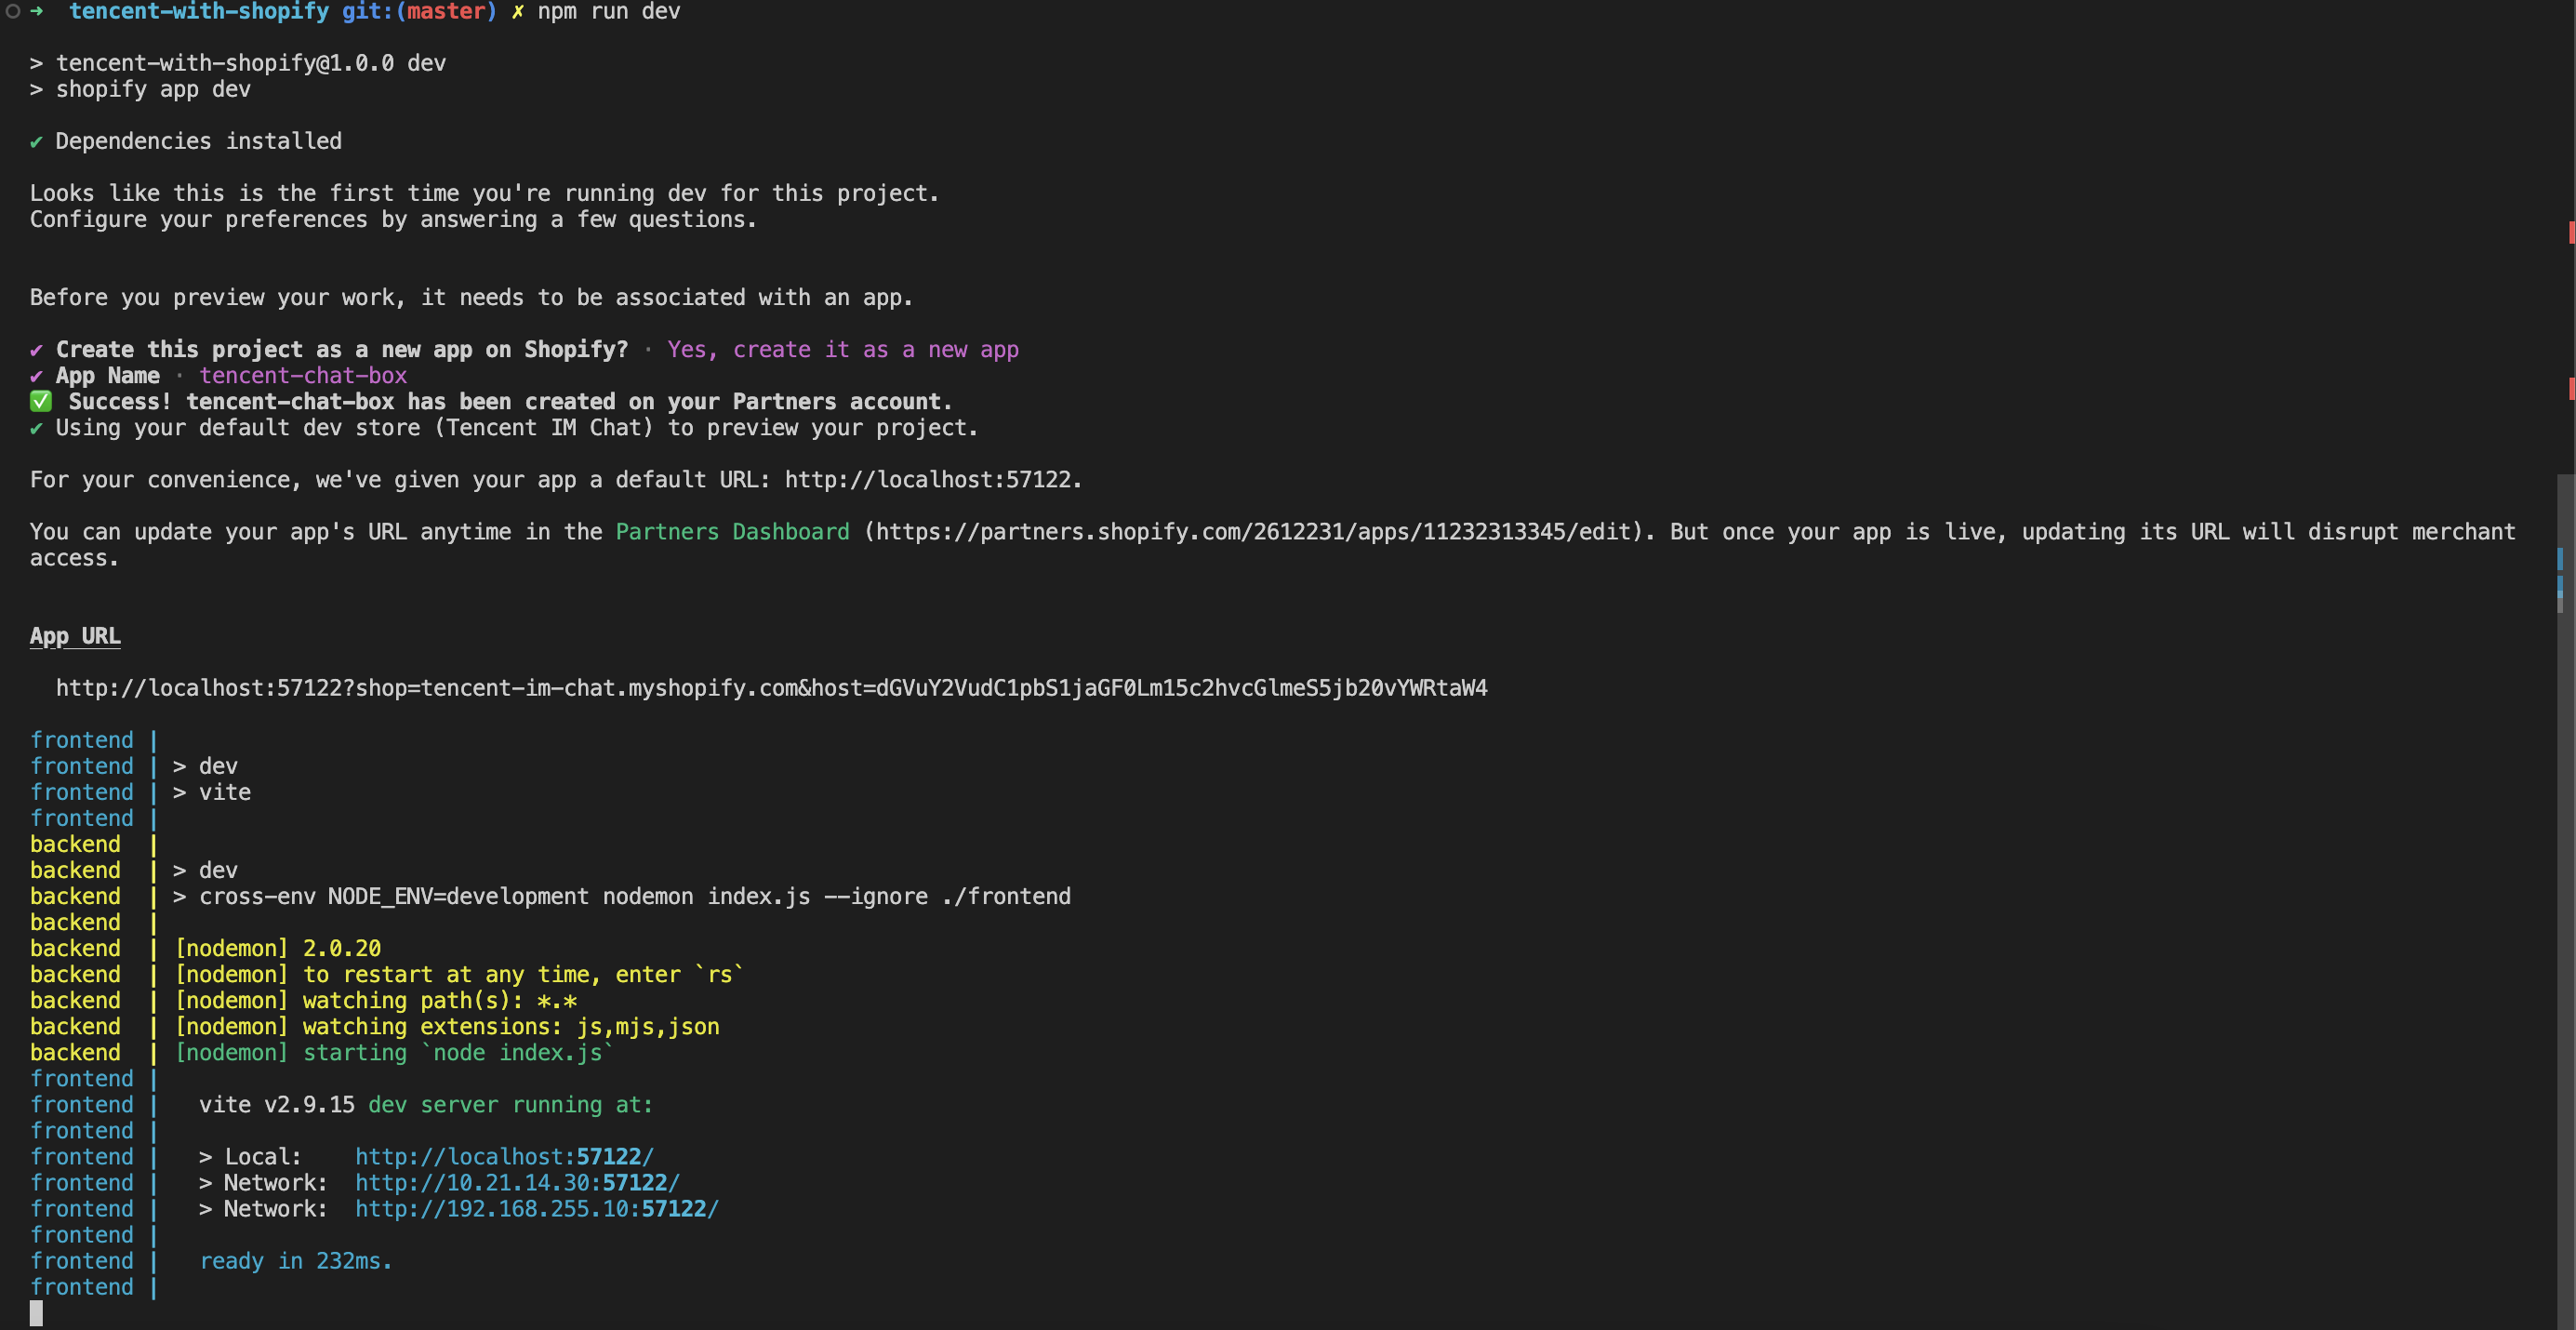
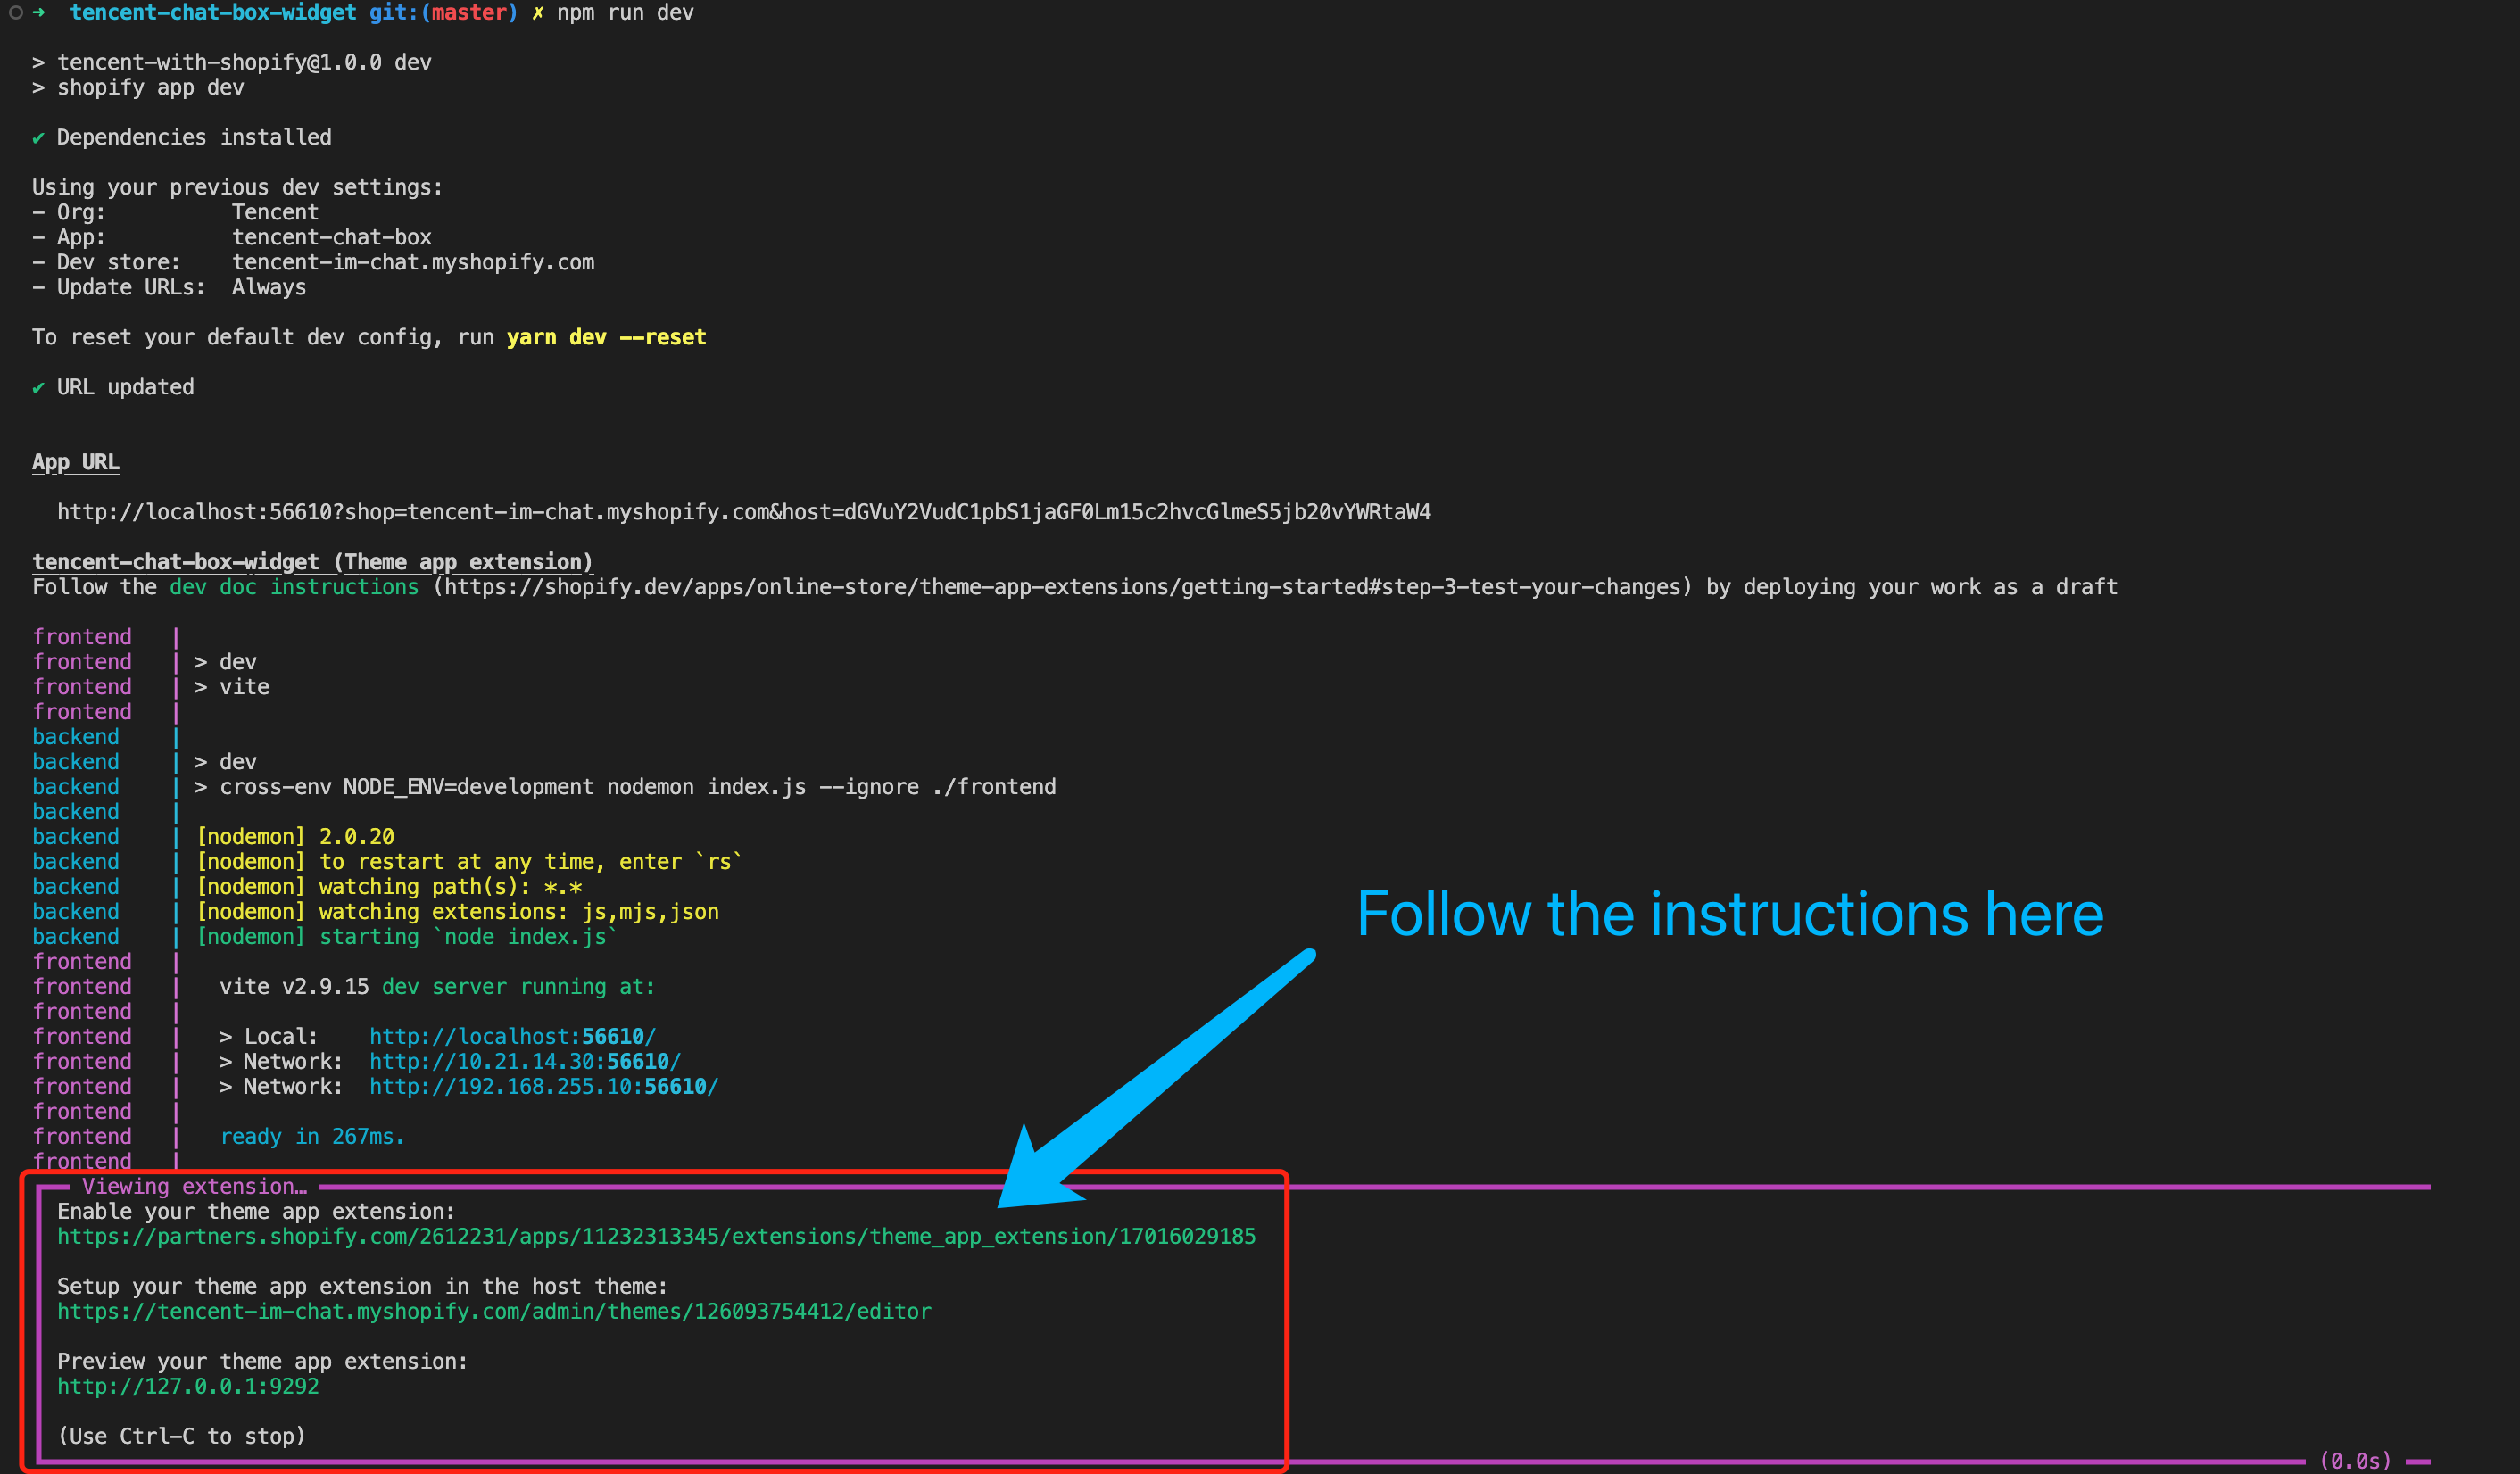
The following image shows a development server being started using dev:
Step 3: Install your app on your development store
With the server running, open the URL in the App URL section of the terminal output in the previous step.
The URL follows the format https://[tunnel_url]?shop=[dev_store].myshopify.com&host=[host], where [host] is the base64-encoded host parameter used by App Bridge, and represents the container the app is running in.
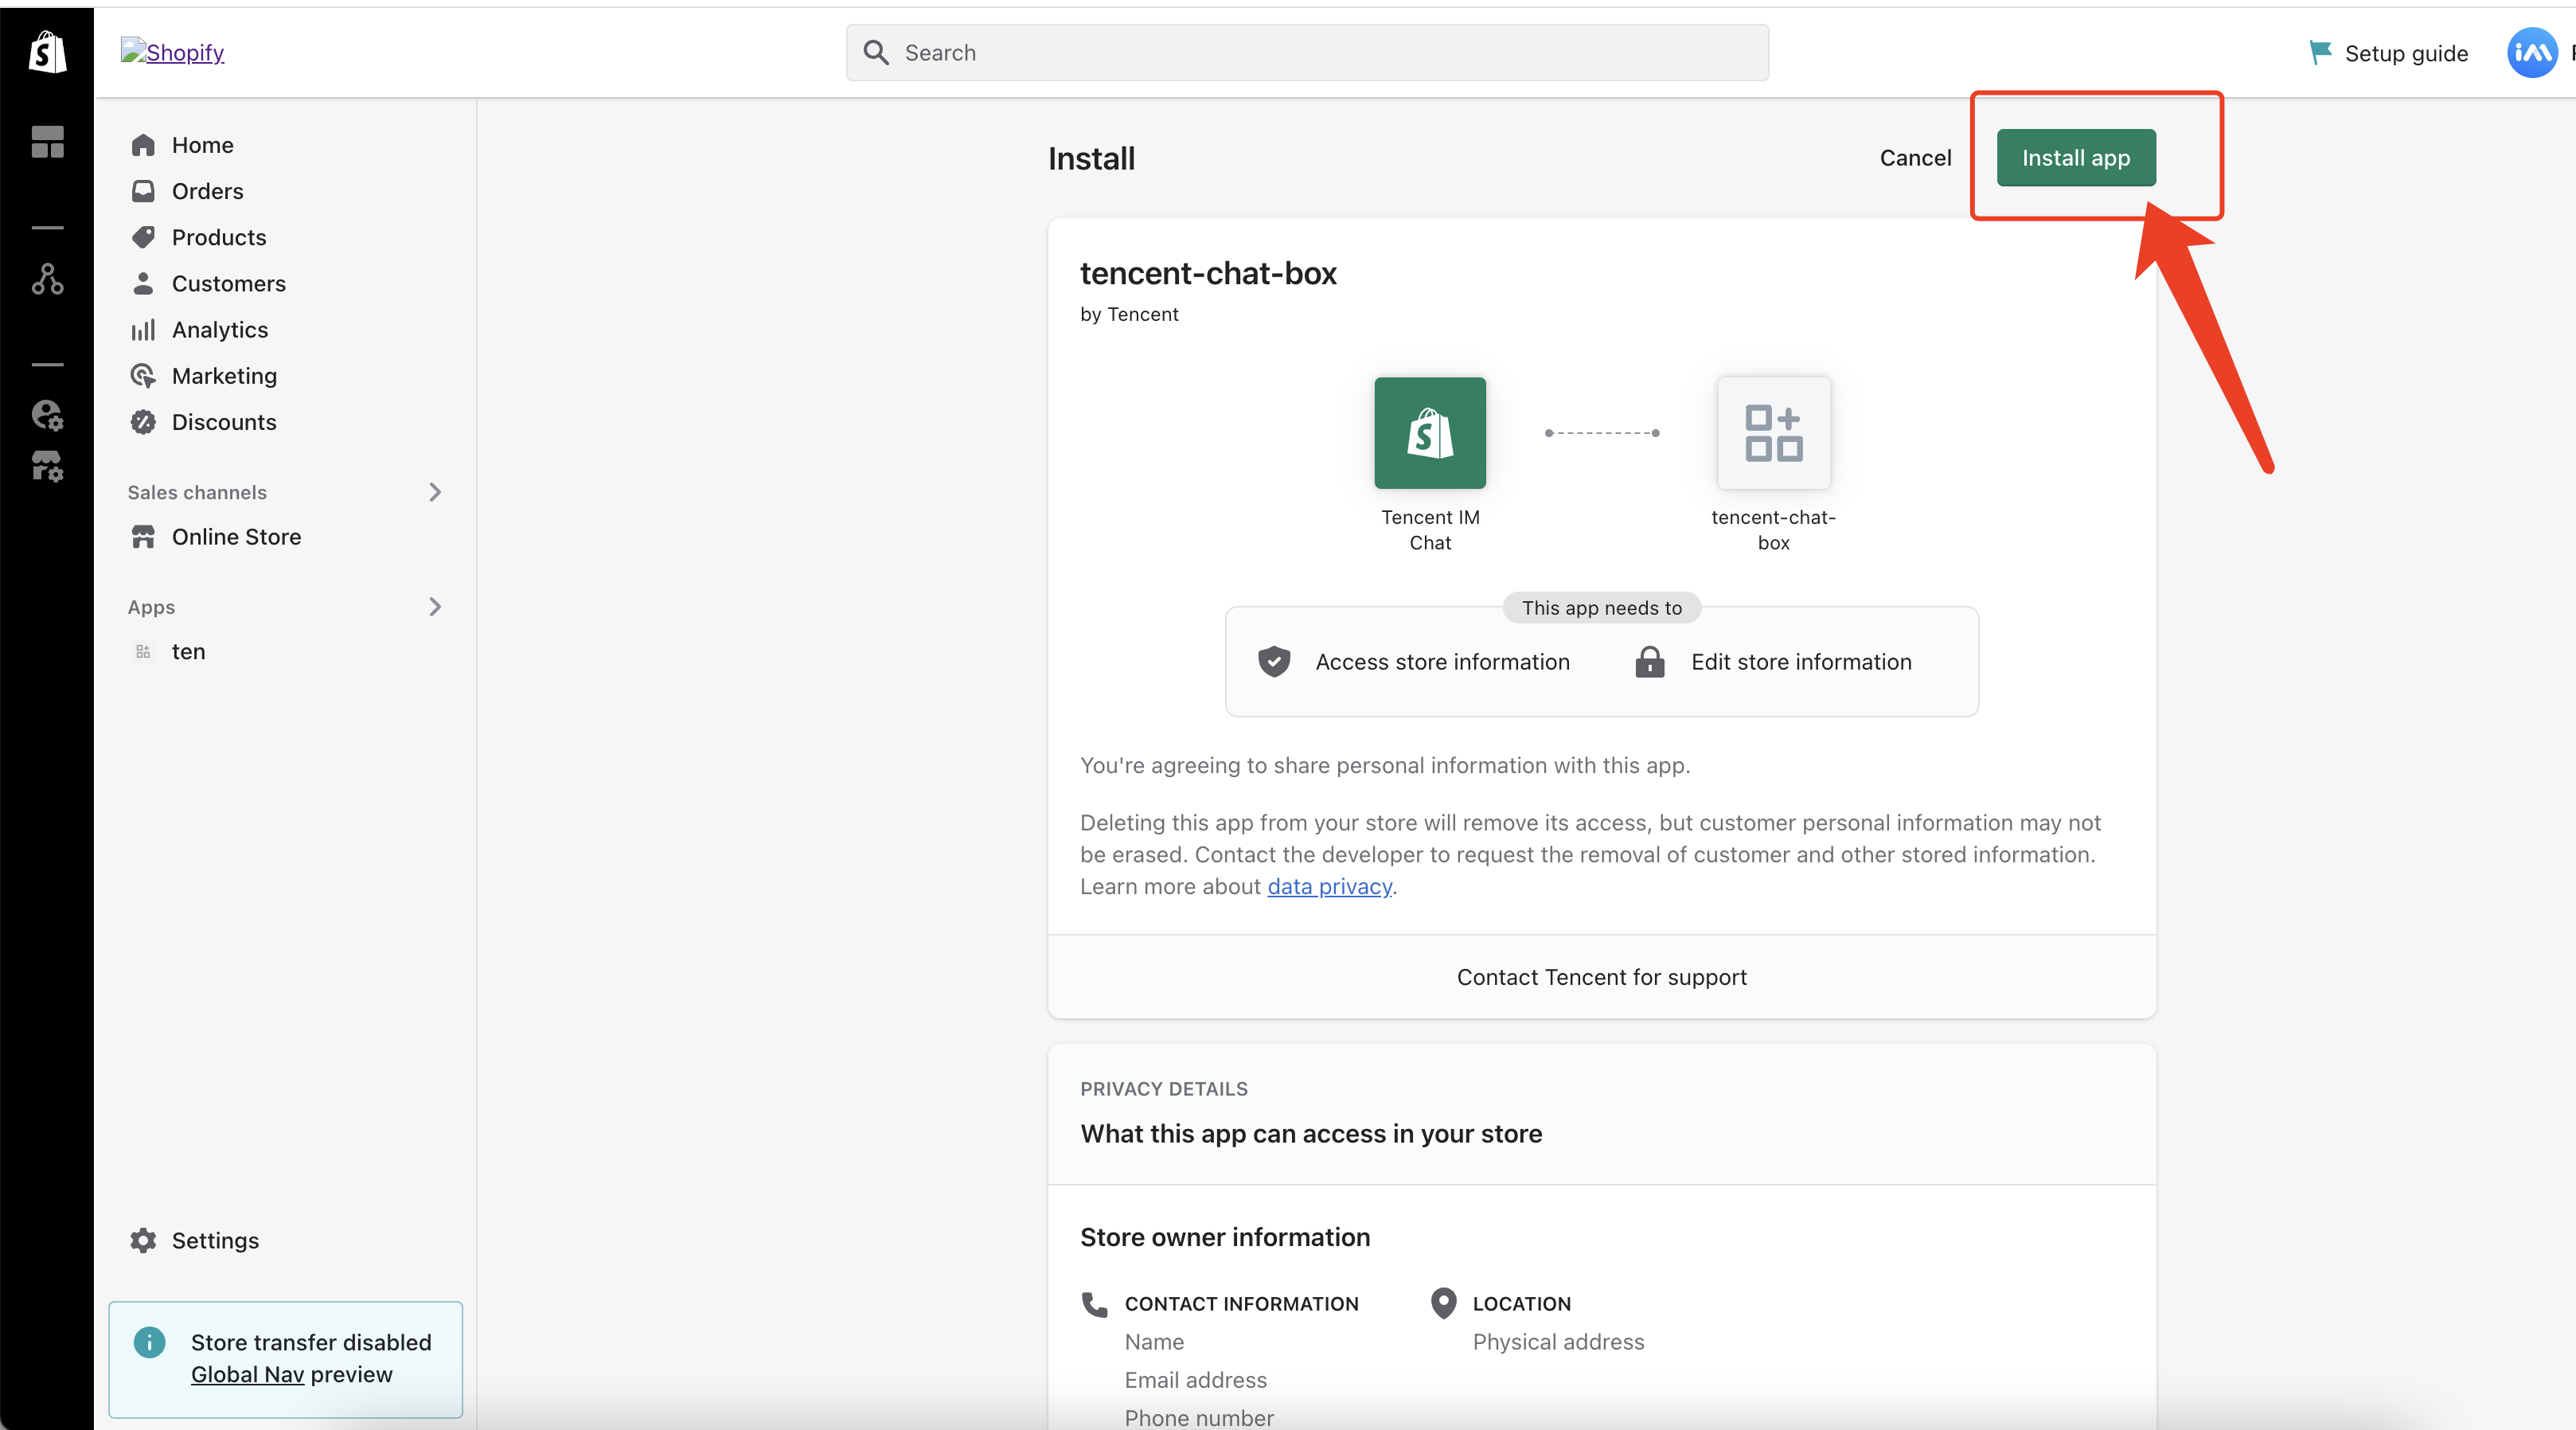
When you open the URL, you're prompted to install the app on your development store.
Click Install app to install the app in the store.
Step 4: Modify the frontend code in this admin dashboard
Note:
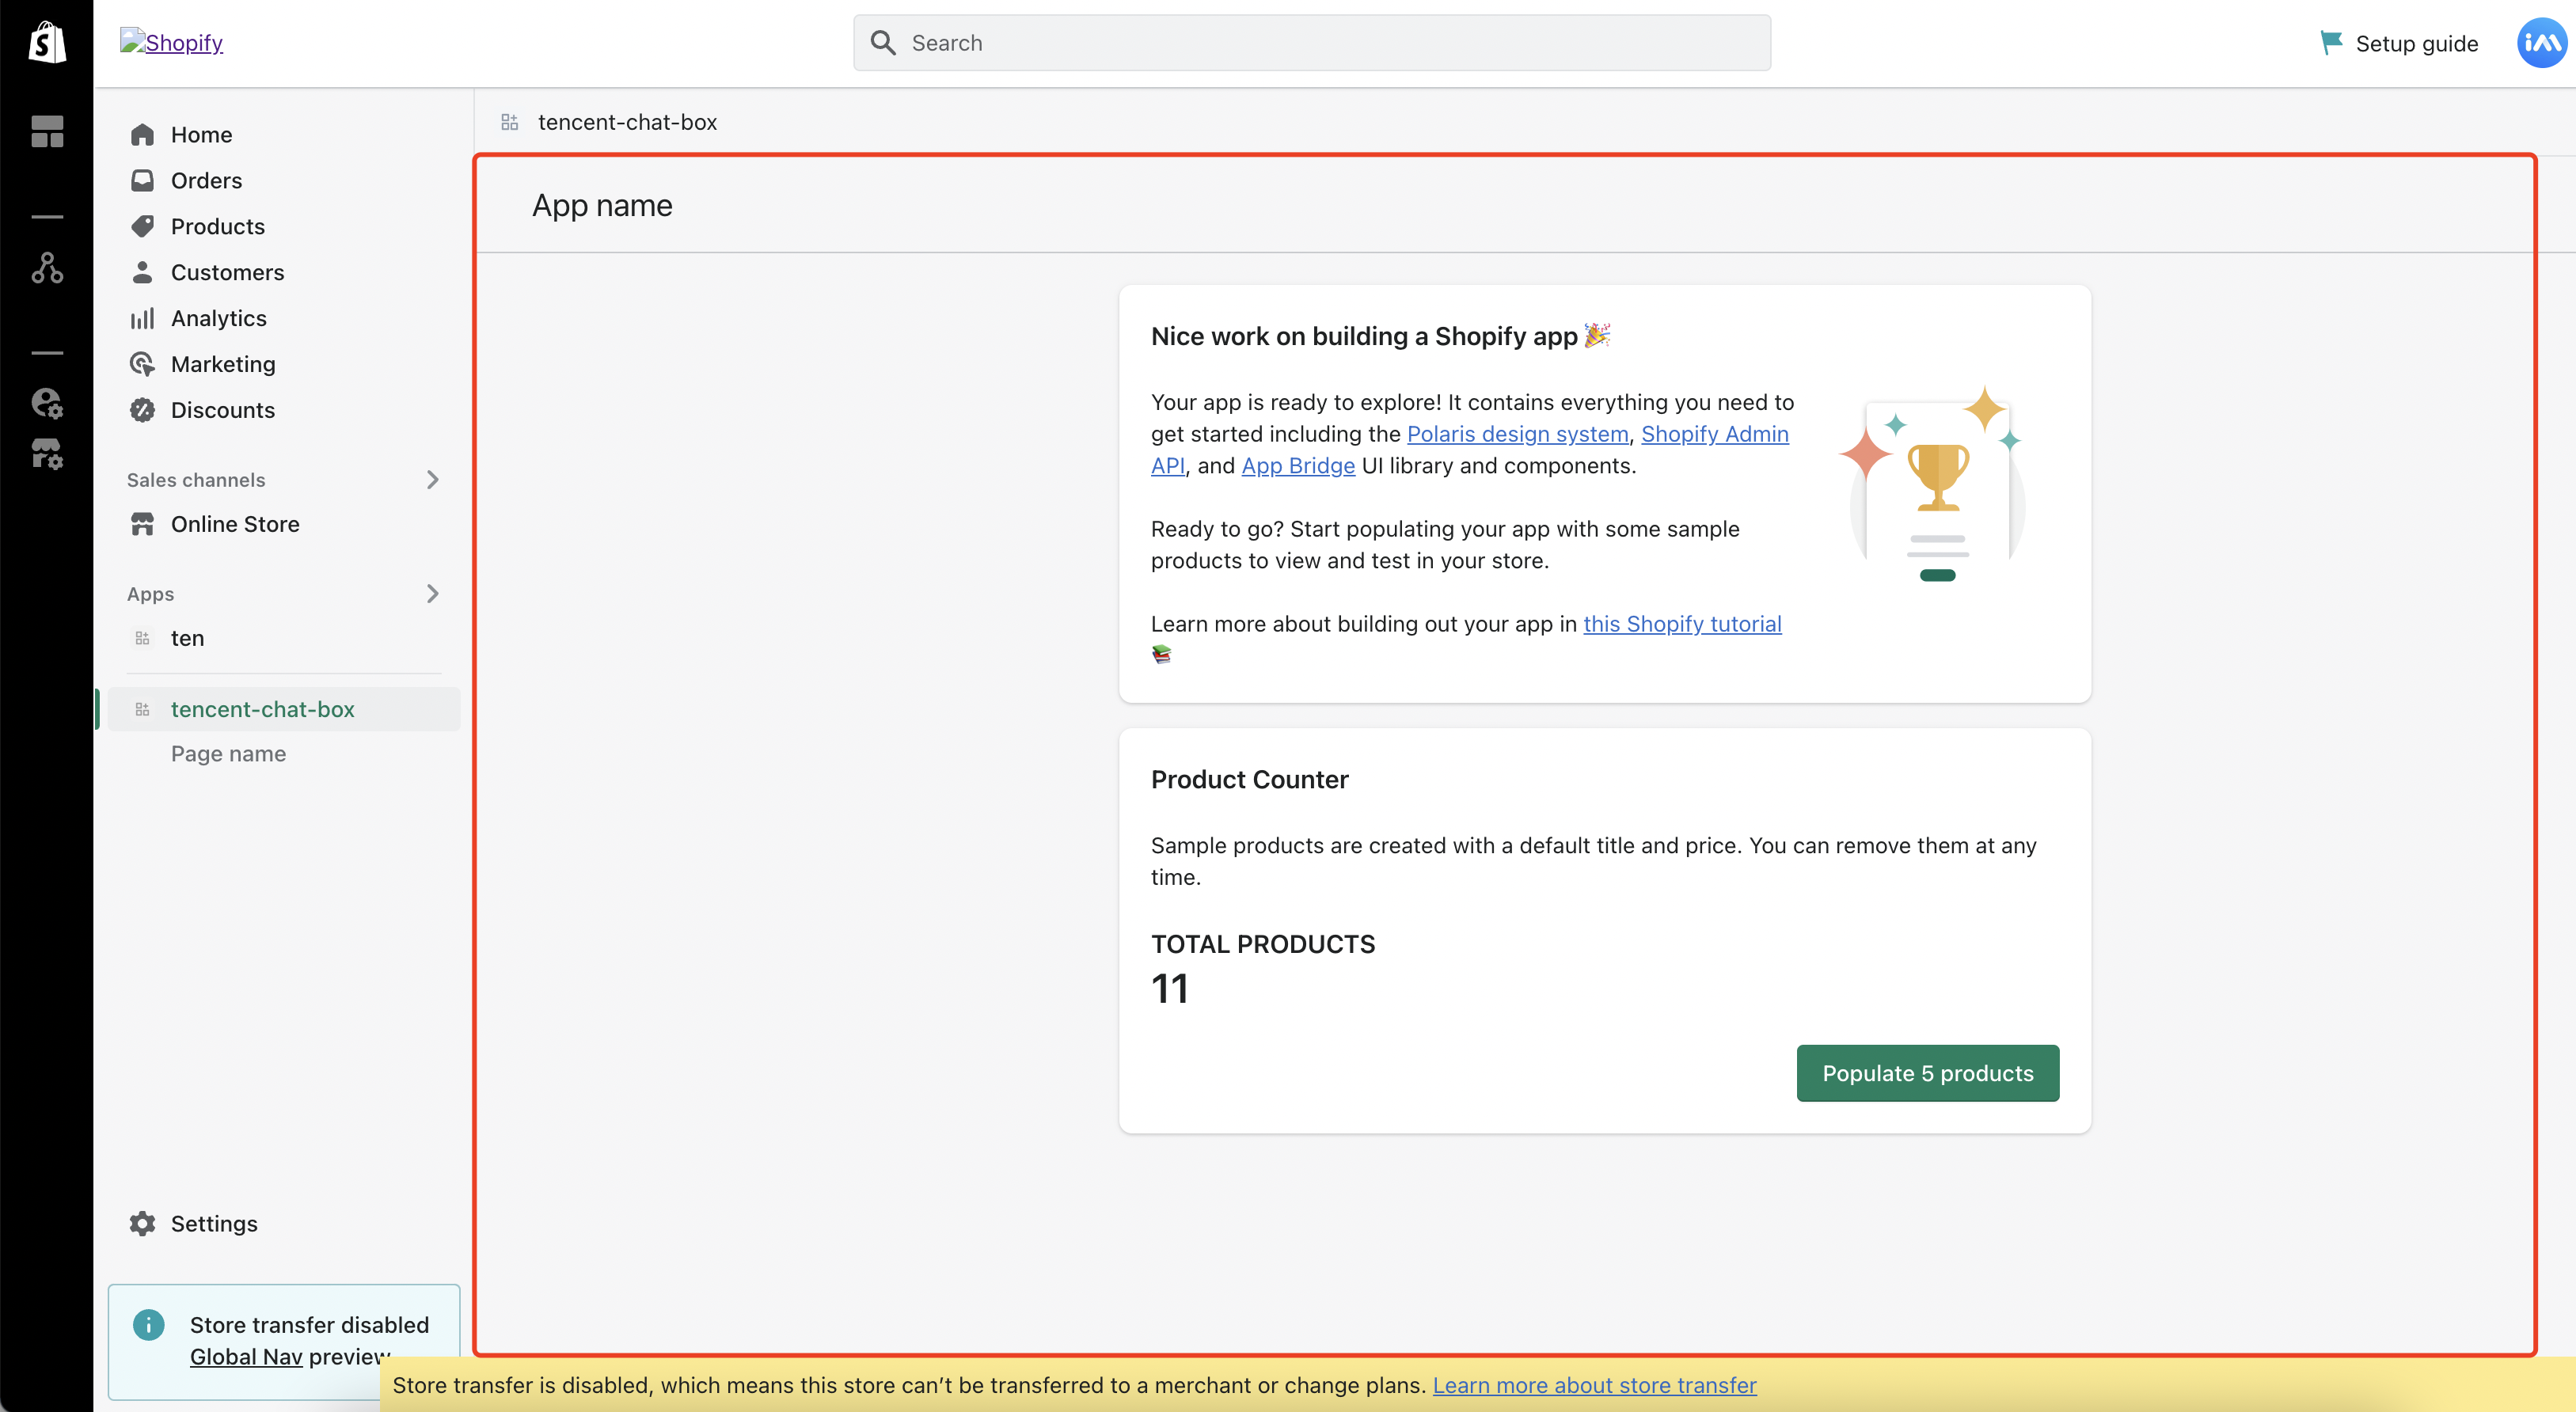
This step is optional, mainly to replace the default app page on admin with the configuration guidance page.
1. Replace the web/frontend/pages/index.jsx file.
Download the new file, named it as index.jsx and replace the file of web/frontend/pages/index.jsx.
2. Add the guide page.
Download the file, named it as Guide.jsx, and move it into web/frontend/components/Guide.jsx.
3. Add a line of export class to web/frontend/components/index.js.
Now, the updating of the admin page is finished, you can refresh the page and see the following page.
Step 5: Create a new extension
This extension will be the chat box widget shown at the bottom right of the online store.
You'll use Shopify CLI to generate a new extension first.
1. Navigate to the directory of the app that you want to add your extension to.
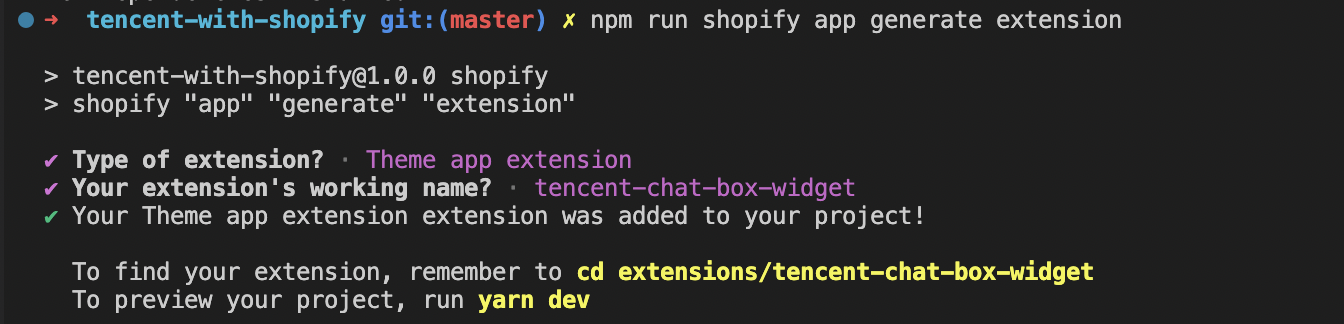
2. Run the following command to start creating the extension, choose Theme app extension as the Type of extension.
npm run shopify app generate extension
Note:
Please make sure you use Shopify CLI 3.0 or higher, if this command does not work.
After your theme app extension is created, you can preview your changes in real time by starting a local development server.
The dev command returns a preview URL that reloads local changes, allowing you to preview changes in real time using the store's data. This preview is only available in Google Chrome.
1. Navigate to your app directory.
2. Run one of the following commands:
npm run dev
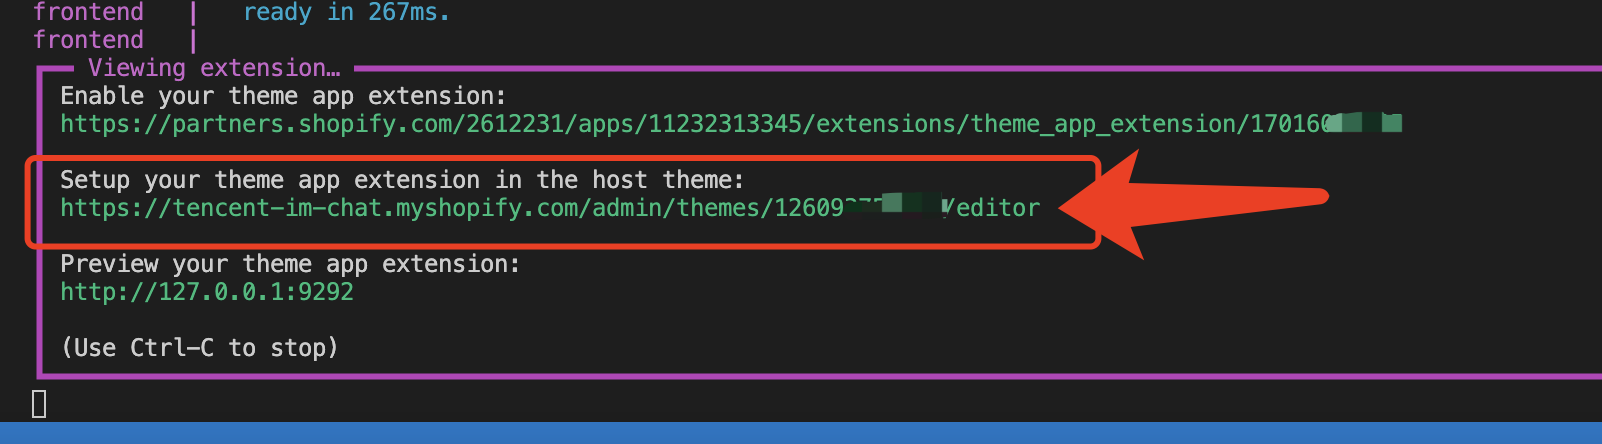
3. Follow the instructions in the CLI output to enable your theme app extension and set it up in the host theme.
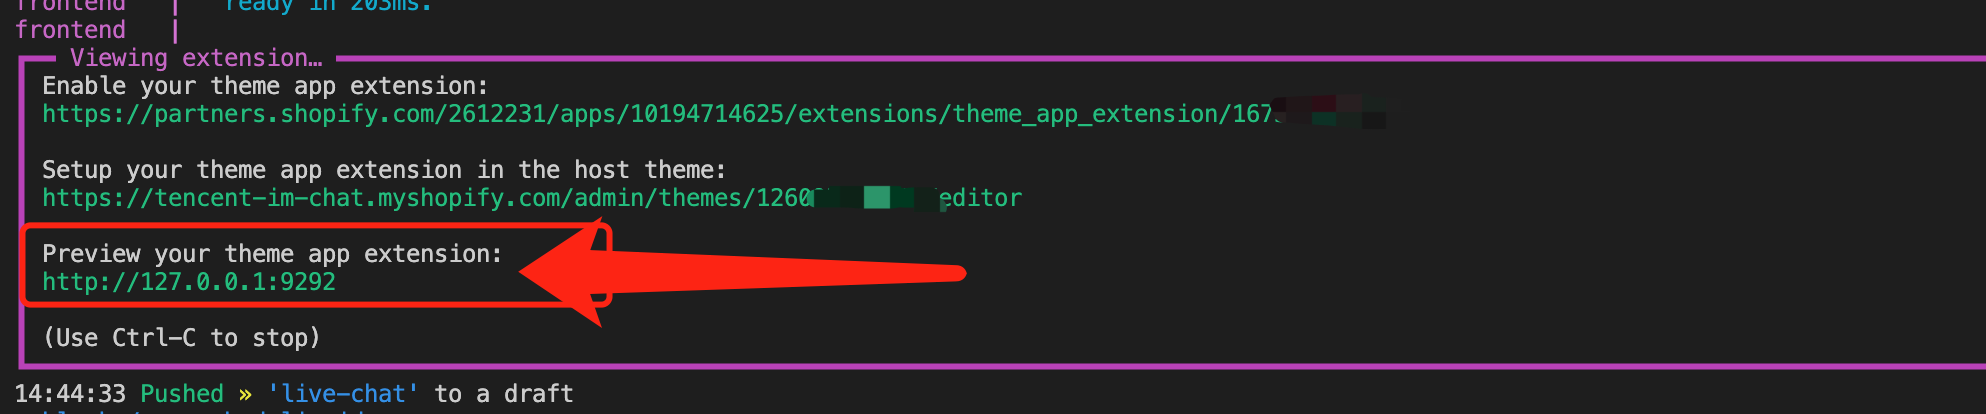
4. Click the URL that's printed at the bottom of the CLI output to preview your extension.
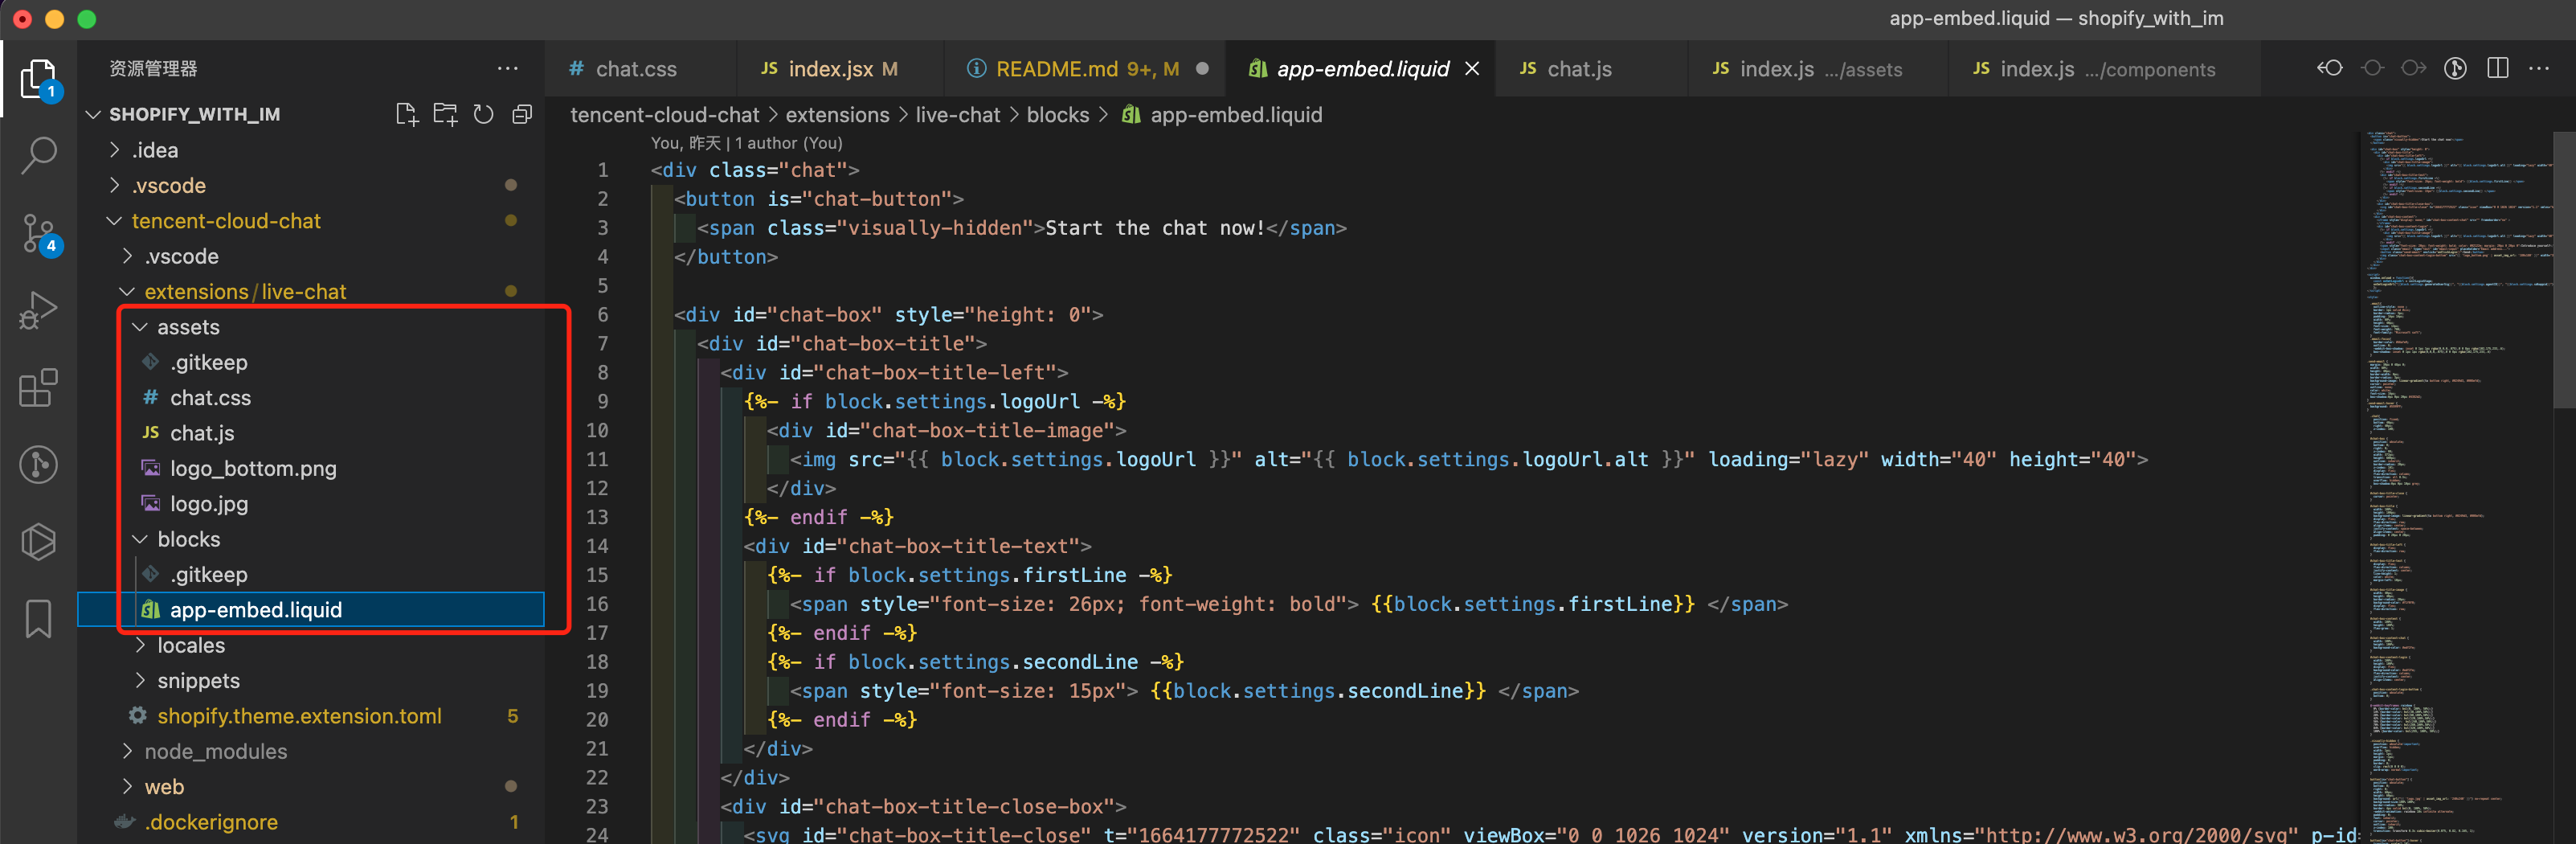
Step 6: Modify the code of extension to build a chat box widget
3. Move and replace the assets and blocks directory to extensions/(your extension directory), and it will be like:
Step7: Start up a server to generate UserSig for each UserID
As you can see in our DEMO (password is tencentim), visitors are supposed to start a chat with their email address, and this field will be the user ID for you app of Tencent Cloud Chat.
As a result, you should start up a server to generate UserSig from UserID, while the SECRETKEY and SDKAppID have been stored on your server for safety purposes.
You could build this service by yourself or using the serverless template we provided.
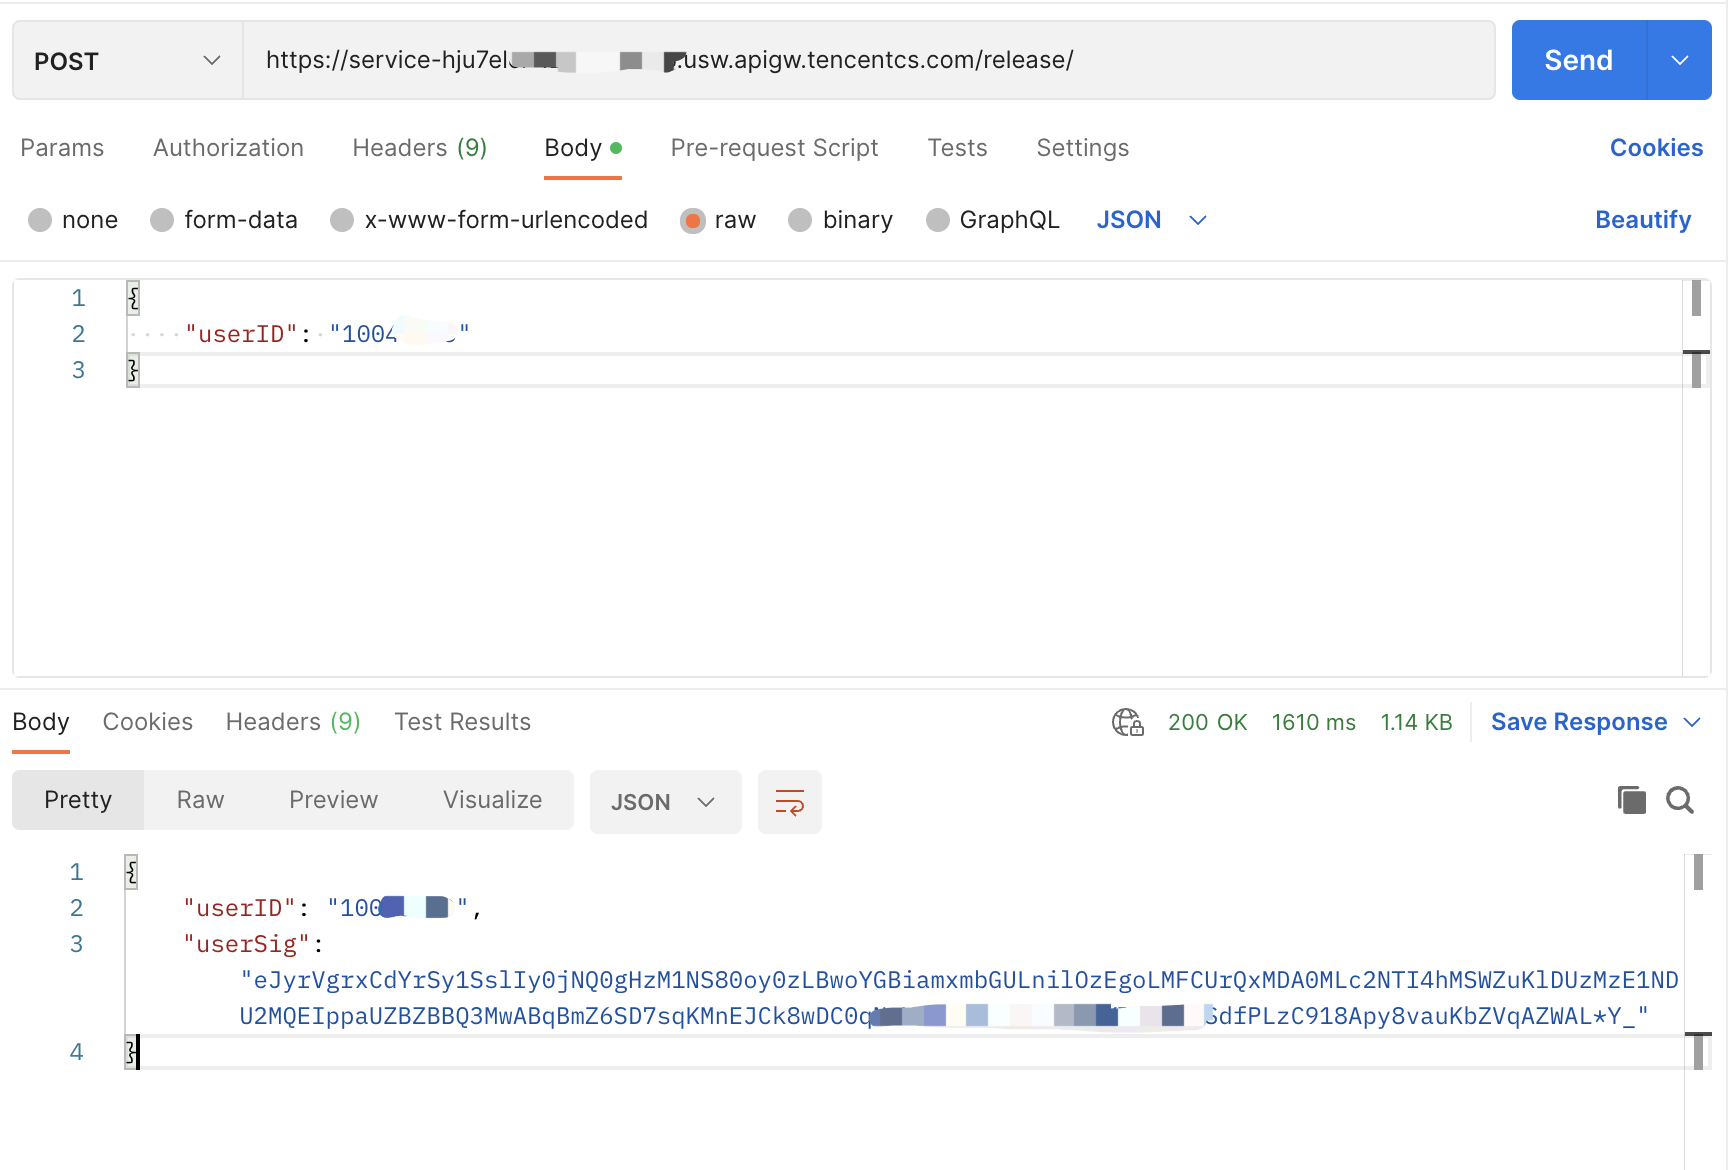
The communication between the chat box and your server should use RESTful API, with POST request.
The following shows request parameters from the chat widget. The Content-Type is application/json.
{
"userID": "The User ID"
}
The response body from your server should be like following:
{
"userID": "",
"userSig": ""
}
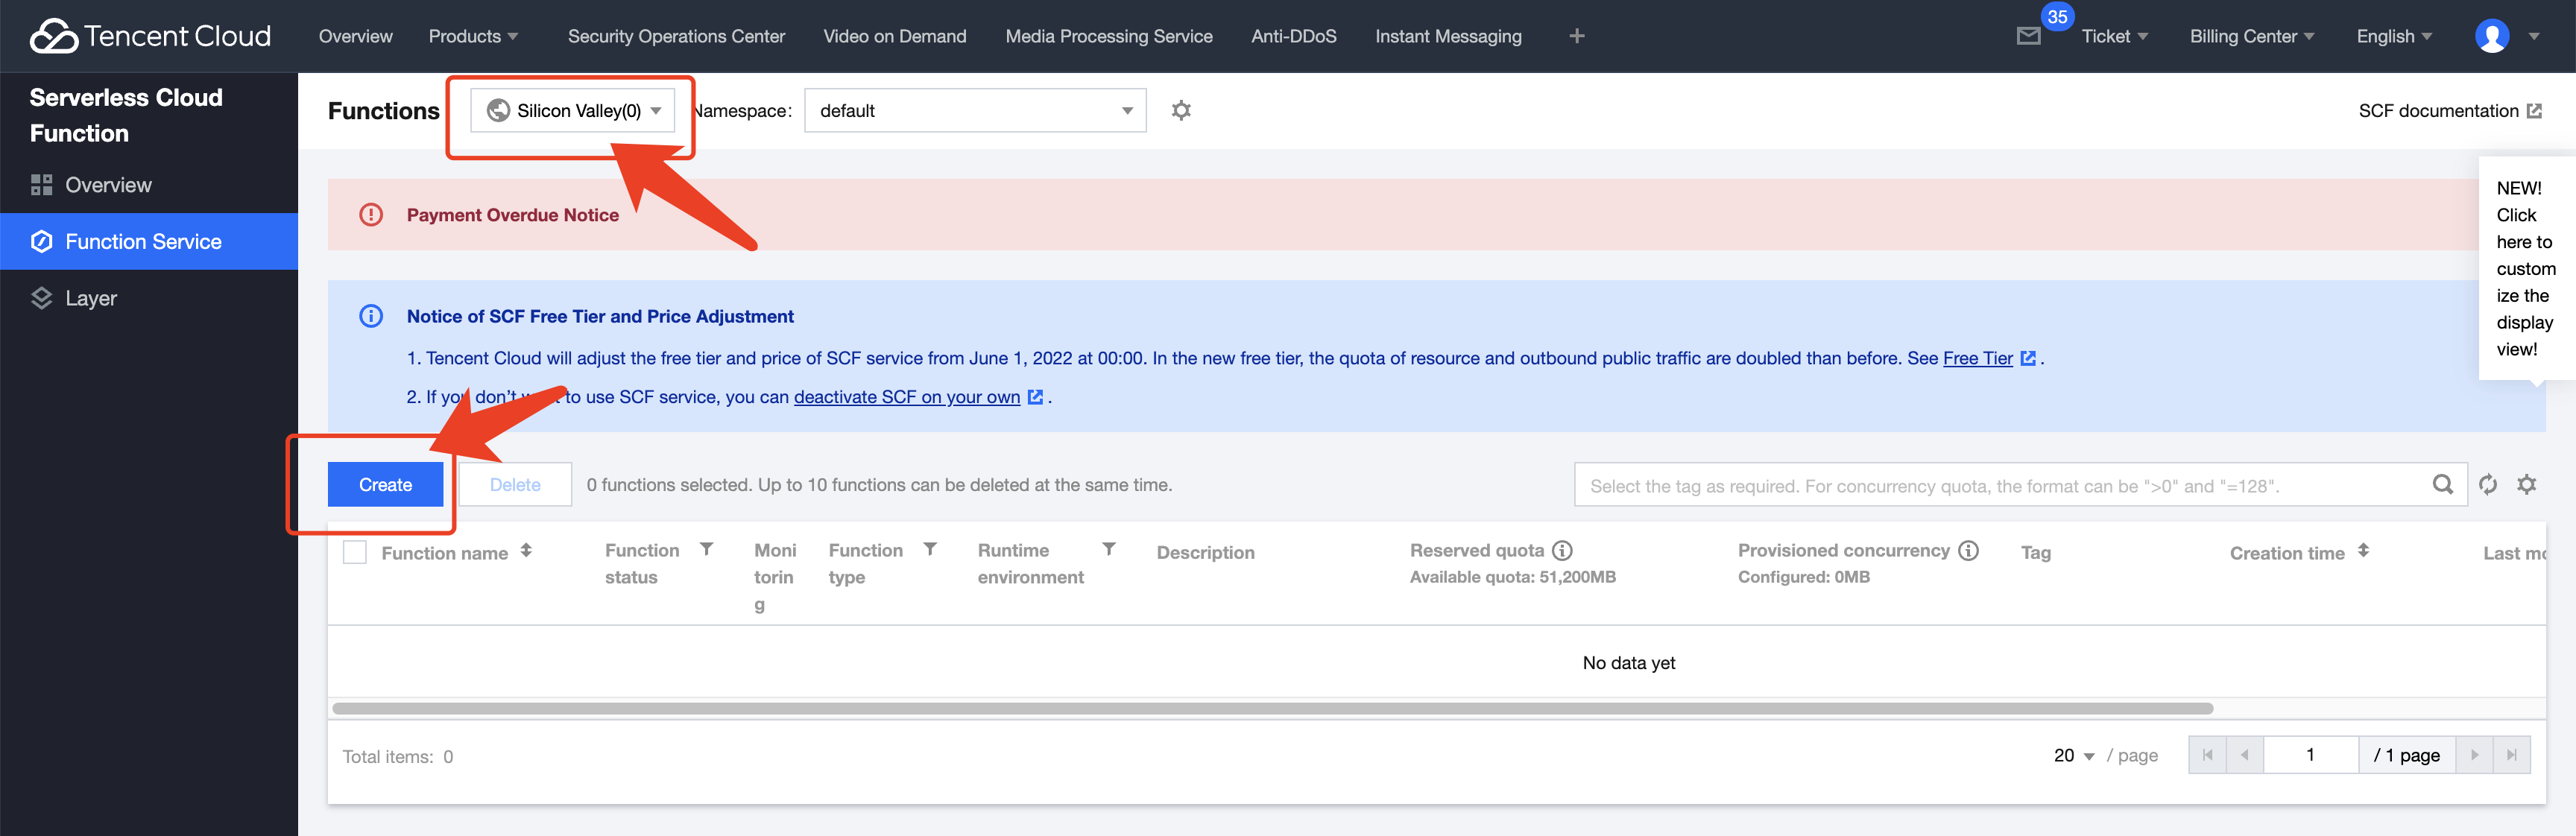
Set up the UserSig generation service with serverless function
You are also encouraged to use our template to create a serverless function on Tencent Cloud, if you find complicating to build such a UserSig generation service.
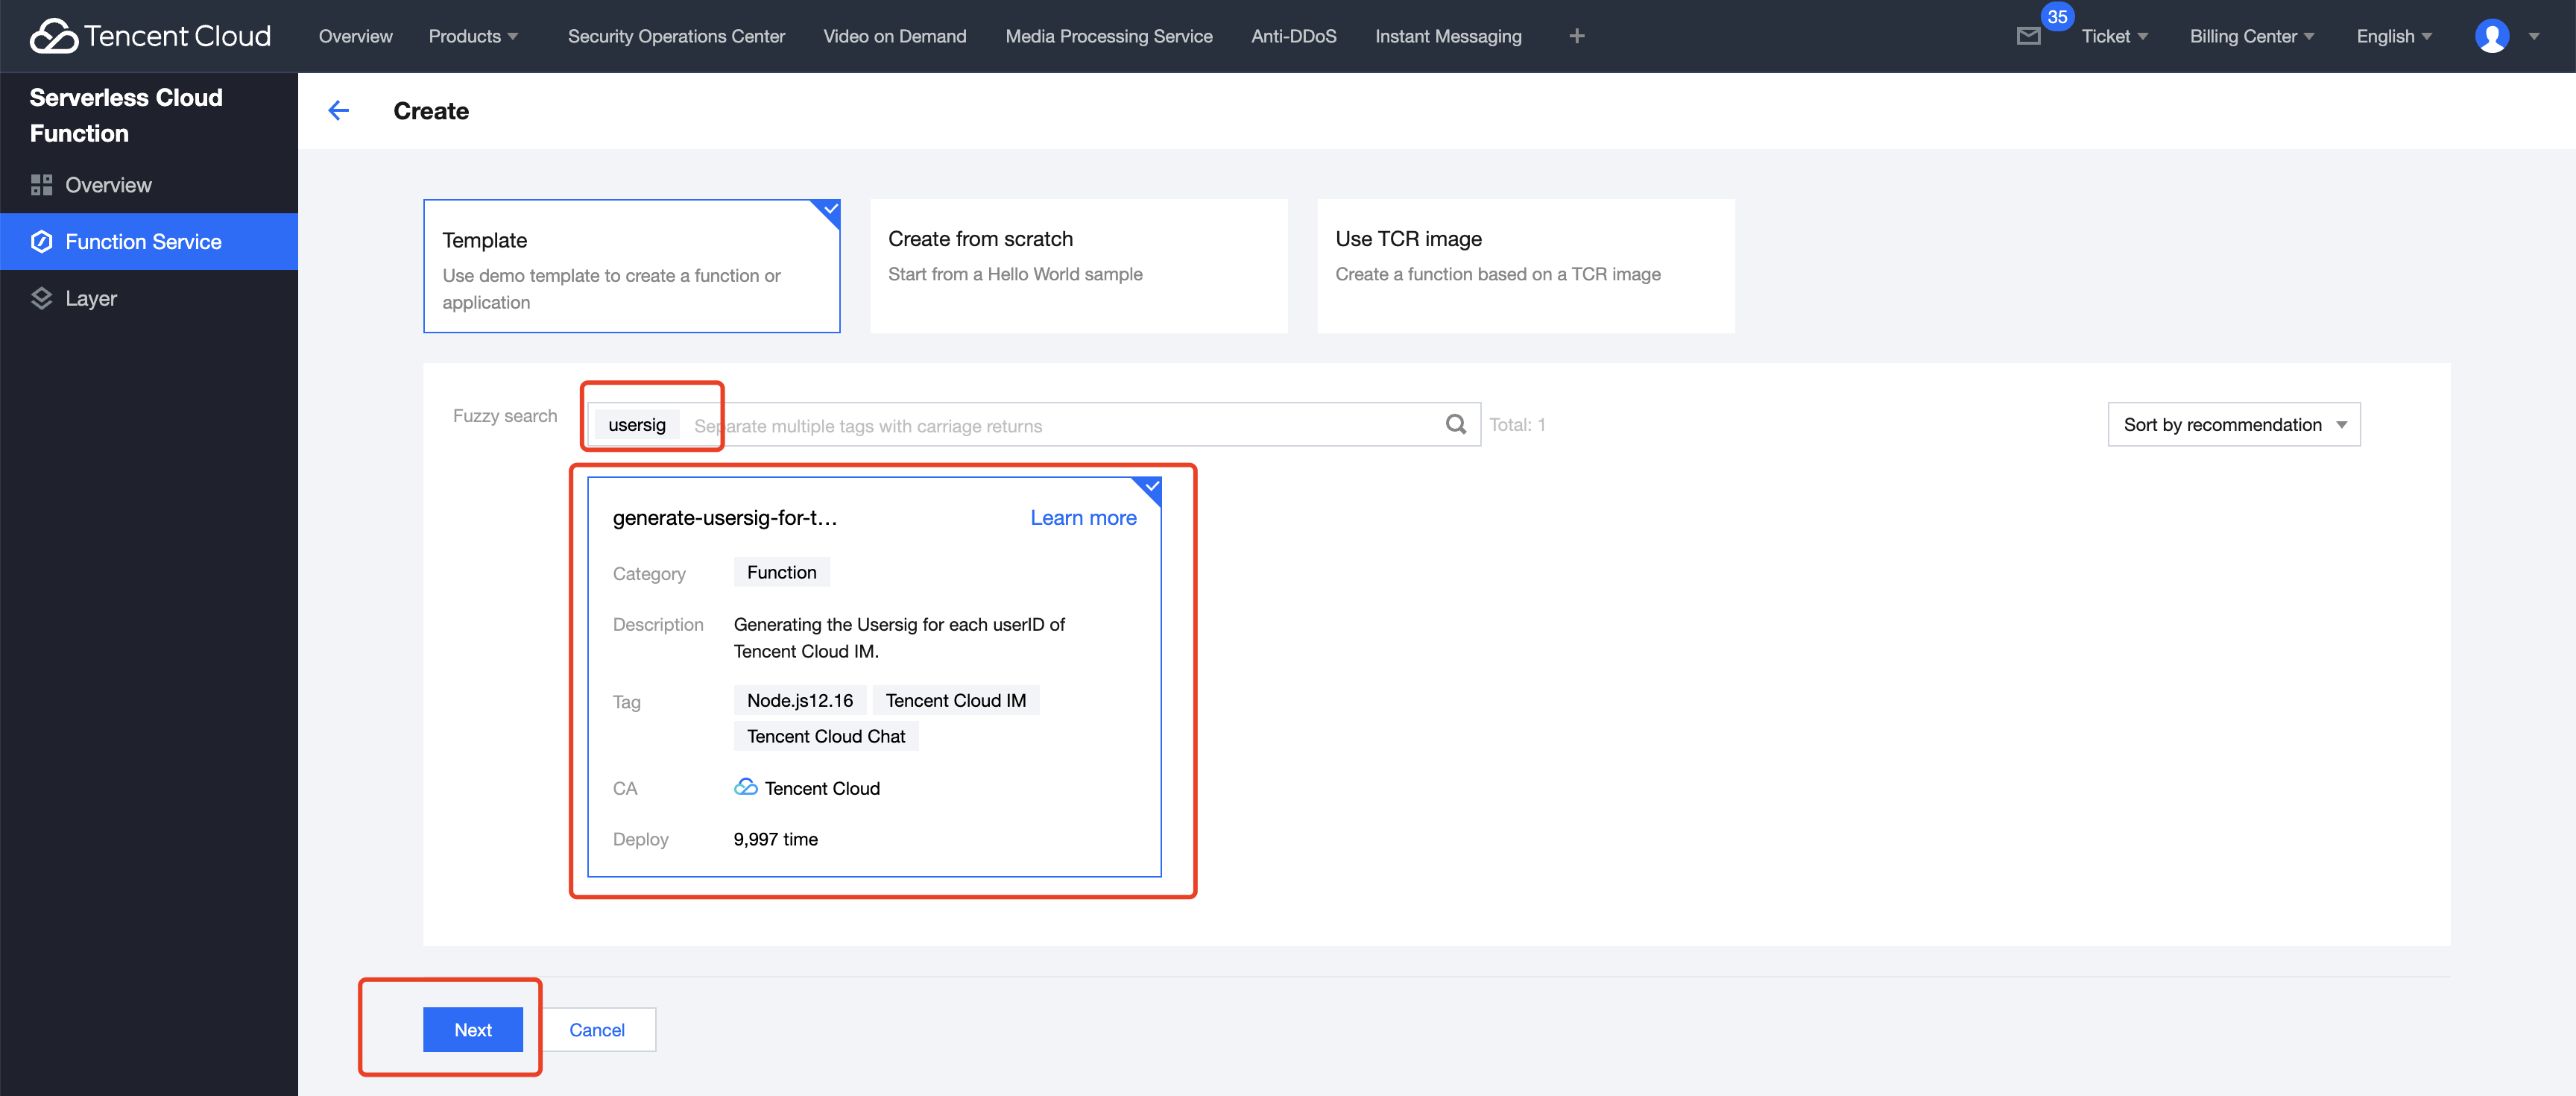
2. Search by keyword, usersig, choose the following one, then click Next.
3. Specify the Function name based on your needs.
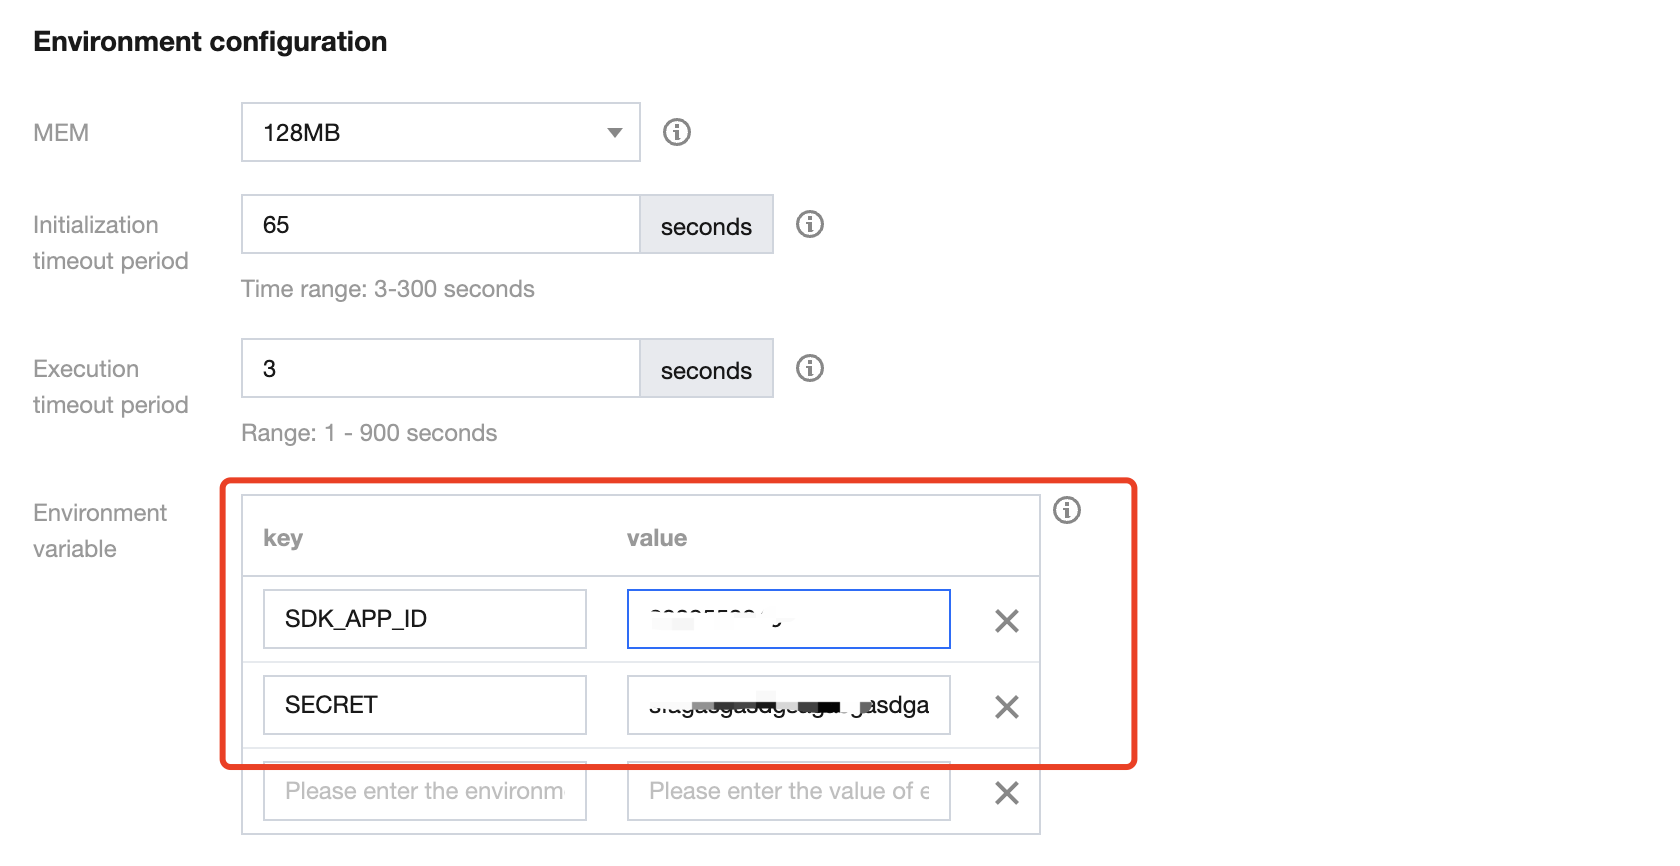
4. Click the Advanced configuration module and add the following Environment configuration.
key
value
SDK_APP_ID
(Your SDKAppID)
SECRET
(The Key shows on the main page of the IM console)
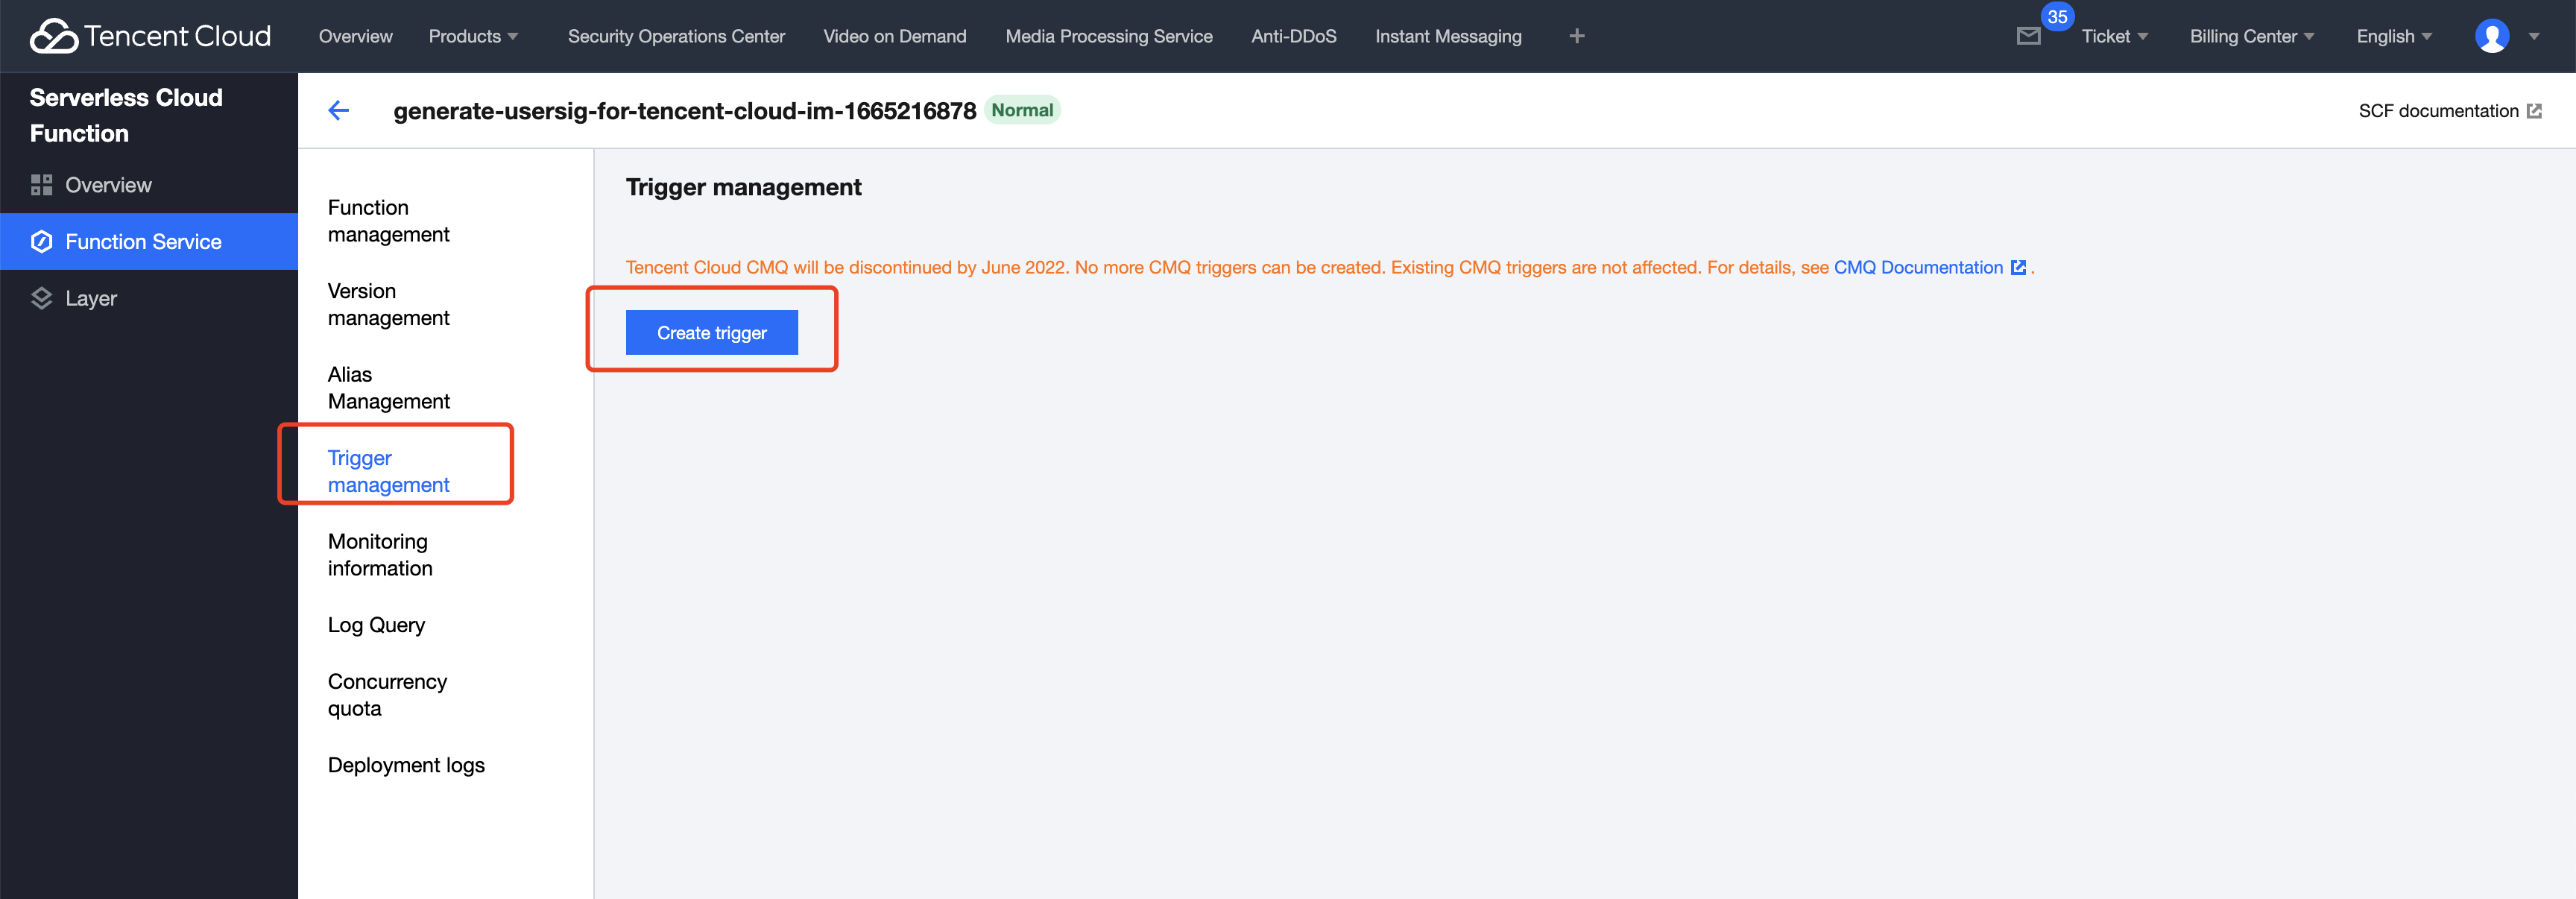
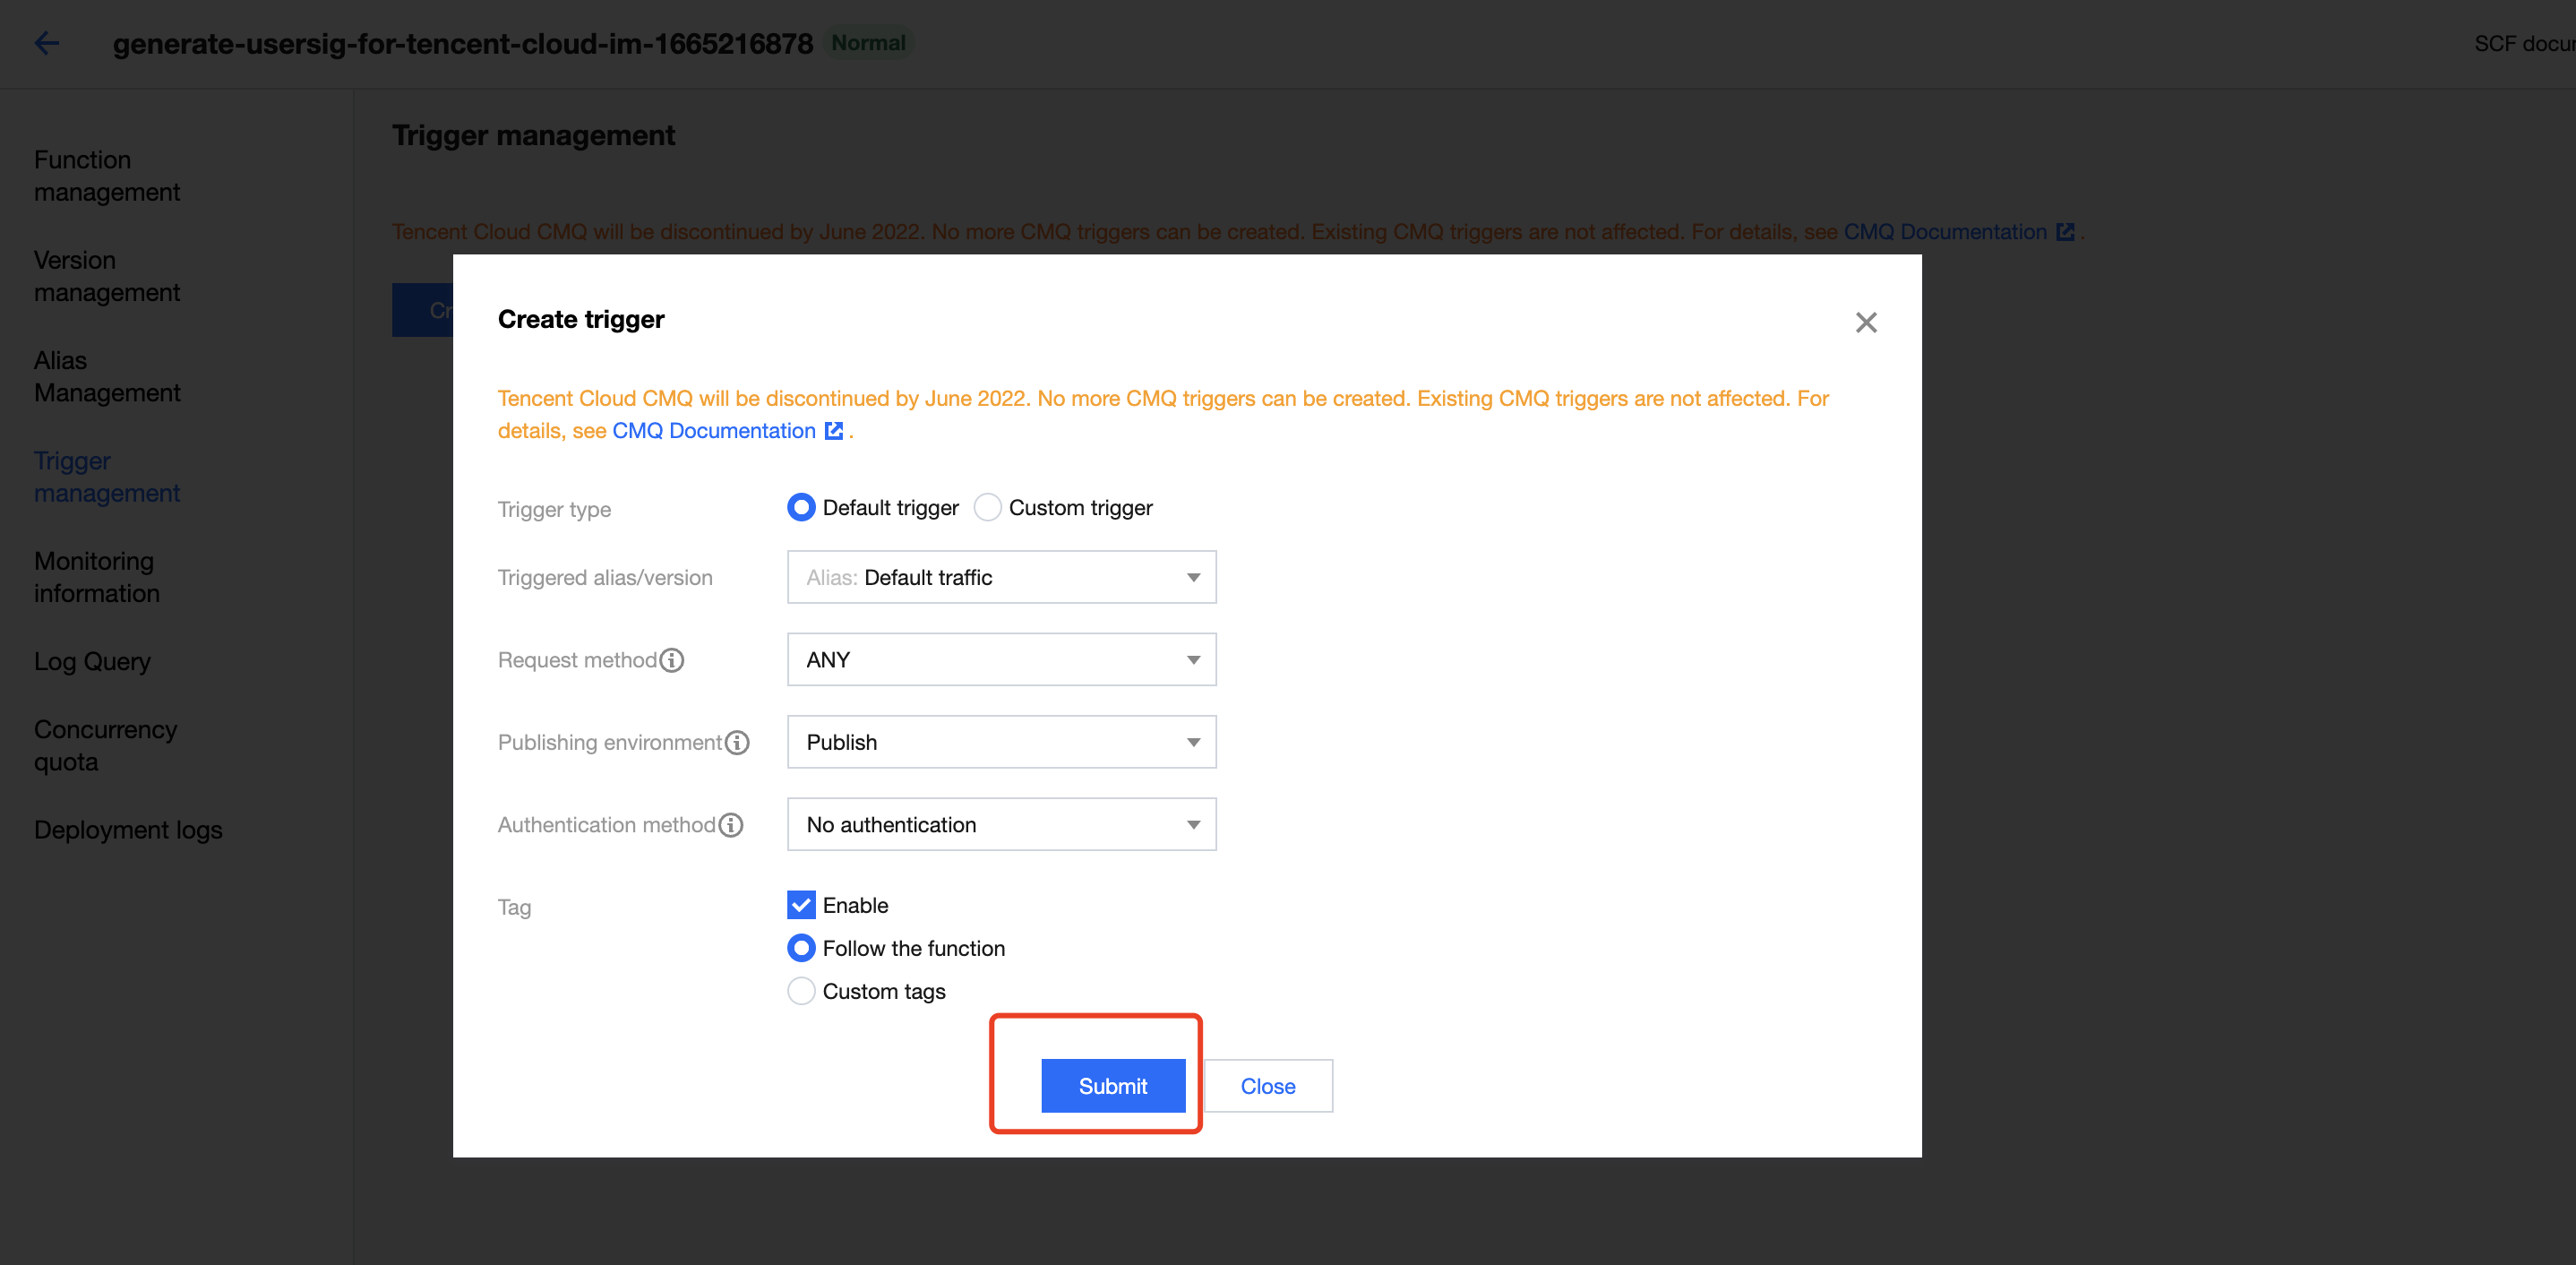
5. After deployment, create a trigger for it by clicking Trigger management on the left bar, then click Create trigger. Use the default settings on the modal opened, then click Submit.
It might require granting permissions to API Gateway first, please follow the instructions to grant.
6. Find the URL of the API created from Function management => Function codes => Access path. This URL will be used in the following steps.
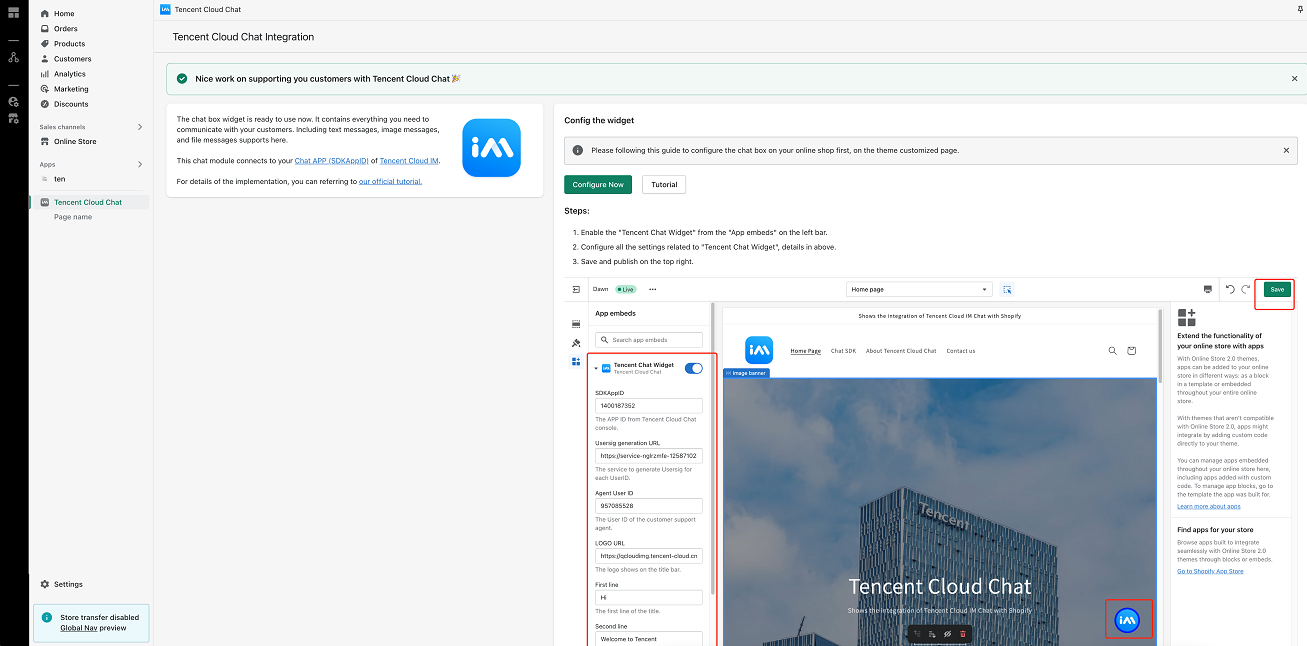
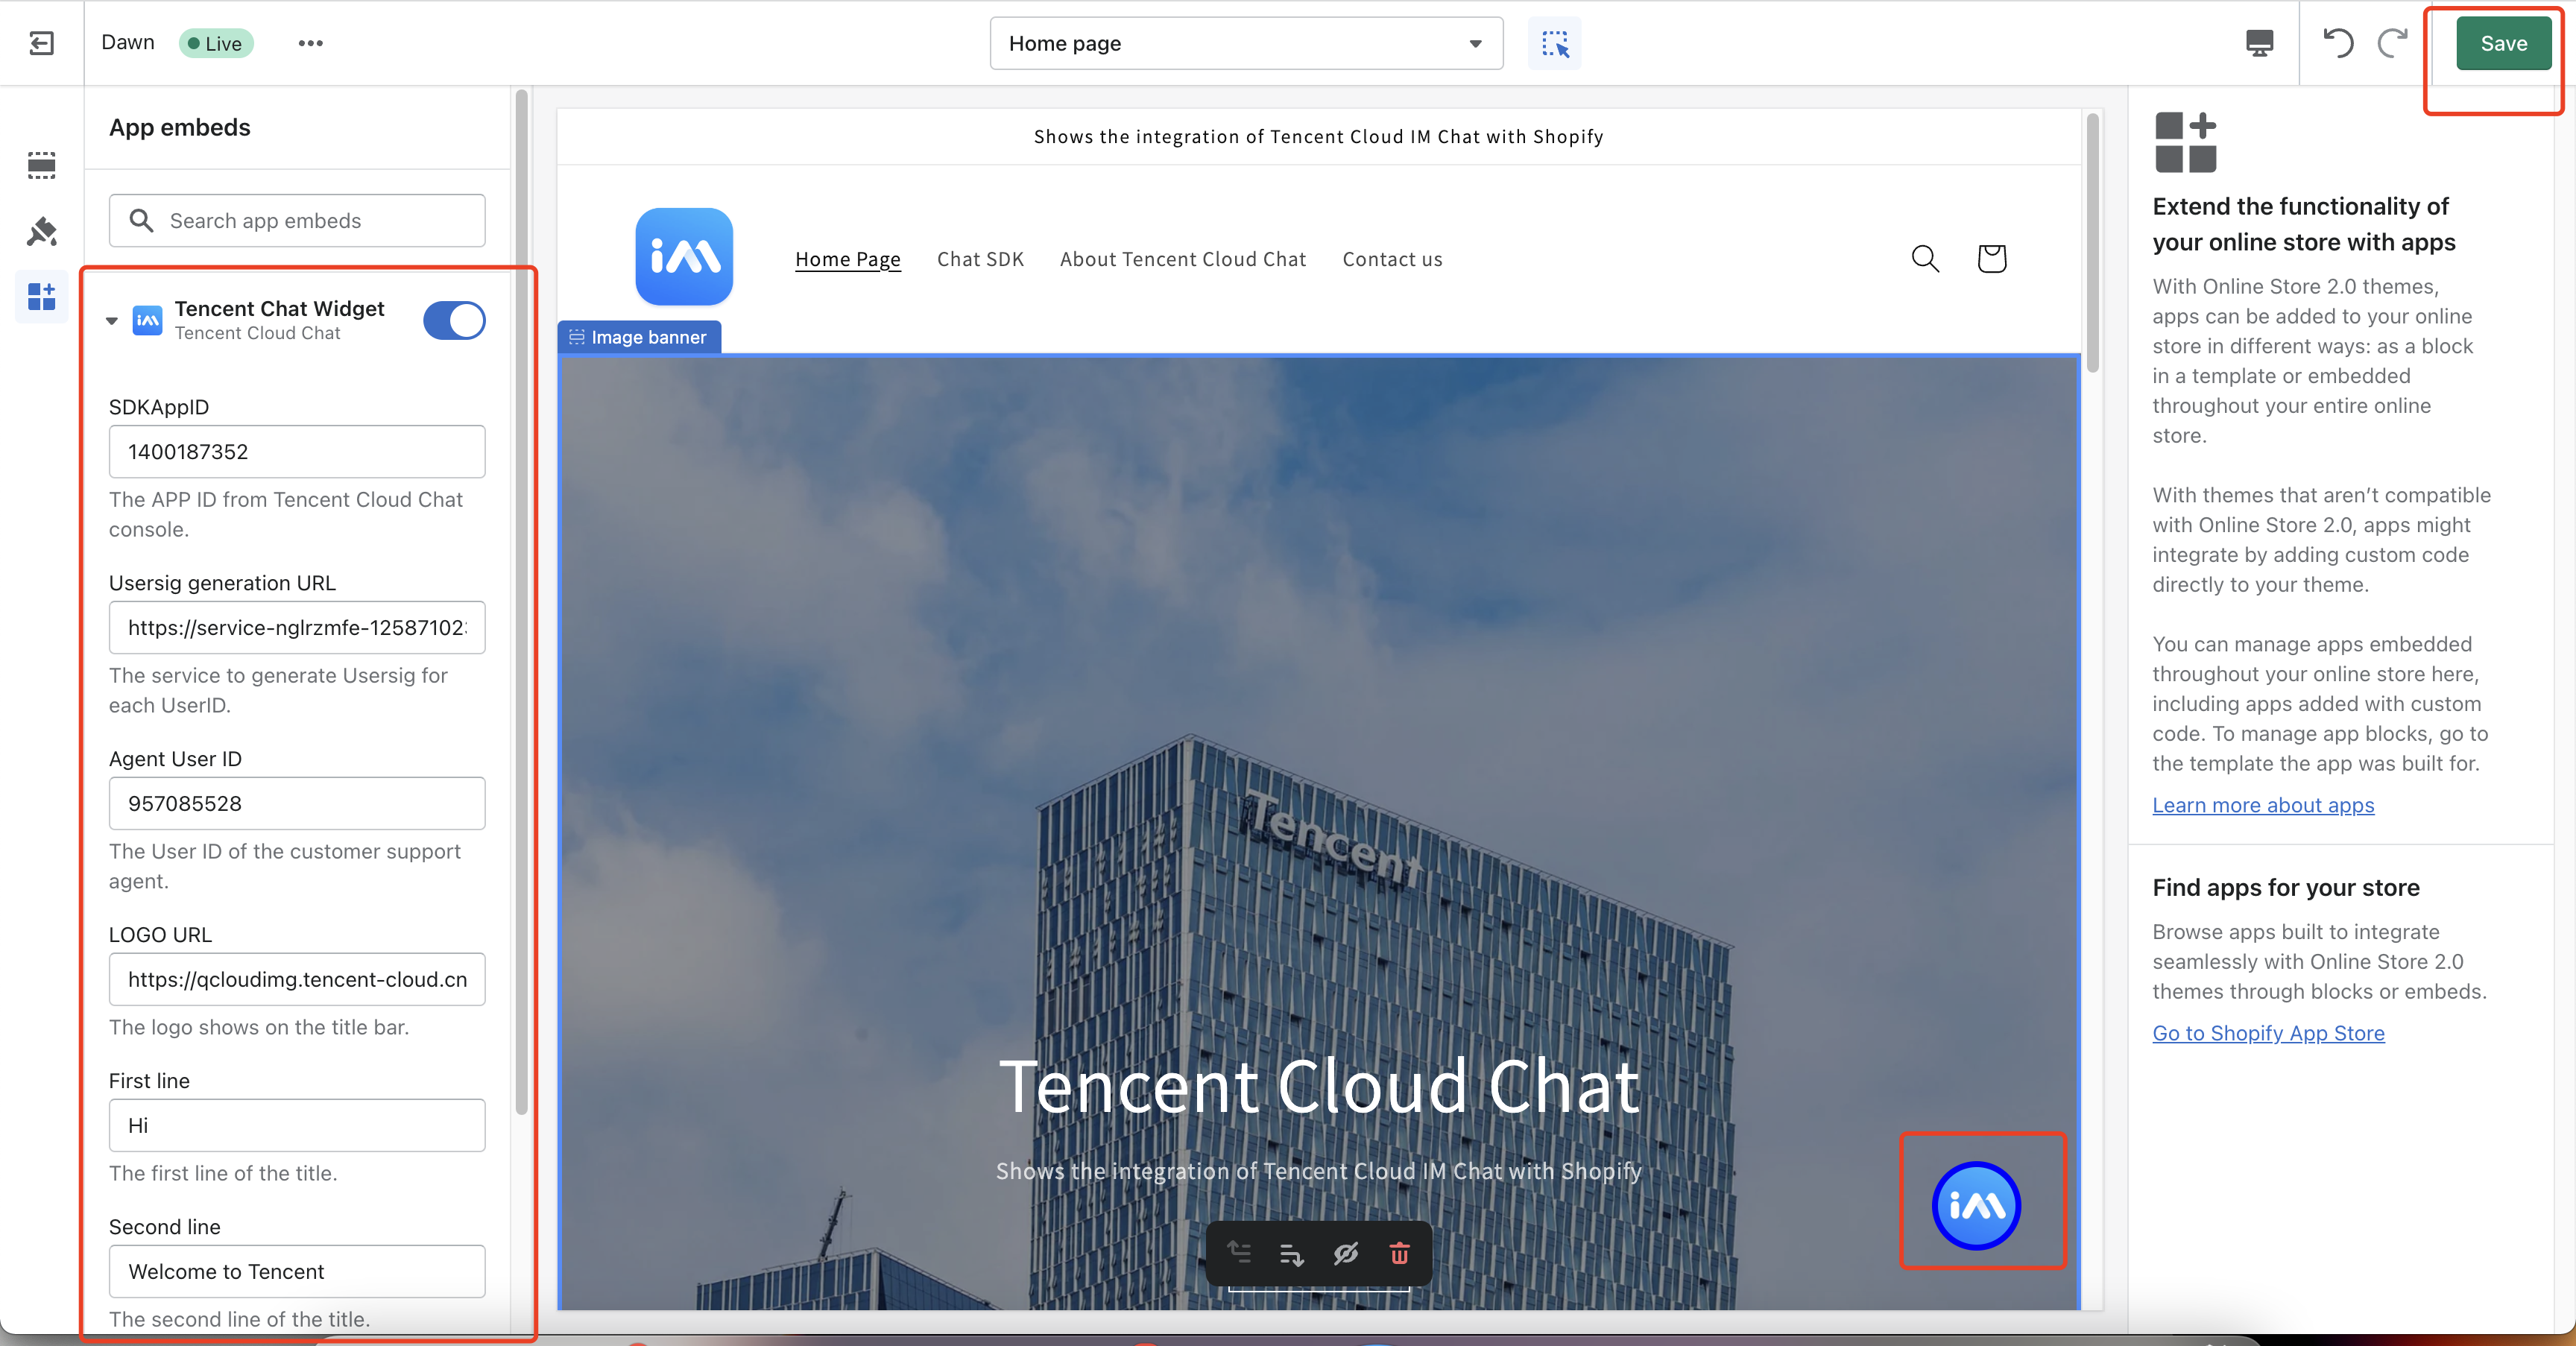
The service to generate Usersig for each UserID. The URL of the API was created from step 7.
true
Agent User ID
The User ID of the customer support agent. The user who visitors chat with.
true
LOGO URL
The logo shows on the title bar.
false
First line
The first line of the title.
false
Second line
The second line of the title.
false
After the configuration, click the Save button on the top right.
Now, you can click the third URL that's printed at the bottom of the CLI output to preview the extension.
Make sure the chat widget works well. You can refer to our sample codes, if errors are encountered.
Step 9: Deploy the chat widget extension
After your chat widget extension is ready for online stores, you can deploy the latest code and make the app extension public to the development store.
1. Navigate to your app directory.
2. Run the following commands:
npm run deploy
3. After you deploy the extension to Shopify, navigate to your app in the Partner Dashboard, click Extensions, and click the draft version that you previously created.
4. Click Create version to create a version of your theme app extension.
5. Click Publish beside the version that you want to publish, and click Publish in the popup modal to confirm.
Step 10: Install this app to your online store
1. From the Shopify Partner Dashboard, go to Apps and then select your newly created app from the list.
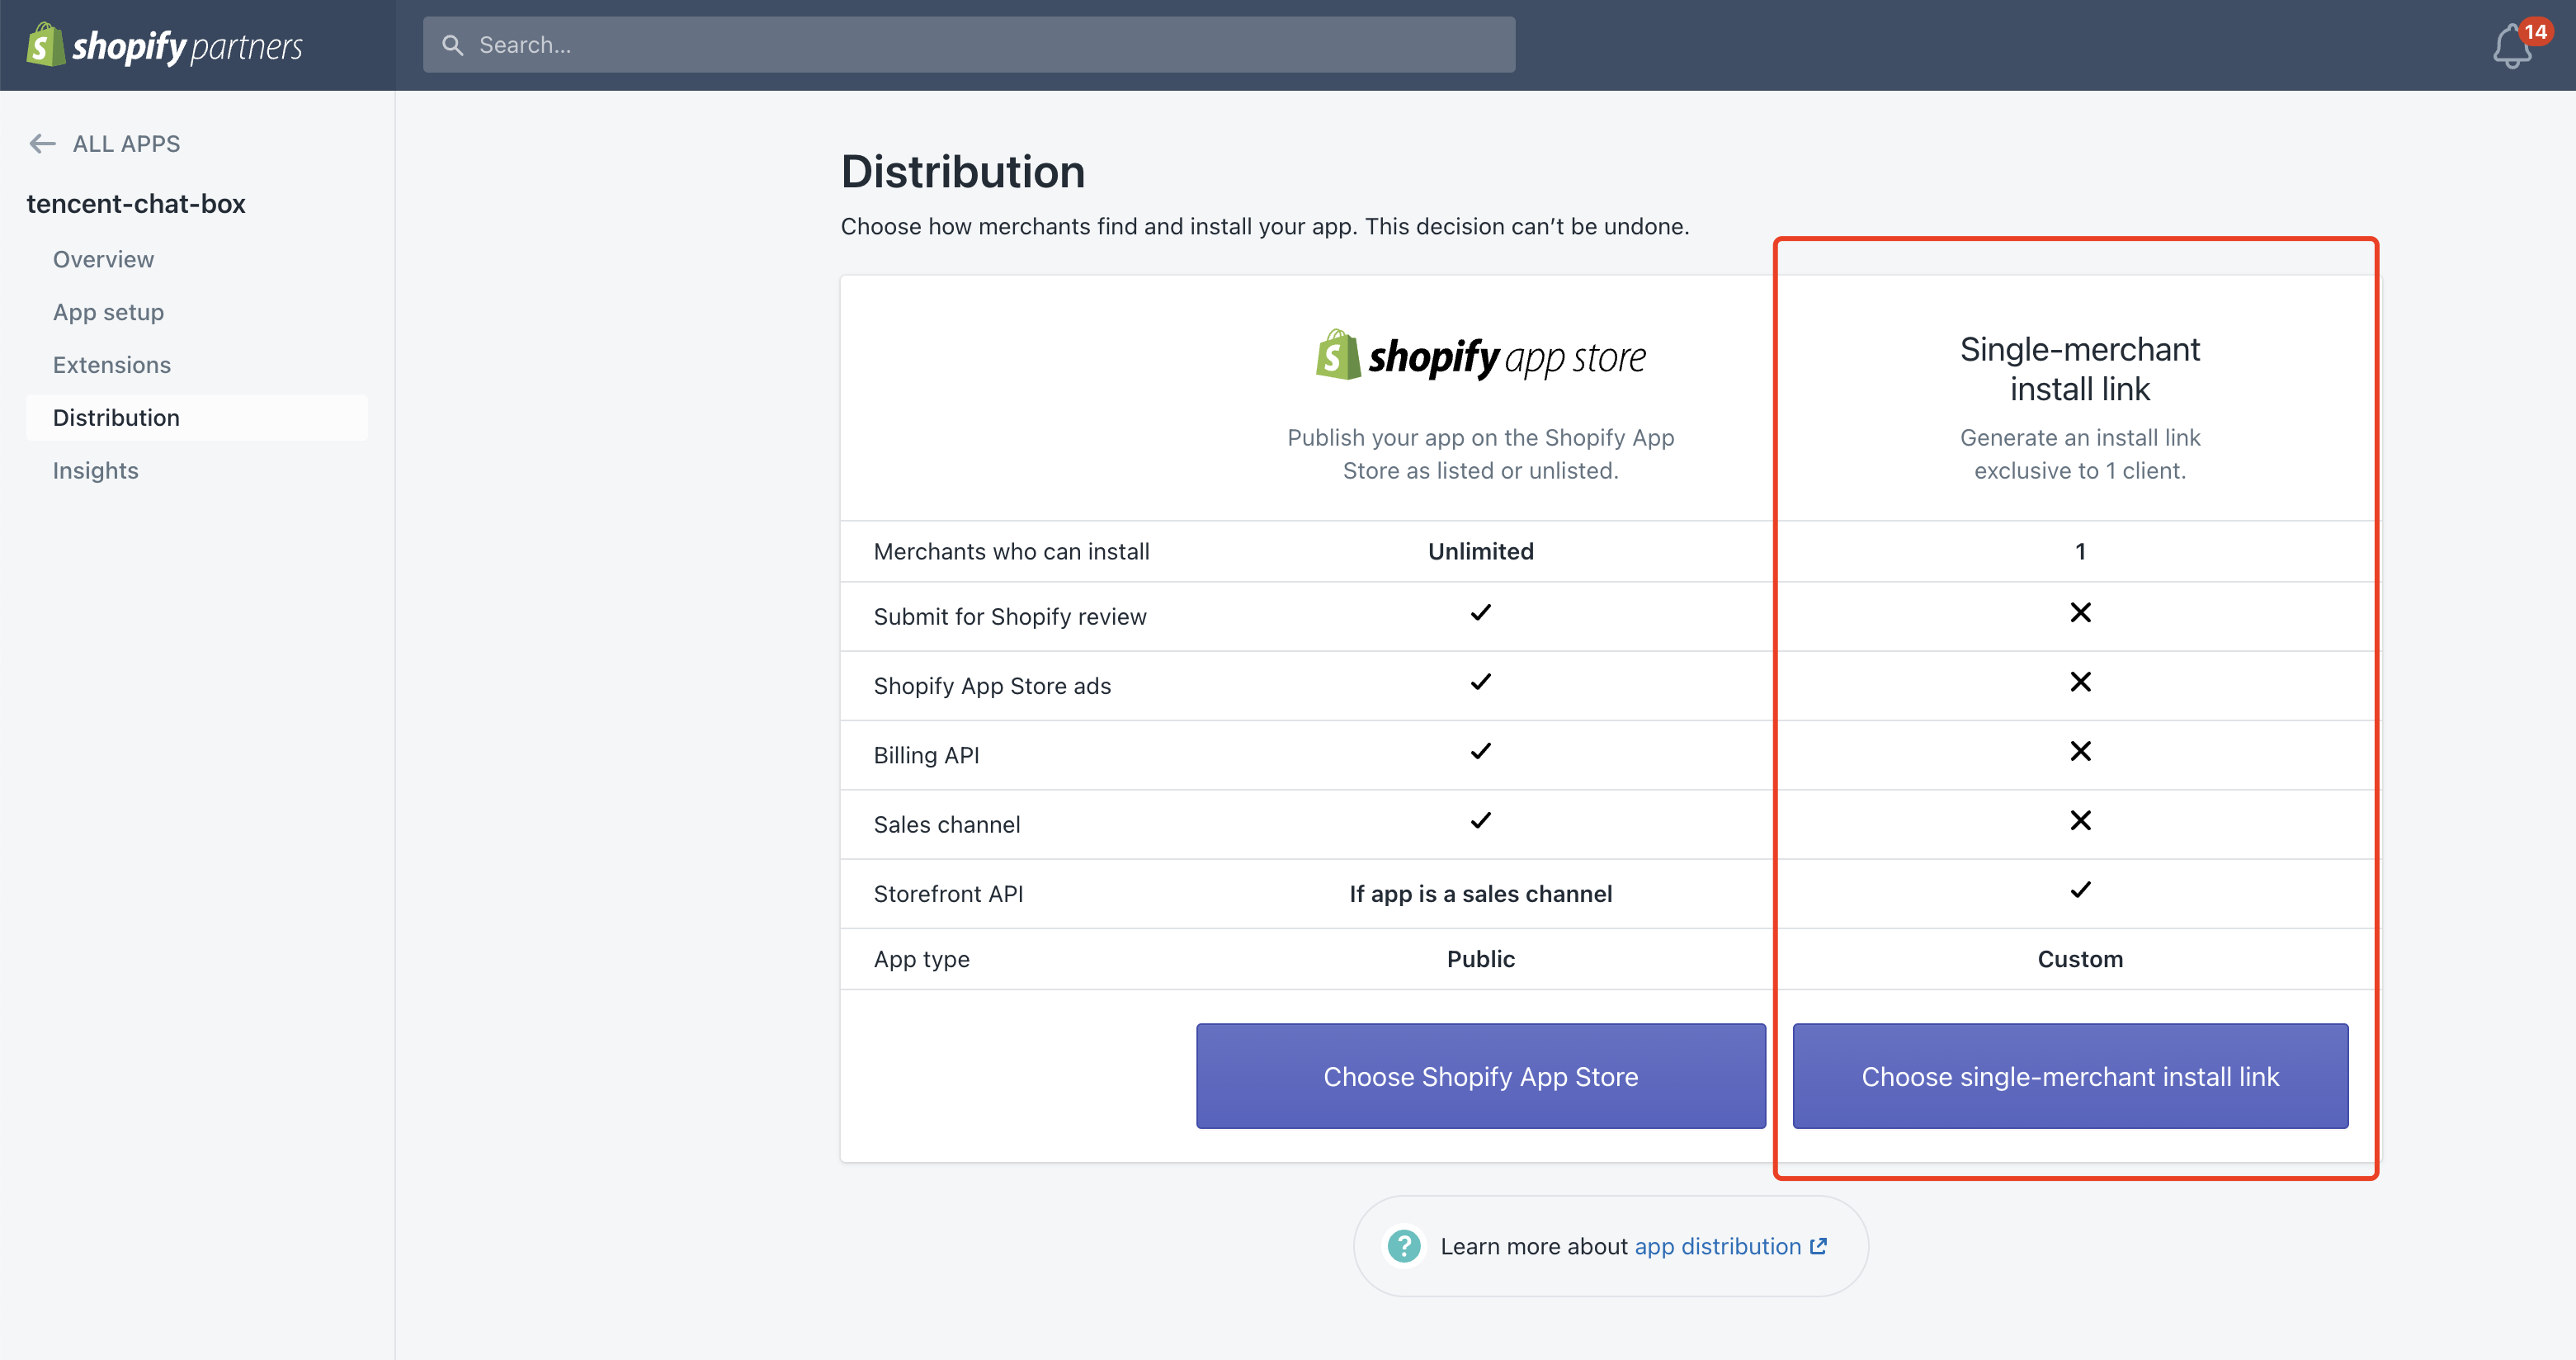
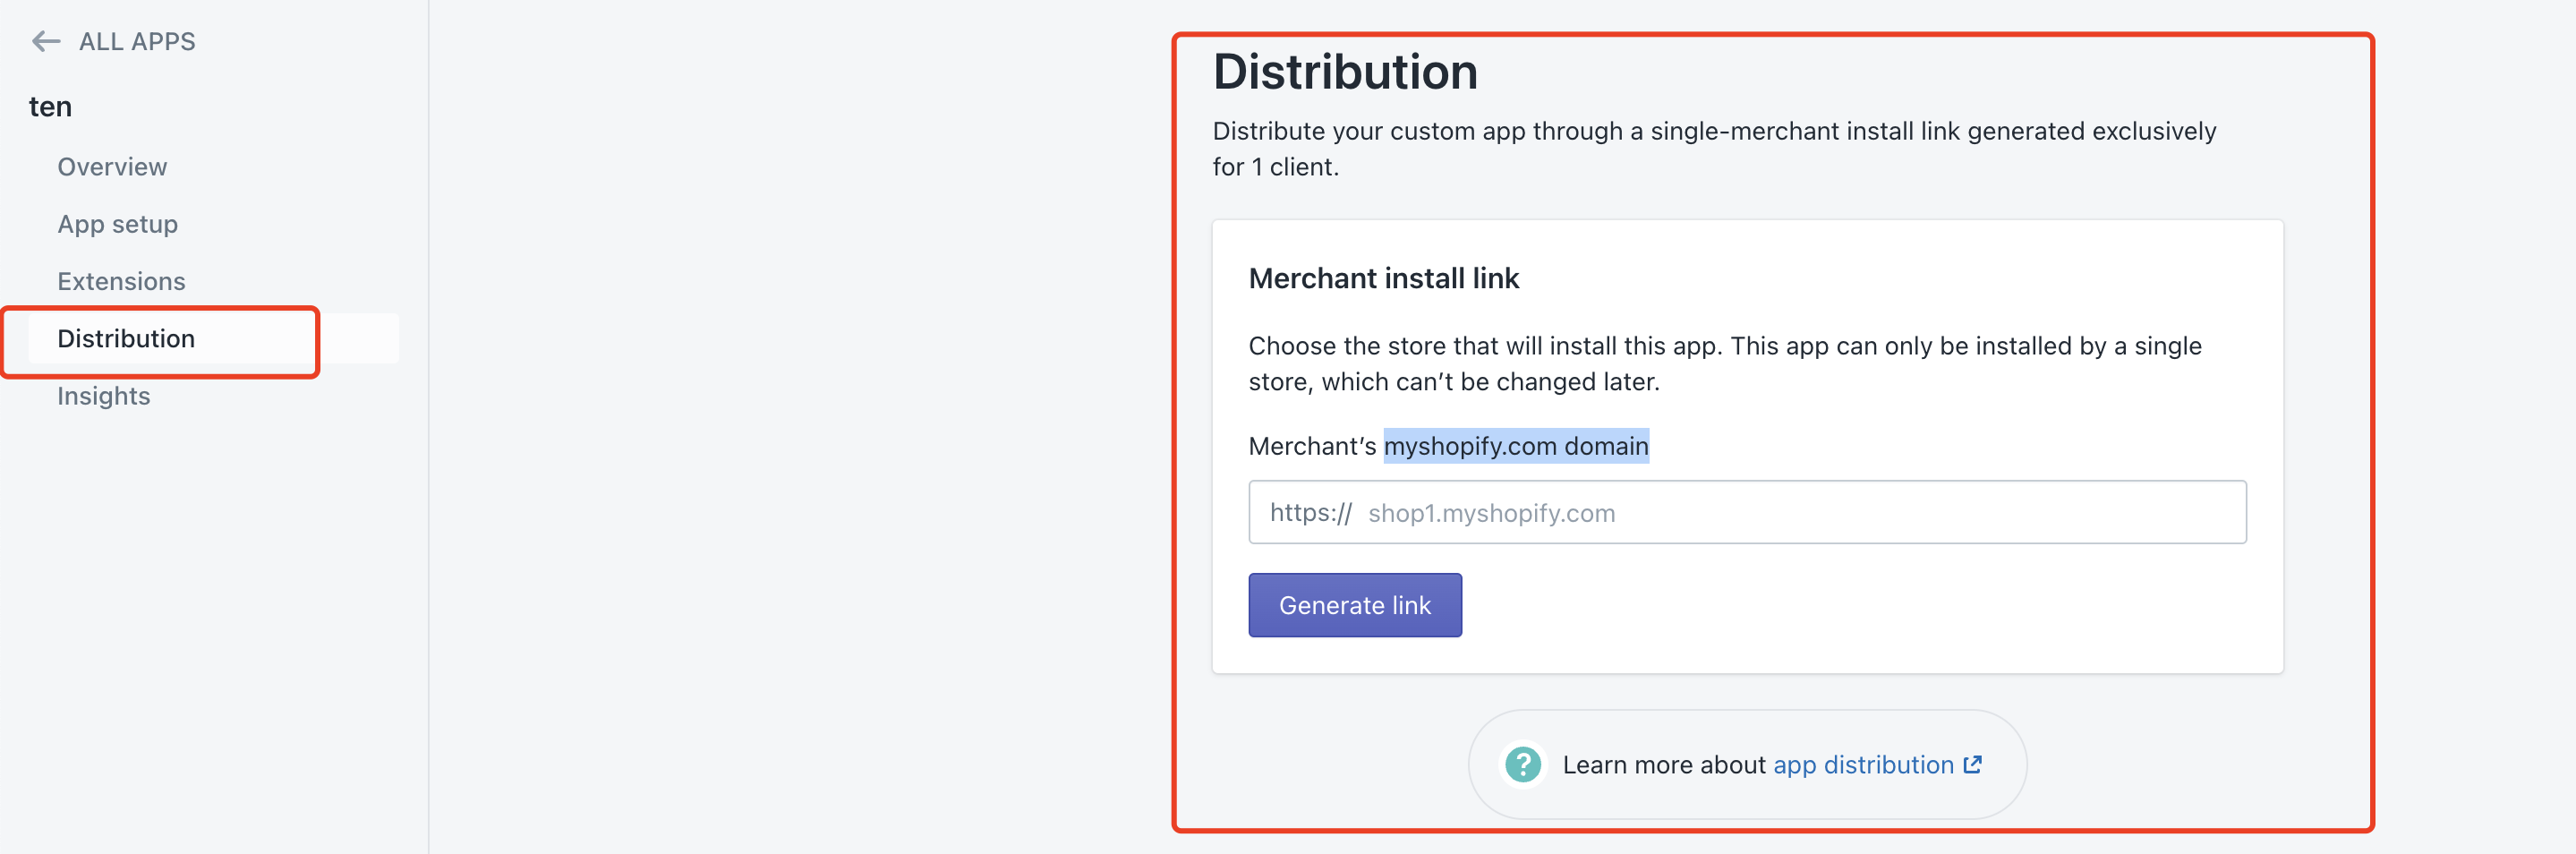
2. In the sidebar, click Distribution.
3. Select "Single-merchant install link" as the distribution method.
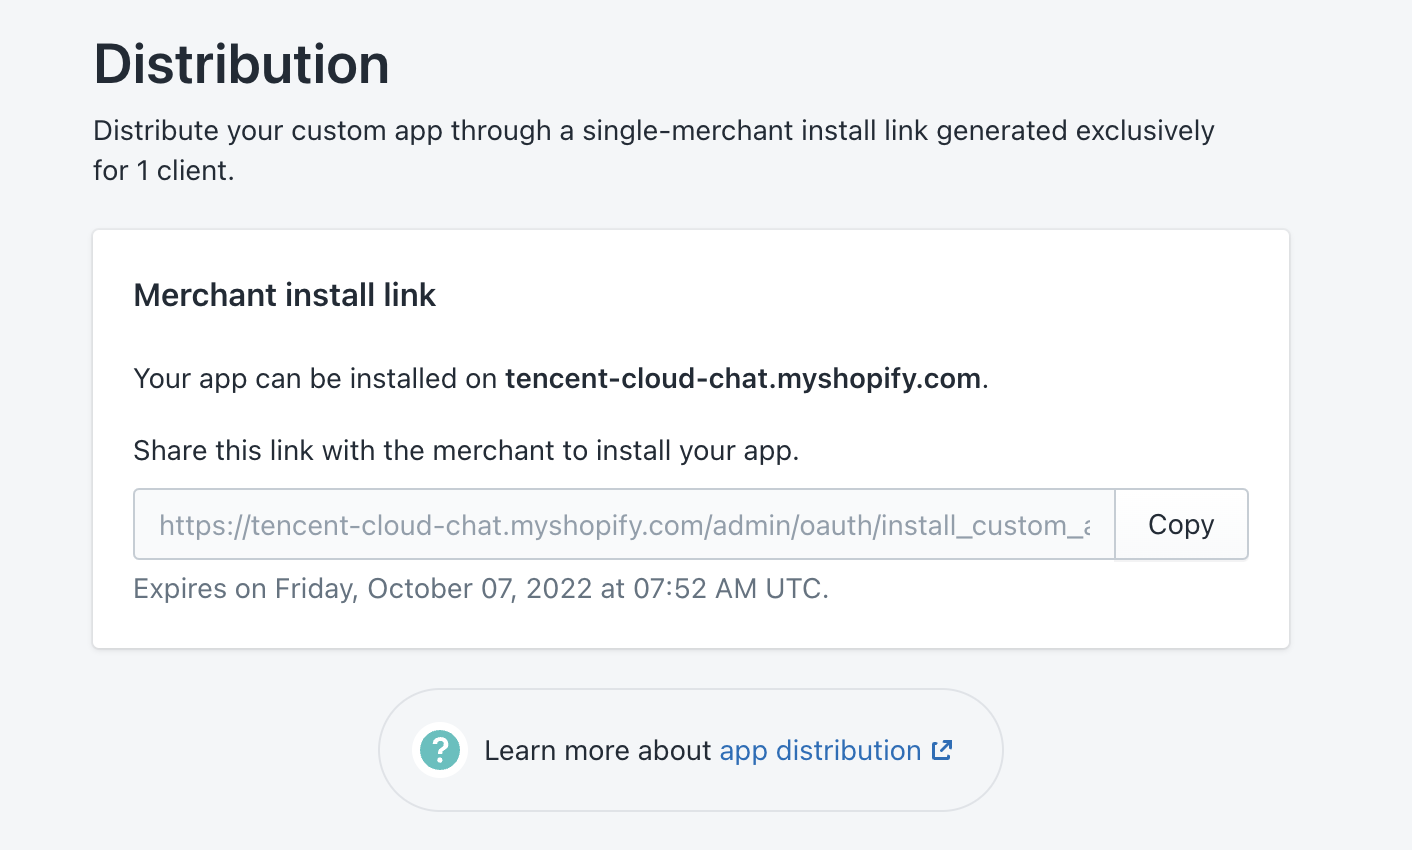
4. Generate the install link for your Shopify store, by entering your myshopify.com domain here.
5. Use the generated link to install the app in your current store.
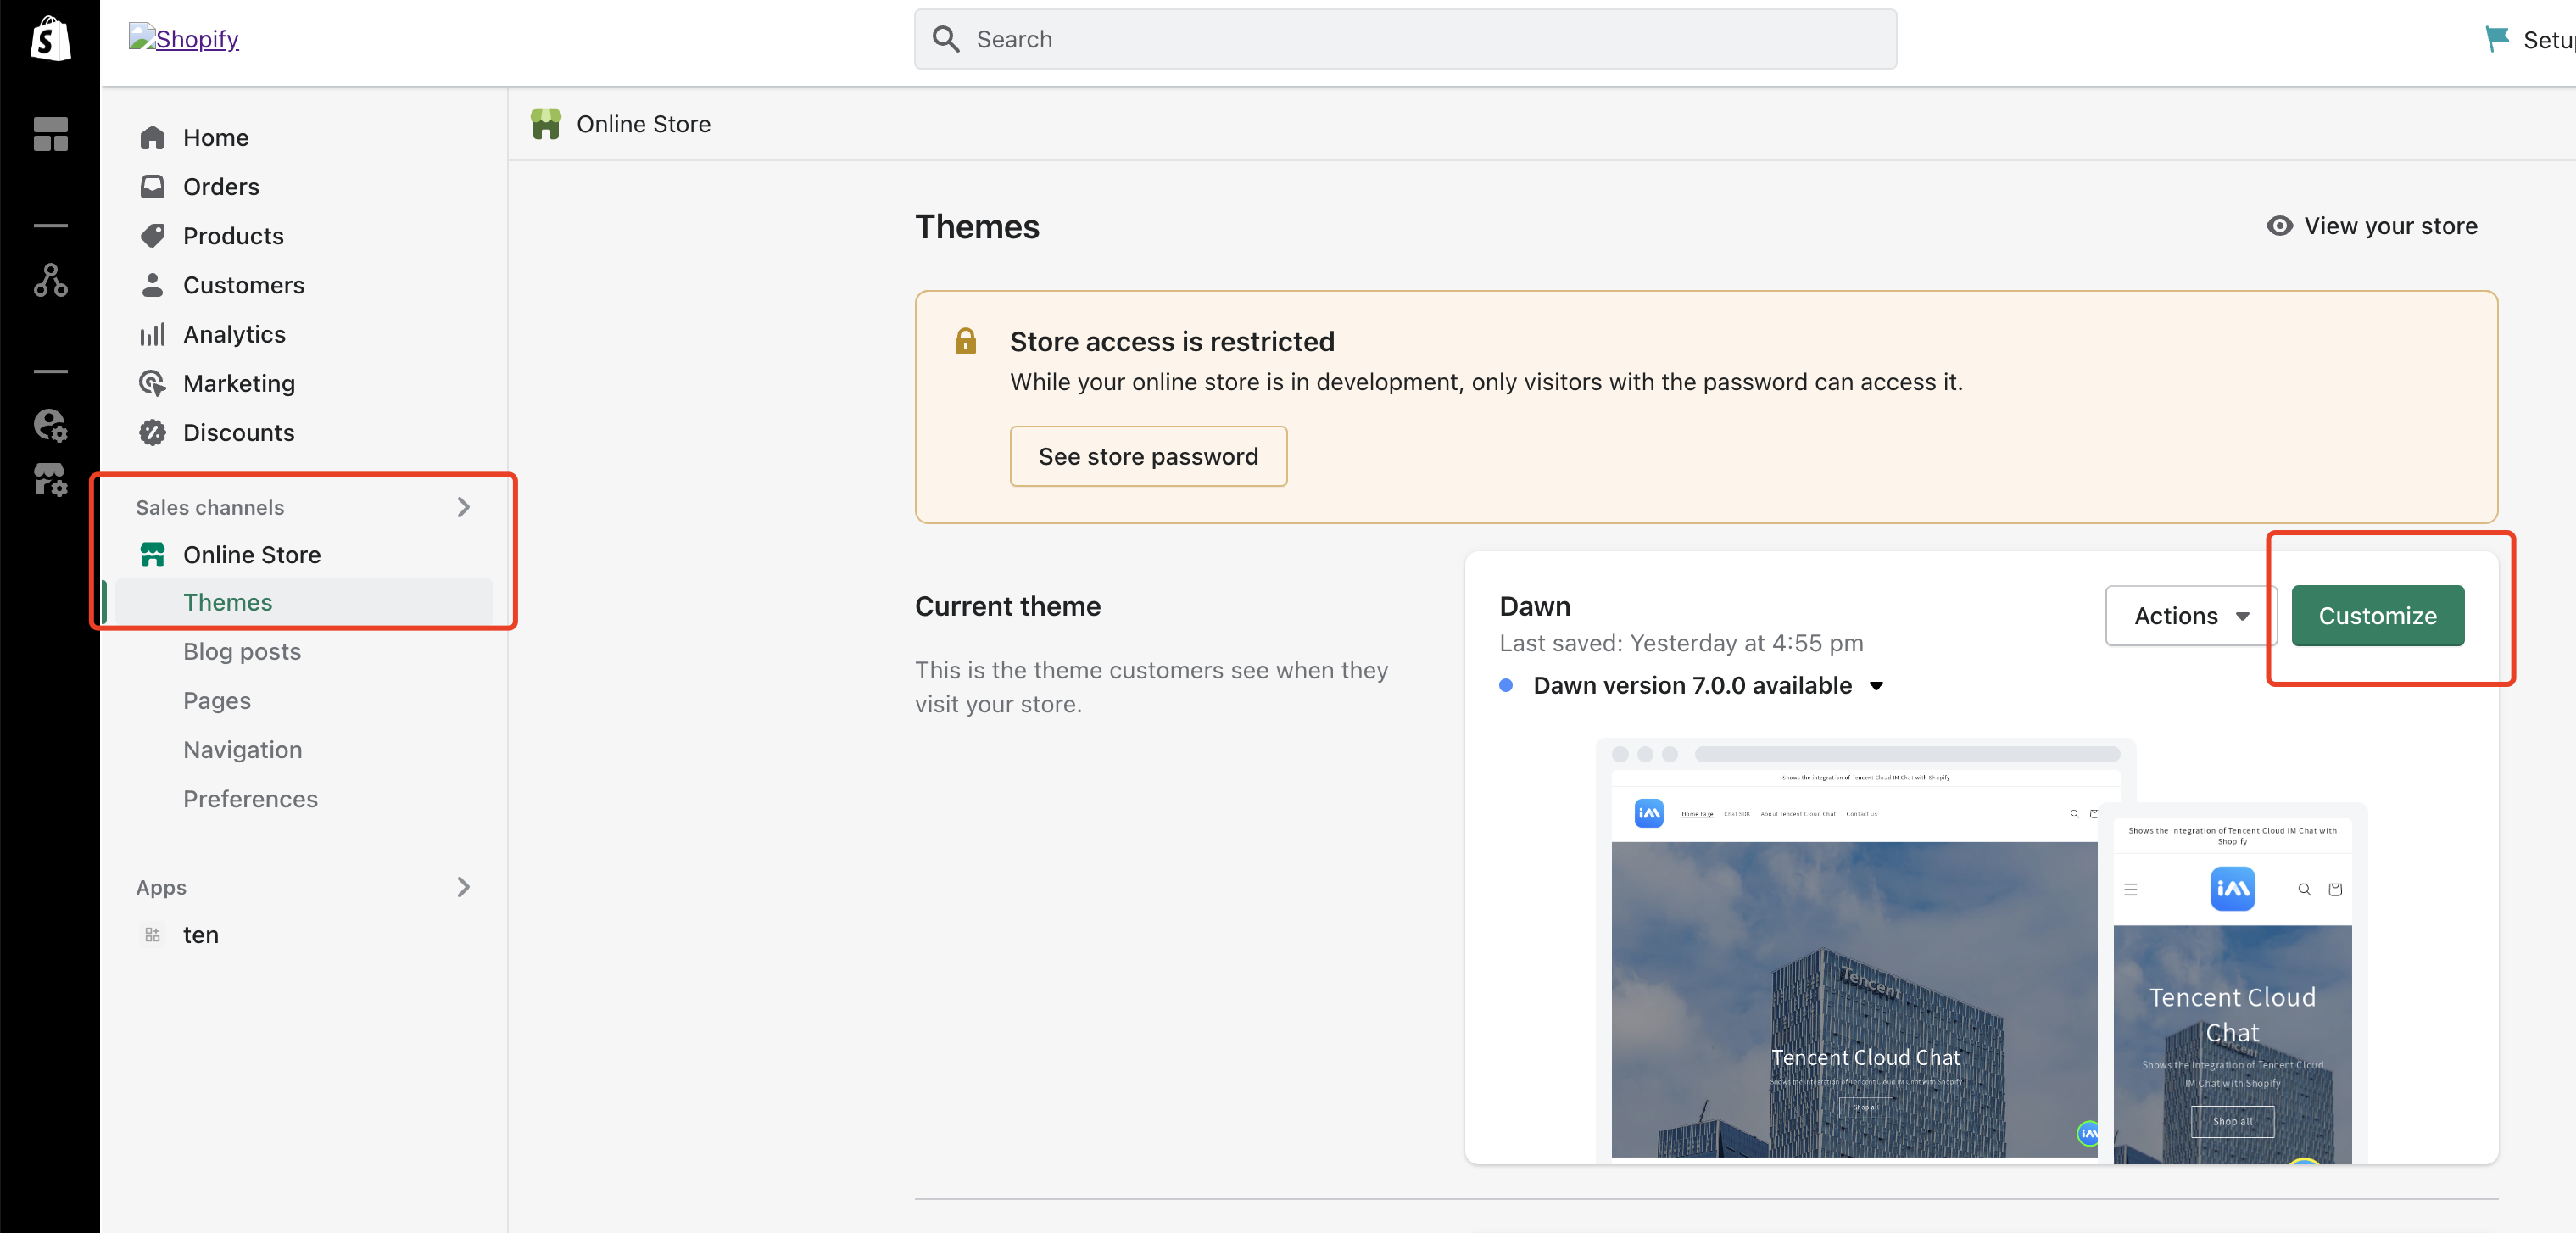
6. Enable and configure the widget on the Themes section of your admin dashboard. The steps of enabling and configuring the widget can refer to step 8.
Conclusion
That's all you need to add a Tencent Cloud Chat widget to your Shopify store.
If there's anything unclear or you have more thinkings about the integration with Shopify, feel free to contact us!


 Yes
Yes
 No
No
Was this page helpful?