- News and Announcements
- Product Introduction
- Purchase Guide
- Development Guidelines
- Demo Zone
- Download
- Chat Interaction (UI Included)
- TUIKit Library
- Getting Started
- Integrating TUIKit
- Only integrate chat
- Build Basic Interfaces
- Modifying UI Themes
- Setting UI Styles
- Implementing Local Search
- Integrating Offline Push
- User Online Status
- Typing Status
- Message Read Receipt
- Message Reactions
- Message Quotation
- Text Message Translation
- Voice-to-Text
- Internationalization
- Adding Custom Messages
- Emoji & Stickers
- Video Call (UI Included)
- Push Feature
- Desk
- Quick Start
- Integration Guide
- Configure Channels
- Admin Operation Manual
- Configure Agent to Proactively Contact Chat Users
- Login to Management End
- Third-party extension
- Agent Management
- Agent Role Permission Management
- Online Status and Reasons for Short Break
- Skill Group Management
- Session Service Flow Management
- Satisfaction Evaluation
- Quick Reply
- Session Routing and Reception Settings
- Agent Operation Manual
- AI Chatbot
- More Practices
- No UI Integration
- SDK Integration
- Initialization
- Login and Logout
- Message
- Message Overview
- Sending Message
- Receiving Message
- Historical Message
- Forwarding Message
- Modifying Message
- Message Inserting
- Deleting Message
- Clearing Messages
- Recalling Message
- Online Message
- Read Receipt
- Querying Message
- Group @ Message
- Targeted Group Message
- Notification Muting
- Message Extension
- Message Reaction
- Message Translation
- Voice-to-Text
- Message Pinning
- Conversation
- Group
- Community Topic
- User Profile and Relationship Chain
- Offline Push
- Local Search
- Signaling
- Client APIs
- Server APIs
- Generating UserSig
- RESTful APIs
- RESTful API Overview
- RESTful API List
- Message Related
- Session Related
- Group Related
- Group Management
- Group Information
- Group Member Management
- Group Member Information
- Group Custom Attributes
- Live Group Management
- Setting Live Streaming Group Robots
- Deleting Live Streaming Group Robots
- Setting/Deleting Live Streaming Group Administrators
- Obtaining the List of Live Streaming Group Administrators
- Checking Whether Users Are in a Live Streaming Group
- Getting the Number of Online Users in an Audio-Video Group
- Getting the List of Online Members in Audio-Video Group
- Setting Audio-Video Group Member Marks
- Getting the List of Banned Group Members
- Community Management
- Creating Topic
- Deleting Topic
- Getting Topic Profile
- Modifying Topic Profile
- Importing Topic Profiles
- Permission Group Management
- Creating Permission Groups
- Terminating Permission Groups
- Modifying Permission Group Information
- Obtaining Permission Group Information
- Adding Topic Permissions
- Modifying Topic Permissions
- Deleting Topic Permissions
- Obtaining Topic Permissions
- Adding Members to a Permission Group
- Deleting Permission Group Members
- Obtaining Permission Group Member List
- Group Counter
- User Management
- Global Mute Management
- Operations Management
- Chatbots
- Official Account Management
- Webhooks
- Webhook Overview
- Webhook Command List
- Operations Management Callbacks
- Online Status Webhooks
- Relationship Chain Webhooks
- One-to-One Message Webhooks
- Group Webhooks
- Before a Group Is Created
- After a Group Is Created
- Before Applying to Join a Group
- Before Inviting a User to a Group
- After a User Joins a Group
- After a User Leaves a Group
- Before Group Message Is Sent
- After a Group Message Is Sent
- After a Group Is Full
- After a Group Is Disbanded
- After Group Profile Is Modified
- Callback After Recalling Group Messages
- Webhook for Online and Offline Status of Audio-Video Group Members
- Webhook for Exceptions When Group Messages Are Sent
- Before a Topic Is Created
- After a Topic Is Created
- After a Topic Is Deleted
- Topic Profile Change Webhook
- Callback After Group Member Profile Changed
- Callback After Group Attribute Changed
- Callback After Read Receipt
- Callback After the Group Owner Changed
- Webhooks related to the Official Account
- Before a Official Account Is Created
- After a Official Account Is Created
- After Official Account Profile Is Modified
- After Official Account Is Destroyed
- Before Official Account Is Subscribed
- After Official Account Is Subscribed
- After a Official Account Is Full
- After Official Account Is Unsubscribed
- Before Official Account Message Is Sent
- Callback After Sending an Official Account Message
- Webhook After Recalling Official Account Messages
- Webhook Mutual Authentication Configuration Guide
- Chatbot webhooks
- Plugin Marketplace
- Console Guide
- FAQs
- Security Compliance Certification
- Chat Policies
- Migration
- Error Codes
- Contact Us
The session service flow serves as a guiding process when users enter online customer service, enabling the setting of welcoming phrases and navigation, etc. You can configure branching, manual transfer, customer service chatbot, and other functions within the session service flow.
Operation step
Step 1: Create a new Session Service Flow
Directly visit Management Console, click on Livechat Settings > Session Service Flow on the left navigation bar to enter the Session Service Flow Management page, click on New at the top left corner of the page.
Step 2: Enter the name of the chat service flow
In the top left corner of the chat service flow canvas, enter a name for the chat service flow, such as: online chat reception.
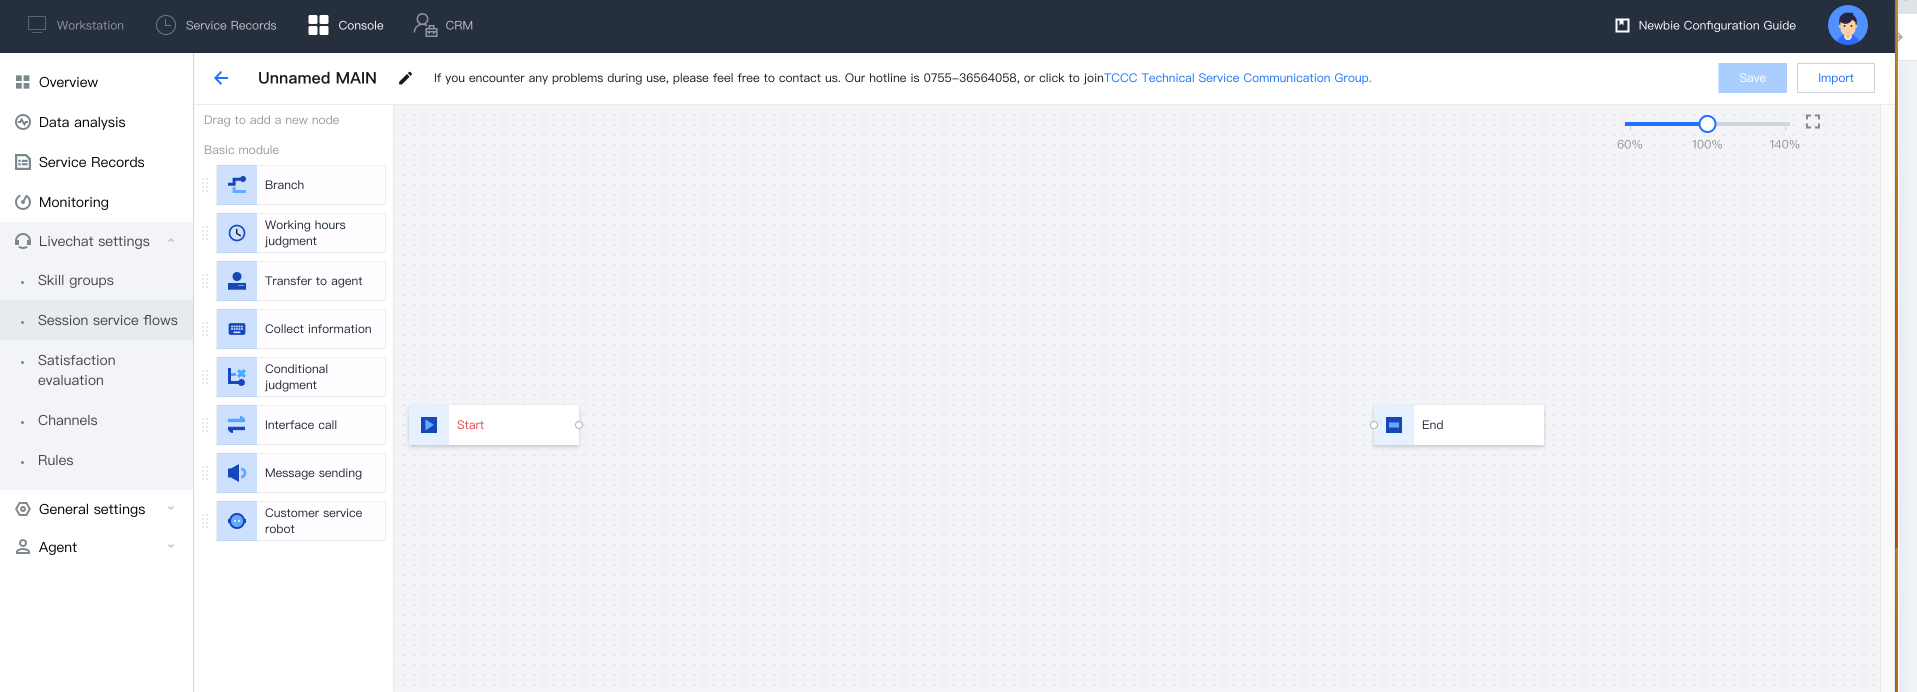
Step 3: Connect Modules
Depending on your specific scenario, drag the required modules to the appropriate location within the canvas area, connect the modules, and fill in the necessary information in each module (see Chat Service Flow Modules for details). Each chat service process must begin with start module as the first one and end with end module as the last one.
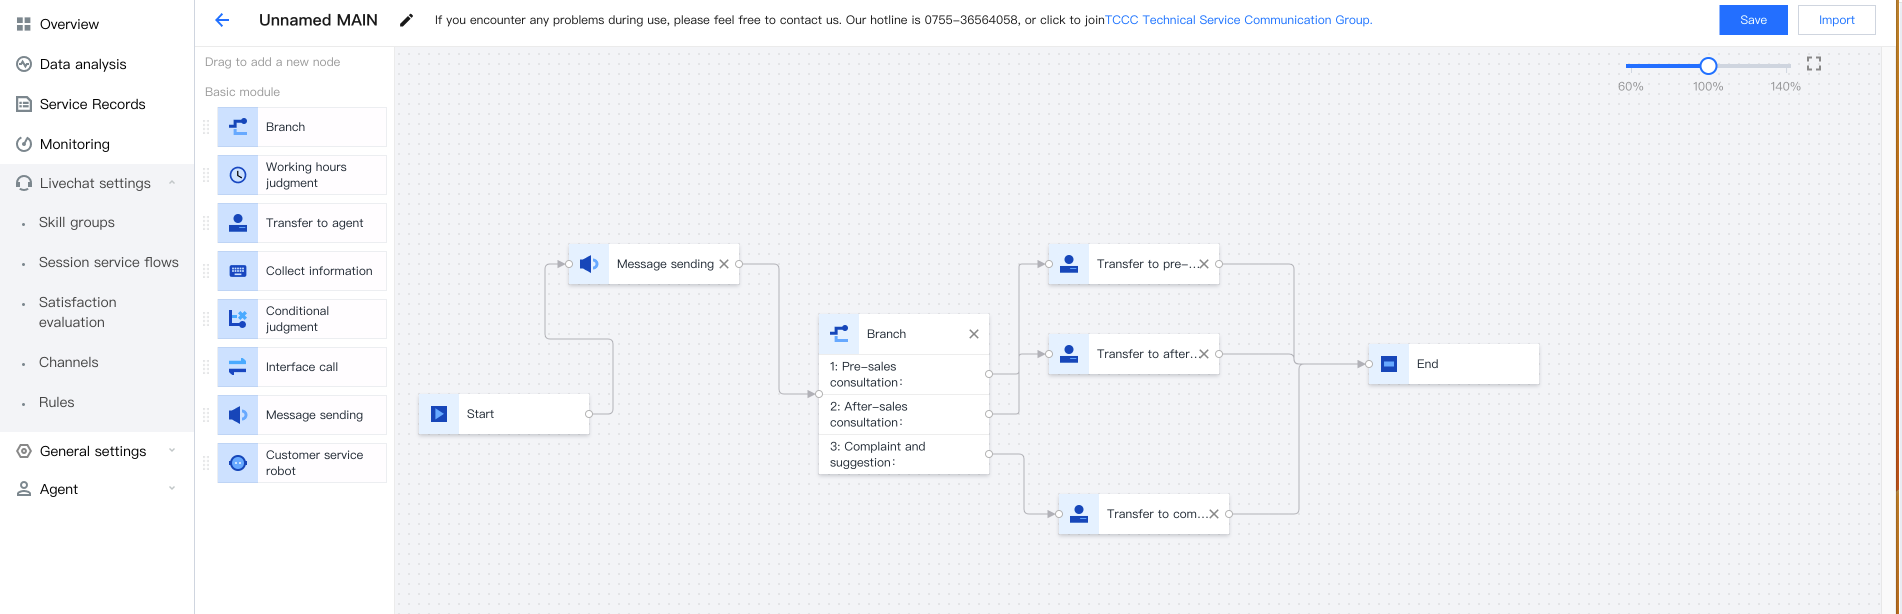
Step 4: Save the chat service flow
Once configured, click Save in the upper right corner of the canvas to return to the list of conversation service flows.
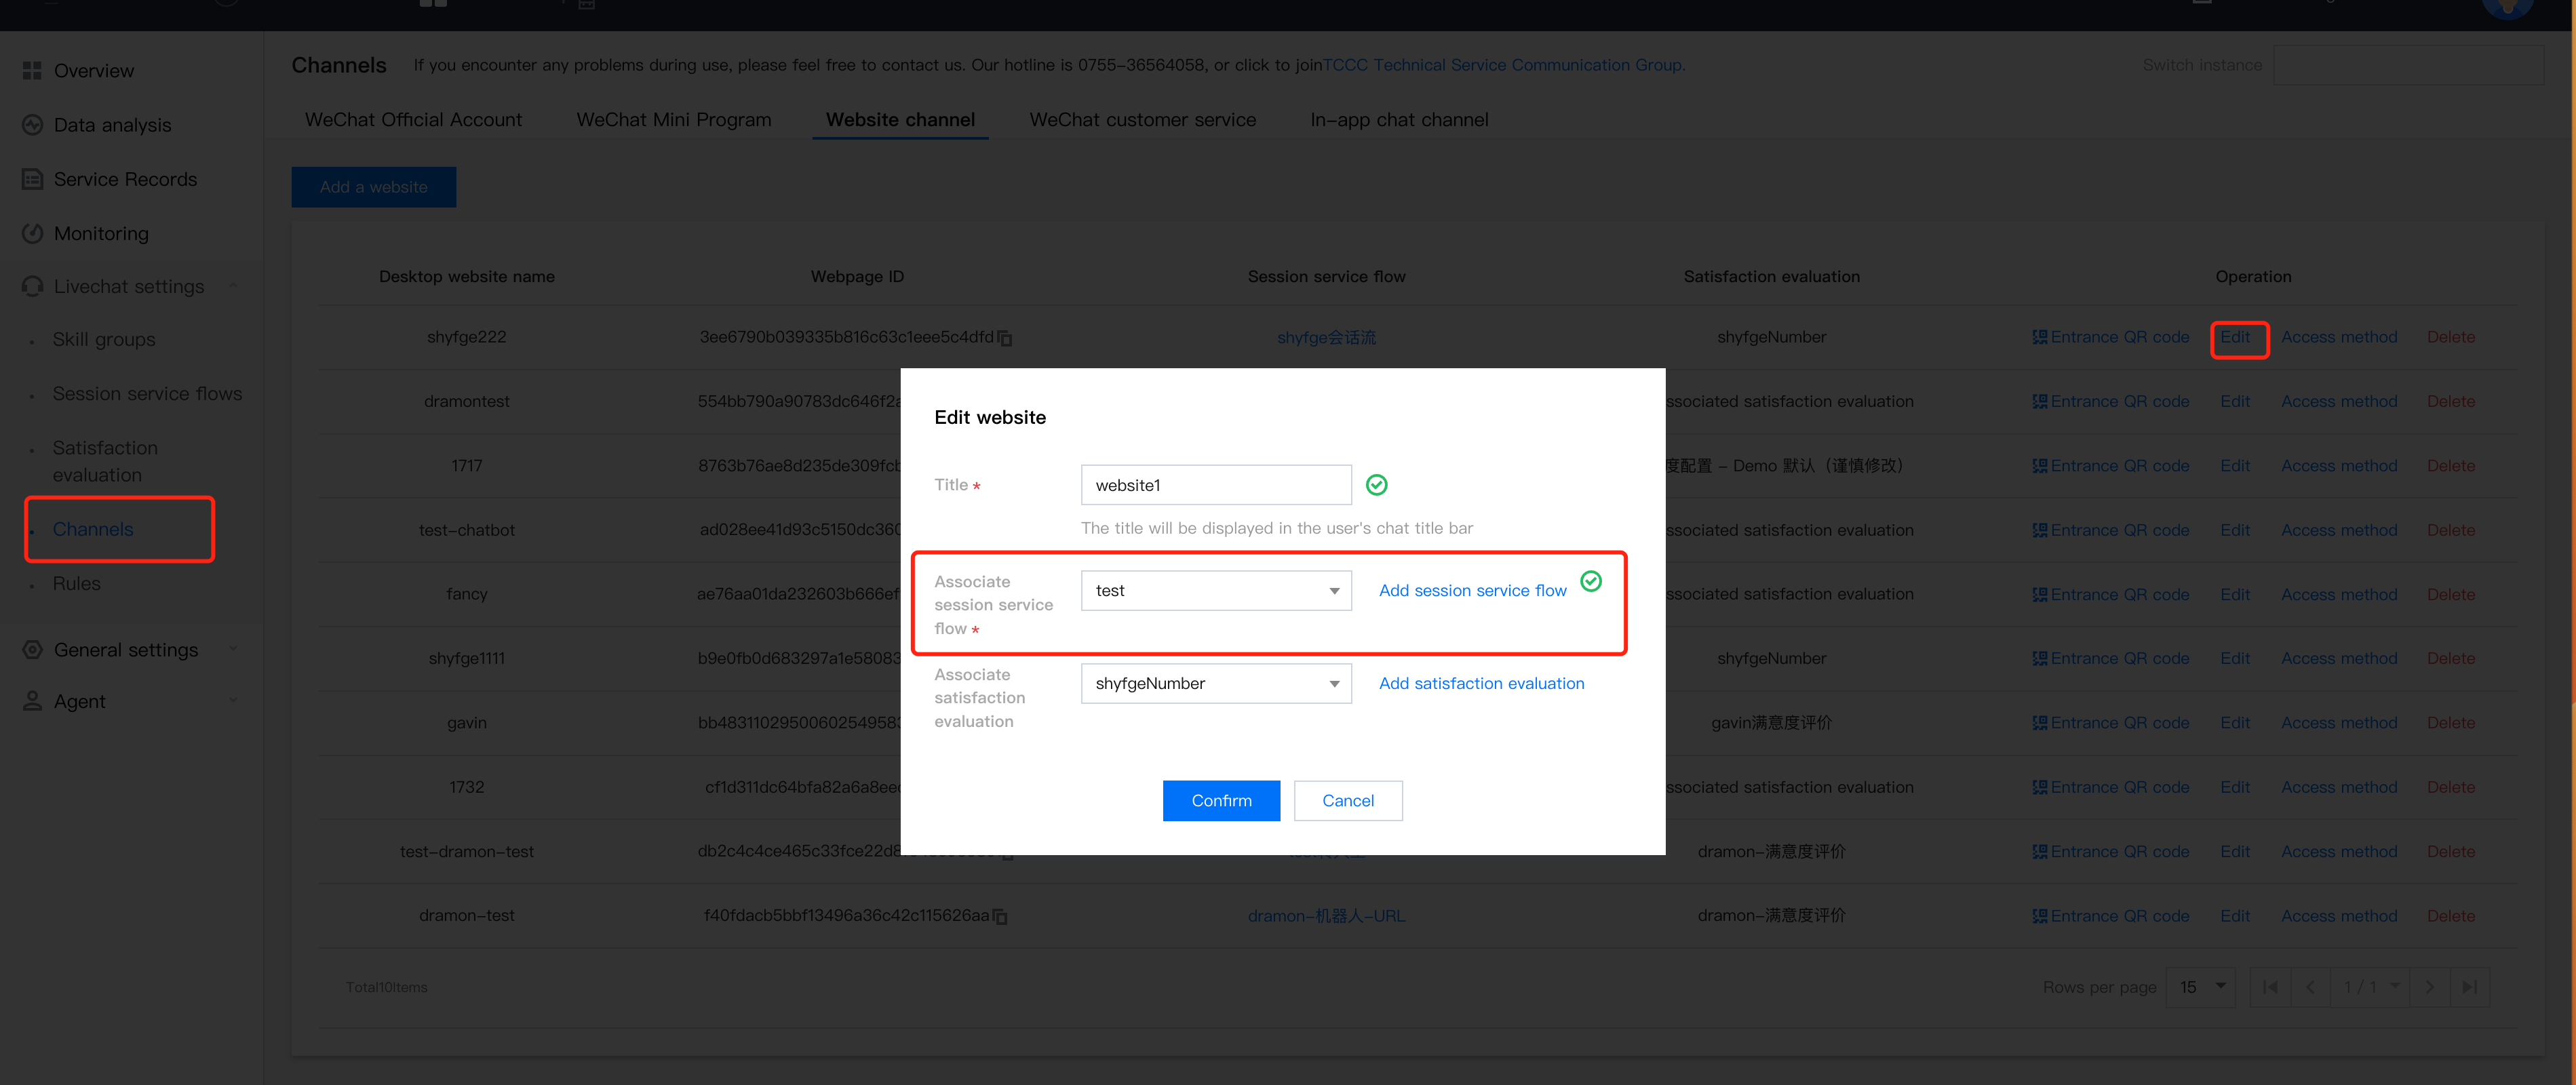
Step 5: Bind the Conversation Service Flow
Go to the Channel Management page, select the channel you want to bind to the conversation service flow, and click View/Edit.
Step 6: Execute the Session Service Flow
In the dialog box, select the session service flow to be associated and click Associate. Once associated, when a user sends a message to the channel, the configured conversation service flow will be followed.

 Yes
Yes
 No
No
Was this page helpful?